Configuring eCommerce Control
Use eCommerce Control (35.13.24) to set default values for eCommerce processing. This program is also available on the eCommerce Utilities menu (35.17).
The program includes three frames:
• Use the initial frame to set domain-level control values, such as directories used during document import and export.
• The second frame sets default values for error handling, as well as the default sequence IDs used to generate repository document numbers.
• The third optional frame lets you set application-specific values that apply only to such functions as Financials, EMT, and so on.
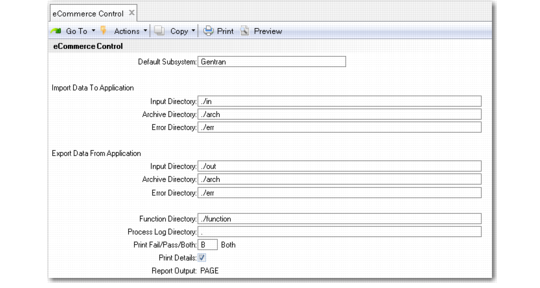
eCommerce Control (35.13.24), Initial Frame
Default Subsystem
Enter the name of the EC subsystem used when documents being processed do not identify the originating subsystem. Define this subsystem in EC Subsystem Definition Maint (35.13.1) before you can enter it in this field.
Input Directory (Import)
Enter the directory where the EC subsystem places files for import. When you run Document Import (35.1) with Direction set to Outbound, the system uses this directory as the source directory for selecting files.
Note: Destination directories for exported files are specified in the Destination field in Transmission Group Maintenance (35.13.13).
Note: If they do not exist, the system prompts you to create directories.
Archive Directory (Import)
Enter the directory where the system places the original SNF files when processing begins.
Error Directory (Import)
Enter the directory where files from the Input Directory that fail during load or unload are stored. Reporting and reprocessing functions use this directory for input.
Input Directory (Export)
Enter the directory where the system looks for files to load directly into the document repository and process for export without creating business documents.
When you run Document Import with Direction set to Outbound, the system uses this directory as the source directory for selecting files.
Archive Directory (Export)
Specify the directory where files from the Input Directory are moved after export processing.
Error Directory (Export)
Enter the directory where files from the Import Directory that fail during export processing are stored. Reporting and reprocessing functions use this directory for input.
Function Directory
Enter the directory where the user-defined functions used during transformation processing are stored. See
Using Transformation Functions.
Process Log Directory
Specify the default directory where the system creates log files when it is processing documents. If the directory does not exist, the system attempts to create it.
You can leave this field blank. If you enter a value, it defaults to the same field for new records in EC Subsystem Definition Maintenance (35.13.1).
Process log files can be used for two purposes:
• As a record of what took place during a processing session, including warning and error messages.
• As source information for system-generated e-mail messages. When processing errors occur, the system automatically notifies the user by adding the process log file to an e-mail message, if e-mail system and address information is defined in User Maintenance. Additionally, it sends status information from the log to other e-mail addresses specified for individual location cross-reference records in Trading Partner Maintenance (35.13.7).
Unless it is blank, the subsystem definition value overrides the eCommerce Control value. If both are blank, logging is disabled, and process control functions do not create permanent log files. Instead, the system creates temporary log files in the user’s startup directory. After sending process status e-mail messages, the system deletes the temporary logs.
Three fields set values for output reports produced when processing is initiated from outside the EDI eCommerce user interface. For example, some Financials applications can be used to process bank transactions directly from a related menu item.
Print Fail/Pass/Both
Specify the level of information included in the output report.
Failed (default): Only files that failed to load are included in the report.
Passed: Only files that loaded successfully are included.
Both: All processed files are included.
Print Details
Set this field to Yes to include detailed error and warning messages in the output report.
When it is No, the report includes only a summary of process events.
Report Output
Enter the output device or file name the system uses to display the report.
If you leave this field blank and click Next, the system sets it to the file name eComOut.
Note: When you use an EDI eCommerce menu program to select documents for import or export, these fields have no effect. You can set the corresponding values directly in the user interface.
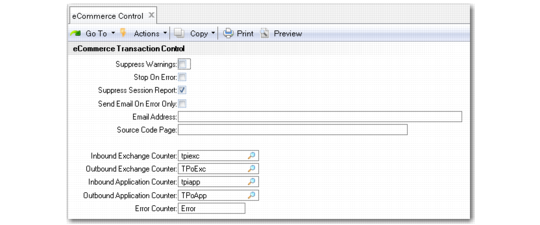
eCommerce Control, Transaction Control Frame
Suppress Warnings
Enter Yes to prevent the system from generating status messages that result from warning conditions during transformation or gateway processing.
When this field is No (the default), the system always generates warnings in the status message table.
This field defaults to new records in Trading Partner Maintenance. You can override it at the trading partner, trading partner document, and trading partner location cross-reference level.
Stop on Error
Enter Yes to have the system stop processing a document during transformation when the first error is encountered. The system skips the rest of the document and moves to the next sequence number.
When this field is No (the default), processing continues regardless of the number of errors that occur.
This field defaults to new records in Trading Partner Maintenance. You can override it at the trading partner, trading partner document, and trading partner location cross-reference level.
Suppress Session Report
Enter Yes to prevent the system from generating a session report following document load or unload.
When this field is No (the default), the system always generates session reports.
This field defaults to new records in Trading Partner Maintenance. You can override it at the trading partner, trading partner document, and trading partner location cross-reference level.
Send E-mail on Error Only
Enter Yes to have the system send e-mail only when the document does not process successfully. Otherwise, e-mail is sent regardless of document status.
This field defaults to new trading partner location cross-reference records defined in Trading Partner Maintenance. You can override the control program value as needed.
E-mail Address
Enter the e-mail address of the person who receives a message when an error occurs during an import or export session.
Note: This address is not related to the Send E-mail on Error Only field.
Addresses must be complete; for example,
[email protected].
Use Email Definition Maintenance to set up your system to manage automated email messages.
Source Code Page
Optionally, specify the default code page used to create files imported to your system. During import processing, the system converts the data to the system code page.
This field is not validated. Be sure that the value you enter is included in the Progress file DLC/convmap.cp. Otherwise, the conversion program returns an error.
If you enter a value, it defaults to EC Subsystem Definition Maintenance. You can update it as needed for individual subsystems.
Counters: Inbound Exchange, Outbound Exchange, Inbound Application, Outbound Application, Error
Specify the default sequence IDs used to assign numbers to documents during processing. You can override these values in Trading Partner Maintenance.
The fields cannot be blank. They must contain values defined in EC Number Range Maintenance.
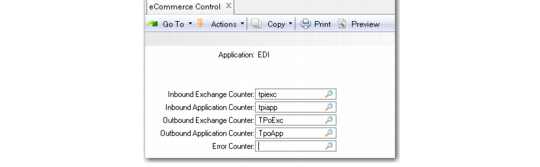
You can use the next frame to override one or more settings for individual applications.
eCommerce Control, Application Frame
Use this frame to override system-level sequence ID defaults defined in the previous frame for a specific application. You can save your changes only if you enter a valid sequence ID in one or more fields. For blank fields, the system continues to use the sequence IDs from the Transaction Control frame.