QAD 2017 Enterprise Edition
>
User Guides
>
Planning and Scheduling Workbenches Administration
>
Configure
>
Adding Browses to the Workbench
Adding Browses to the Workbench
You can only configure the workbench to add browses. Adding new components other than browses to the XML requires that you have a knowledge of C# and workbench framework internals.
To configure, you start by accessing and editing the ControlConfig.XML file within the /plugins directory. In most cases, companies have their own data with which they work when creating master or production schedules, so the most common configuration change is the addition of a customer browse that pulls fields that hold data of interest to your schedulers.
To add a new browse that displays as a tab in the Supporting Data area alongside other QAD SE browses and programs, use the following example.
Example: You have a QAD browse, YourBrowsebr001.p, customized for your business needs. You need the fields in the browse to display in a browse in the Planning and Scheduling Workbenches.
To easiest way to do this is to copy an existing browse configuration in the ControlConfig.XML file; then edit the copied text for your new browse entry.
To use this method, use the following procedure.
1 In ControlConfig.XML, locate and copy a browse control type definition:
- <control type="browse">
<class>QAD.Plugin.WorkbenchServices.ChildBrowseControl</class>
<assembly>WorkbenchServices</assembly>
<program>qpbr011.p</program>
- <link>
<field>pt_mstr.pt_part</field>
<operator>Equals</operator>
<contextField>Item</contextField>
</link>
- <link>
<field>si_mstr.si_site</field>
<operator>Equals</operator>
<contextField>Site</contextField>
</link>
<name>ITEM_PLANNING</name>
<visible>true</visible>
</control>
2 In the copied code, set the <program>qpbr011.p</program> entry to reflect the name of your new browse program, for example: <program>YourBrowsebr001.p</program>.
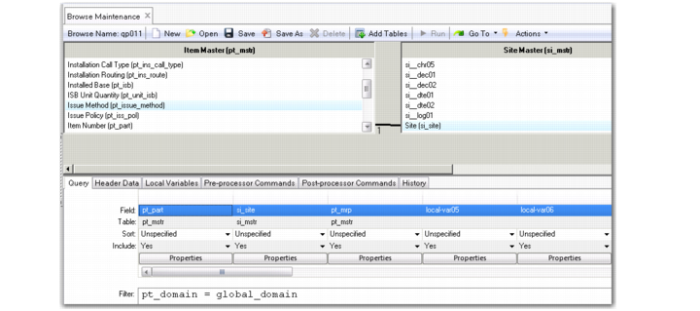
3 Determine which fields should be linked to the workbench, using QAD SE Browse Maintenance (36.20.13) to find valid field names for the fields that display in your browse; see
Browse Maintenance (36.20.13).
For example, if you are only interested in linking the item field with the workbench, you use Browse Maintenance for YourBrowsebr001.p to determine that the name of the item field is xx_mstr.xx_part.
4 Locate the <link> entry of the copied text, then enter the field name as depicted in Browse Maintenance within the <field> </field> parameters for the field to display in the browse.
Using the example in Step 3, enter:
<field>xx_mstr.xx_part</field>
5 Enter the operator as:
<operator>Equals</operator>
6 Enter the context for the field.
Using the example in Step 3, enter:
<contextField>Item</contextField>
For the Planning and Scheduling Workbenches, you can only enter a certain set of values for <contextField>. You cannot increase the set of values without QAD assistance. The set includes the following <contextField> values:
• Item
• Site
• DueDate
• Resource
• Resource2
• ResourceType
Where:
Resource is the production line ID or work center ID.
Resource2 is used for the machine.
ResourceType is zero (0) for the production line and one (1) for the work center or machine.
7 Continue editing existing <link> entries or add new <link> entries.
8 Name your browse and enter the name of the browse as:
<name>YourBrowse</name>
9 Save your entries.
Important: You should configure the XML for each client machine where the Planning and Scheduling Workbenches are configured.
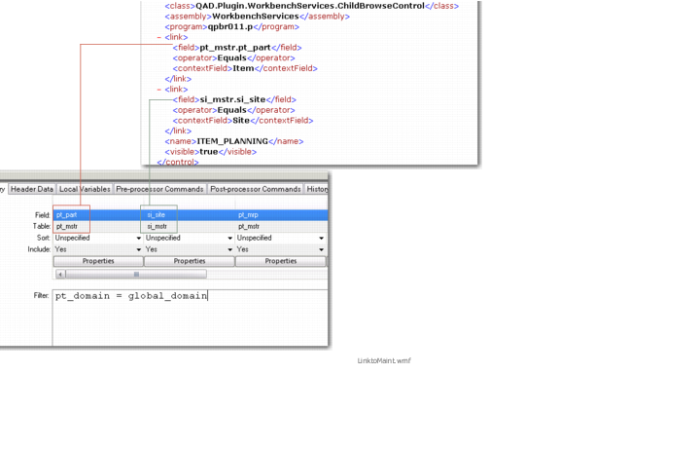
Browse Maintenance (36.20.13)
The following graphic depicts the code for a browse definition within ControlConfig.XML. It depicts how the fields names that you enter into the XML file were selected from Browse Maintenance.
XML Fields