Creating Browses
Use Browse Maintenance (36.4.8.13) to create custom browses or modify system-supplied browses.
When you create a browse, it is saved in your working directory as a source-code file. The source-code name is the first two characters of the name you entered, then the letters br or lu (depending on whether you selected power or look up), then any remaining numbers from the name you specified, then the extension .p.
Example: You create a power browse and name it ap010; the system names the code apbr010.p. If you selected both power and lookup browses, the system generates two source-code files: apbr010.p and aplu010.p.
Although you do not need to compile the source code of the browse, you should for better performance. If other users on your network want to use your browse, you must compile it and move it to the network directory. Use the Progress editor to compile the browse.
Note: You can access the Progress editor only if your PROPATH is correctly set up to access source files.
Browse Maintenance has some special features that are not available in the character UI and that are not like other HTML programs. This section illustrates the program in the .NET UI.
Browse Maintenance (36.4.8.13)
To create or modify a browse:
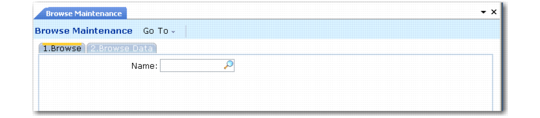
1 Select or enter a name for the browse. To name the browse, enter two letters and click Next. Use the existing QAD module mnemonics or make up your own. The system gives the browse a name that increments by one the number in the file name of the last browse created.
2 Click Next or click the second tab, Browse Data, to continue.
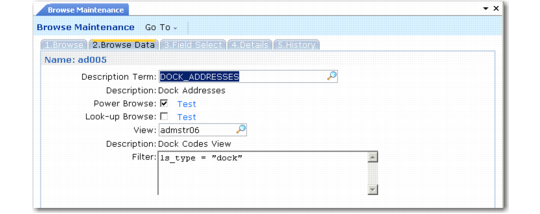
Browse Maintenance, Browse Data
3 Enter a label term in Description Term. The long label contained in this term is displayed as the title in the browse window.
4 Indicate whether this is a power browse, lookup browse, or both.
5 In View, enter the name of an existing view or a primary table whose data the browse displays. You can see only those views you have access to. If a view exists for a table and the view name is the same as the table name, you have access to only those fields that are available in the view. See
Creating Views.
Note: The view name you enter in View must already be defined in View Maintenance, or you must enter a primary table name.
6 In the Filter field, type the selection criteria (optional) to limit the browse’s search to records that meet a certain condition. Do not put a period (.) at the end of the criteria, because the system adds a no-lock no-error statement to the criteria.
The Preview function, accessed with a button in the character user interface, is accessed by clicking one of the Test links next to the Lookup Browse and Power Browse check boxes. This displays the currently edited browse in a new tab. For existing browses, you can preview the browse before changing it.
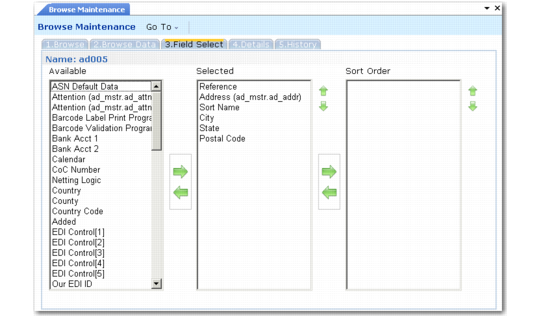
Use the Field Select tab to select fields to be included in the browse and specify the display order.
Browse Maintenance, Field Select
7 Fields from the view or primary table entered in the Browse Data frame display in Available Fields. Include up to 20 fields in your new browse.
• In the .NET UI, move fields from one list to another by clicking the field to select it and clicking the arrow that indicates the appropriate direction. Multiple fields can be selected by holding down the Shift key and clicking. Use the Move Up and Move Down buttons to arrange the fields in the Selected Fields list.
• In character mode, select a field to include in your browse by using the Up and Down keys to locate it and then press Enter. Multiple fields can be selected. Use the Tab key to choose the Add, Field Help, or Done buttons or to navigate between the Available Fields list and the Selected Fields list.
8 In the .NET UI, to specify sort columns—for look-up browses only—select one or more fields in the Selected column and click the right arrow to move them to the Sort Order column. You can use the up and down arrows to reorder the fields in the Sort Order list. The look-up browse sorts the records on the first column you enter in the Sort Order field.
In the character UI, use the Sort Columns field to enter the columns you want to have available for sorting. Enter the columns as a comma-delimited list of up to seven numbers. The first field name in the Selected Fields list is column 1, the second is column 2, and so on.
9 When you have arranged the fields in the order you want, click Next to display the Details tab.
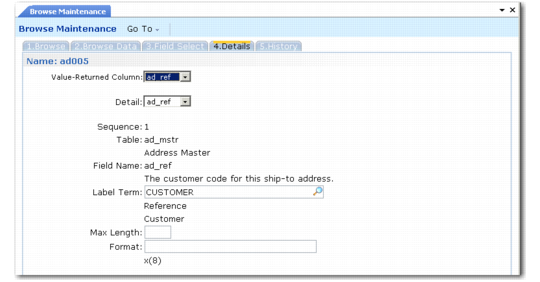
Browse Maintenance, Details
10 Enter the column number to take the field values from in Value‑Returned Column (optional). The default is the first column of the browse.
11 To view the details related to a specific field, select it from the drop-down list in the Detail field.
12 If needed, you can change the default field label and format. To control the display length of a label, enter a Max Length value. Click Back if you want to view or modify data for other fields. Otherwise, click Next to display the browse history.
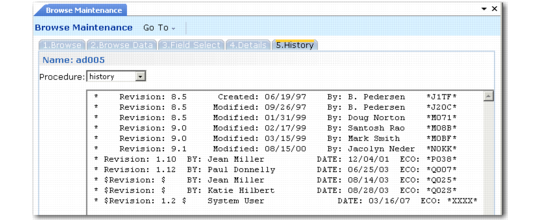
Browse Maintenance, History
13 The program automatically creates a revision history line containing a revision number, the user name (or logon ID), and current date. You can modify this as needed. The revision history is also saved in the source code.
Note: The Procedure field offers other choices; only History is currently implemented.
14 Click Next to generate the browse.