Creating Views
A view is a display of some or all of the fields from one or more tables. You join two or more tables for a view by specifying the relationships between fields in different tables and choosing the type of join to use.
Views are used in browses, which display the fields gathered using views. By choosing which fields to include or exclude in a view, you control which fields are available for a browse to display. By putting security on the view, you can allow users to modify browses, knowing that they can access only those fields that you have authorized.
Use View Maintenance (36.4.8.18) to create or modify views.
Using Progress Syntax
You use some Progress syntax in creating or modifying views. You must also understand database table and field relationships.
To create or modify a view:
1 Select the table or tables to include in the view.
2 For sequences after the first, specify the type of join to use: inner or outer.
3 Join the tables using Progress logic.
4 Select fields from the tables.
5 Save the view.
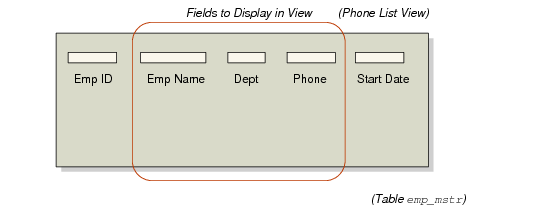
Creating a View from One Table illustrates how to create a view of selected fields from one table.
Creating a View from One Table
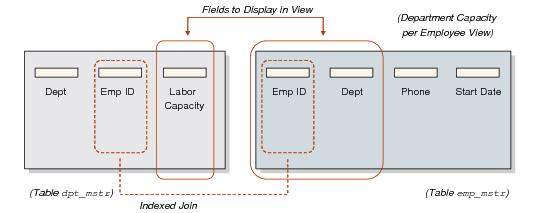
Creating a View by Joining Two Tables illustrates how to create a view of selected fields from two tables.
Creating a View by Joining Two Tables
Using Join Types
When a view includes data from more than one table, you can choose from two types of joins when creating a view:
An inner join returns the records selected for the first table combined with related records selected from the second table. If a record does not exist in the second table, no records are returned. Only related records selected from both sides of the relationship display in the view.
An outer join returns the records found by an inner join. However, in addition, for each value in the first table, it returns unknown values from the second table when no related record is found. As a result, all matching records from the first table are preserved for unmatched records in the second table.
The default join type is inner. Using the outer join can give you more flexibility in displaying information.
Example: An inner join between customers and sales orders displays only customers with sales orders. An outer join includes all customers, even those who do not have orders.
Using View Maintenance
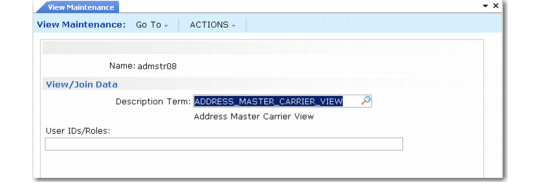
View Maintenance (36.4.8.18) illustrates View Maintenance (36.4.8.18).
View Maintenance (36.4.8.18)
1 Select or enter a view name.
2 Enter a label term in Description Term. The long label contained in this term is displayed as the view label.
3 In User IDs/Roles, enter one or more user IDs or roles to limit user access to the view (optional). Enter multiple user IDs or roles by separating them with commas.
4 Click Next to continue.
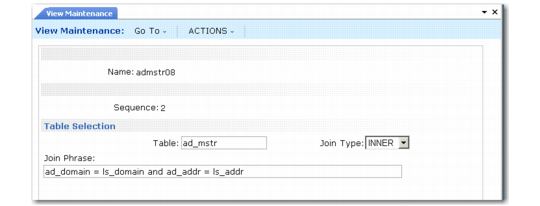
View Maintenance, Table Selection
5 The number you enter in Sequence controls the order in which the table defined in Table is joined to the view.
6 Enter a table name.
7 If the sequence is not 1, specify the type of join, either inner or outer. The Join Type field is only enabled when the sequence number is greater than 1.
8 Enter or edit the phrase to join the tables. Use proper Progress syntax. Do not include a Where verb. Join phrases express the field relationships between tables (see
Creating a View by Joining Two Tables). For a faster display of fields, use indexed fields in the Join Phrase.
9 Click Back.
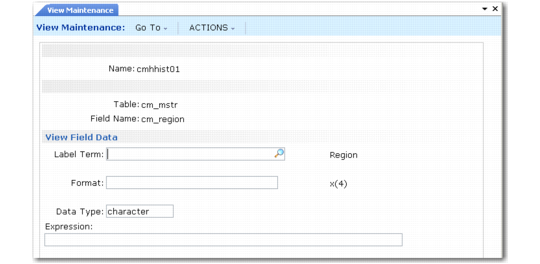
View Maintenance, View Field Data
10 In Field Name, enter a field from one of the tables in the view or enter a local variable. When entering a local variable, name it local‑varnn, where nn is a number incremented by one from the last defined variable.
For example, you see from the lookup browse that the last local variable was local-var05; you name your local variable local‑var06. Use local variables when you want to return a value resulting from an operation on two fields; for example, the quantity required minus the quantity open. Define the operation in Expression.
11 If you entered a local variable in Field Name, enter its Label Term, Format, and Data Type.
Note: Search for a label term by entering a portion of a label, then use Next/Previous to display available records.
12 If Field Name is a local variable, you can enter Progress syntax in Expression to define the local variable. Valid expressions include:
• field1 + field2 (computation, where field1 and field2 are fields within the record)
• >, <, >= (operands that perform comparisons)
• Progress functions, such as substring (field1,1,4) or round (field1,1)
Note: Incorrect syntax terminates your session if you attempt to use the view.