QAD 2017 Enterprise Edition
>
User Guides
>
Warehousing
>
Defining Warehouses
>
Warehouse Master List Maintenance
Warehouse Master List Maintenance
When an inventory transaction is created for a particular item, you should link a default warehouse to that item, specifically for that type of transaction.
Example: You can specify that when purchased supplies of item X are ordered, they are normally received in warehouse A. This links transaction type RCT-PO for item X with warehouse A. However, after internal storage, transfers, and repackaging, sales order picking of item X is normally carried out in warehouse B. This links transaction type PICK‑SO for item X with warehouse B.
In some cases, you can specify an alternate warehouse to cover situations where the first choice has insufficient stock. The first choice for picking item X can be warehouse B, but the second choice, if warehouse B runs out of stock, is to pick directly from warehouse A.
You achieve this by creating warehouse master lists. You identify each list by a unique name, and then specify the warehouses to associate with particular transaction types within that list. You can specify more than one warehouse for a given transaction type by giving each warehouse a sequence number. For that transaction type, the system tries to use the warehouses in the order of the sequence numbers you have assigned.
Note: Warehouses in the warehouse master list provide default values. If you want to specify a different warehouse or location for the item you can override the warehouse that the system has offered from the warehouse master list. Warehouse master lists are completely optional; if an item has all its operations performed in the same warehouse, you can simply specify that warehouse as the default location for the item, without using a master list at all.
You set up warehouse master lists using Warehouse Master List Maintenance (4.1.5). You can then attach a warehouse master list to an item using Item Master Maintenance (1.4.1). Enter the name of the warehouse master list in the Location field for the item.
In summary, use a warehouse master list:
• To receive/issue stock from different warehouses.
• For inter-warehouse picking.
• For multiple warehouse picking. If the stock is not available in one warehouse, start looking in the next one.
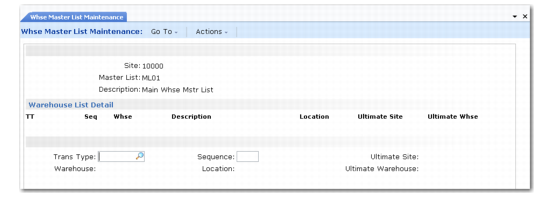
Warehouse Master List Maintenance (4.1.5) illustrates Warehouse Master List Maintenance.
Warehouse Master List Maintenance (4.1.5)
Enter values in the following fields:
Site
Enter the site associated with the warehouse master list.
Master List
To add a new list, enter the name of the list. To modify an existing list, enter the name of the list.
Description
Enter a description of the master list. Description displays in the lookup to help you select the required list, either for future modification or when attaching lists to items.
Trans Type
Enter the transaction type code for which you want to specify one or more default warehouses.
Warehouse
Enter the name of the warehouse you want to default to this sequence number and this transaction type.
Sequence
Enter a sequence number. You can specify one default warehouse for each sequence number. The lowest sequence number is the first warehouse that the system tries to use for this transaction type.
Location
Enter the location to display from the master list. See the discussion below for more information about the Location field.
Ultimate Site
If the transaction type relates to inter-warehouse picking where you pick in one warehouse and transfer to a different warehouse before issue, enter the site for the final issuing warehouse. Otherwise, leave this field blank.
Ultimate Warehouse
If the transaction type relates to inter-warehouse picking, enter the final issuing warehouse. Otherwise, leave this field blank.
Use the Location field to minimize the number of transactions created. For instance, specify a location such as a receipt dock instead of a warehouse for receipt transactions.
When the receipt is into a warehouse, the inventory is moved next to the location determined by the first step of the internal routing linked to the receipt movement. This is generally the receipt dock. From there, a transaction is created to move the stock from the dock to the destination location, which is calculated by a put-away algorithm.
This means that five system transactions are created:
• RCT-PO in the dummy warehouse
• ISS-TR from the dummy warehouse
• RCT-TR in the dock
• ISS-TR from the dock
• RCT-TR in the destination location
Note: The last two are created after confirmation only.
If, instead, you use a location such as the dock, and not a warehouse, the system makes the initial receipt (RCT-PO) in this location and the system creates a task to move it from the dock (ISS-TR) to the destination location (RCT-TR), which means three transactions only. This can make a significant difference in performance and disk usage.