Advanced Installation
Select the Host and Modules to Install
Choose the Host and Install Set
1 Enter the host on which to install the components in the Host Selection panel.
2 Use the Add and Delete buttons to create and delete hosts as required.
3 In the Module Selection panel, select the components to install on the specified host.
Note: To install QXI only, select the QXI servlet and adapter code components. To install QXO only, select all of the QXO components and the adapter code component.
Note: Under each environment (
QDCS Information Hierarchy and
Select Environment), you can select each component once across all hosts that make up the configuration. You cannot perform this type of selection with the QXtend Adapter and QXO Events Database. This functionality allows you to configure against multiple QAD Enterprise Applications installations.
4 Click Next to display the Module Copy Selection screen.
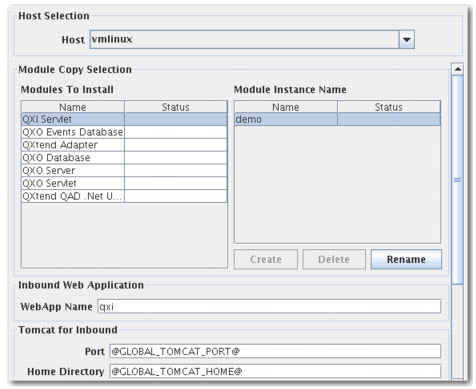
Module Copy Selection
The component list on the left shows the components available for installation. The Status column to the right indicates the installation status of each component. The first time the installer is run, the Status column is blank. After an installation, the Status column shows Incomplete, indicating the component was not installed successfully, or Complete, indicating the component was installed successfully.
5 For each selected component, do the following as required:
a Create, rename, or delete instances.
Note: New instances are enabled only for the QXtend Adapter and QXO Events database. This functionality allows you to configure against multiple QAD Enterprise Applications installations.
b Assign the required components to an instance. Select the check box for a component if its corresponding instance is highlighted.
c For each selected component for that instance, enter all of the required parameter settings as described in the following sections.
You cannot select a different component until you have entered all of the required information for the currently selected component.
Note: Enter information in the fields highlighted in orange.
Configure the QXI Servlet
6 In the Inbound Web Application panel, enter the application name known to the Tomcat application server.
7 In the Tomcat for Inbound panel, complete the required fields.
Port
Enter the Tomcat port.
Home Directory
Enter the home directory where Tomcat is installed.
Admin Name
Enter the user name for the Tomcat manager role.
Admin Password
Enter the password of the user with the manager role.
8 In the Migrate Inbound Configuration panel, make the necessary selections and complete the field.
Enable
Select the check box to enable migration of QXI servlet configuration data from a previously installed QXI servlet.
WebApp Name
Enter the application name known to the Tomcat application server.
Tomcat Directory
Enter the location of the home directory where Tomcat is installed.
Version
Select the version being migrated from the drop-down list.
9 If necessary, select the next component to configure from the Modules to Install panel. Otherwise, go to
step 35.
Configure the QXO Events Database
10 Complete the required fields in the MFG/PRO version panel.
Version
Enter the version of QAD Enterprise Applications that the adapter is being installed against.
Service Pack
Enter the number of the service pack in use.
Database Type.
Select Progress, Oracle, or Other, depending on the type of database that QAD Enterprise Applications uses. Other refers to non-Progress and non-Oracle databases.
Database UTF
Whether the database codepage is UTF.
11 In the MFG/PRO Database panel, complete the required fields.
Physical Name
Enter the physical name of the qaddb for QAD Enterprise Applications.
Connection Type
Select Local or Network.
Multi-user
Select this option if your database is operating in multi-user mode. If you use this option, the database must be running during QXtend installation. If you do not use this option, shut down the database before installing QXtend.
Database Directory
The database where the QAD Enterprise Applications admin database is installed. Enter the directory if the connection type is Local.
Host
Enter the name of the host where the QAD Enterprise Applications database is installed.
Service Name
Enter the network service that the QAD Enterprise Applications admin database uses.
12 In the MFG/PRO Admin Database panel, complete the required fields.
Physical Name
Enter the physical name of the QAD Enterprise Applications admin database.
Connection Type
Select Local or Network.
Multi-user
Select this option if your database is operating in multi-user mode. If you use this option, the database must be running when you install QXtend. If you do not use this option, shut down the database before installing QXtend.
Database Directory
Enter the name of the database directory where the QAD Enterprise Applications admin database is installed.
Host
Enter the name of the host where the QAD Enterprise Applications admin database is installed.
Service Name
Enter the network service that the QAD Enterprise Applications admin database uses.
13 In the QXEvents Database panel, complete the required fields.
Physical Name
Enter the qxevents database physical name. If the Database Type is Oracle, this field has a fixed value of qxevents_sh and cannot be edited.
Database Directory
Enter the qxevents database directory.
Connect Using Client/Server
Select this check box to use client/server mode to connect to the database.
Host
Enter the name of the host where the qxevents database is installed.
Service Name
The name the installer enters into the services file. Otherwise, enter the name of the network service that this database uses.
Create Services File Entry
Select this check box to enable the Service Port field and to have the port information added to the service.
Service Port
Entered into the services file by the installer. Otherwise, enter the number of the port that this network service uses.
MFG DB Start Script
Enter the location of the script that starts the QAD Enterprise Applications databases.
MFG DB Conn. pf
Enter the full path (including the file name) of the connection parameter file that the client session uses.
Block Size
Enter the block size to use for the qxevents database. The value depends on the operating system block size.
Progress Directory
Enter the Progress location the Progress AppServer uses.
14 If you are migrating an existing qxevents database to the new install, complete the following required fields in the QXEvents Migrate Configuration panel (see
Migrating QXtend for more details). These fields may already be populated.
Enable
Select the check box to enable migration of qxevents configuration data from a previously installed qxevents database.
Physical Name
Enter the physical name of the source qxevents database.
Connection Type
Enter the connection type to use to connect to the source qxevents database.
Multi-user
If the source QXEvents Connection Type is Local, specify whether to connect in multi-user mode. If you use this option, the database must be running during QXtend installation. If you do not use this option, shut down the database before installing QXtend.
Database Directory
Enter the source qxevents database directory. The entry only applies when the Connection Type is Local.
Host
Enter the name of the host where the source qxevents database is installed.
Service Name
If the Connection Type is Network, specify the ServiceName or service port number to use.
Version
Select the version being migrated.
15 If necessary, select the next component to configure from the Modules to Install panel. Otherwise, go to
step 35.
Configure the QXtend Adapter
16 Complete the required fields in the MFG/PRO panel.
Version
Use the drop-down list to select the QAD Enterprise Applications version that the adapter is being installed against.
Service Pack
Enter the number of the service pack in use.
Home Directory
Enter the home directory where the QXtend adapter is installed.
Propath
If not populated automatically, enter the MFG/PRO source code (xrc) directory to use during QXtend Adapter compilation.
Database Type
Select Progress, Oracle, or Other, depending on the type of database that QAD Enterprise Applications uses. Other refers to non-Progress and non-Oracle databases.
Database UTF
Whether the database codepage is UTF.
Internal Codepage
Enter the name of the codepage used in memory.
Stream Codepage
Enter the name of the codepage used for stream I/O.
Use Alternate DB Set
Enable this option to specify non-standard empty QAD databases. If this option is unchecked, skip steps
17 and
18 because the MFG/PRO Database and MFG/PRO Admin Database panels are disabled.
Empty DB Directory
If not populated automatically, enter the directory where the QXtend adapter empty databases are located.
Empty DB
Enter the name of the empty QXtend adapter database.
Admin Empty DB
Enter the name of the empty QXtend adapter admin database.
Additional Connections Params
Enter any extra parameters required to compile the QXtend adapter.
Dataserver Connection Params
Used if the database type is Other. Specify the parameters to use to connect to the database through Progress.
Progress Directory
Enter the location of Progress that this instance of the QXtend adapter uses. This version is the same Progress version required by QAD Enterprise Applications.
QDT Directory
Enter the location of the QDT. The location is only applicable if you are installing against QAD Enterprise Edition.
Environment Name
Enter the configuration name that was specified in QDT.
Financial AppServer
Enter the name of the AppServer for Financials. The name is only applicable if you are installing against QAD Enterprise Edition.
Financial NameServer Port
Enter the NameServer port that the Financials AppServer uses. The port is only applicable if you are installing against QAD Enterprise Edition.
.NET UI Home Directory
Enter the location of the .NET UI Progress code.
17 In the MFG/PRO Database panel, complete the required fields.
Physical Name
Enter the physical name of the qaddb for QAD Enterprise Applications.
Connection Type
Select Local or Network.
Multi-user
Select this option if your database is operating in multi-user mode. If you use this option, the database must be running during QXtend installation. If you do not use this option, shut down the database before installing QXtend.
Database Directory
The database where the QAD Enterprise Applications qaddb database is installed. Enter the directory if the connection type is Local.
Host
Enter the name of the host where the QAD Enterprise Applications qaddb is installed.
Service Name
Enter the network service that the QAD Enterprise Applications qaddb uses.
18 Complete the required fields in the MFG/PRO Admin Database panel.
Physical Name
Enter the physical name of the QAD Enterprise Applications admin database.
Connection Type
Select Local or Network.
Multi-user
Select this option to indicate that your database is operating in multi-user mode. If you use this option, the database must be running during QXtend installation. If you do not use this option, shut down the database before installing QXtend.
Database Directory
Enter the name of the database directory where the QAD Enterprise Applications admin database is installed.
Host
Enter the name of the host where the QAD Enterprise Applications admin database is installed.
Service Name
Enter the network service that the QAD Enterprise Applications admin database uses.
19 Complete the required fields in the QXtend Adapter panel.
Destination Directory
Enter the directory where the QXtend adapter is located.
Client Startup Params
Enter the client startup parameters required for starting a character session in QAD Enterprise Applications.
20 In the Adapter Native API AppServer panel, complete the required fields.
Note: This information only applies to eB2.1 SP4 and later.
AppServer Name
Enter the name of the AppServer for using Native APIs.
AppServer Port
Enter the AppServer port number.
AppServer Max Connections
Enter the maximum number of connections to the AppServer.
Name Server
Enter the NameServer name to which the AppServer belongs.
Name Server Port
Enter the NameServer port that the AppServer uses.
AdminServer Port
Enter the AdminServer port that the AppServer uses.
Update Ubroker Properties
Select this check box for the installer to update the Ubroker Properties. Ensure that the installer has the permissions required to update the file. If you do not select the check box, you can create the entry manually. You can find the template under the properties subdirectory of the QXO Adapter directory.
21 If necessary, select the next component to configure from the Modules to Install panel. Otherwise, go to
step 35.
Configure the QXO Database
22 Complete the required fields in the Outbound Database panel.
Physical Name
Enter the physical name of the QXO database. If the Database Type is Oracle, this field has a fixed value of qxodb_sh and cannot be edited.
Database Directory
Enter the QXO database location.
Service Name
The installer enters the name into the services file. Otherwise, enter the name of the network service for this database.
Create Services File Entry
Select this check box to enable the Service Port field and to have the port information added to the service.
Service Port
The installer enters the port into the services file. Otherwise, enter the port number for the network service.
Block Size
Enter the QXO database block size.
Progress Directory
Enter the location of the Progress directory this database uses.
Advanced Database Config
Selecting this box displays additional fields for specifying the locations of the schema areas for the QXO database. Placing these areas on different disks can improve performance.
Selecting this box displays the following fields:
Before Image.
The location of the BI file.
Schema Area.
There are no tables in this area.
Configuration Data.
A low-volume, low-capacity area.
Configuration Indexes.
A low-volume, low-capacity area.
Transactional Data.
A high-volume, medium-capacity area.
Transactional Indexes.
A high-volume, medium-capacity area.
Raw Msgs (CLOB).
A high-volume, high-capacity area.
Subscriber Msgs (CLOB).
A high-volume, high-capacity area.
23 In the Migrate QXODB Configuration panel, complete the required fields.
Enable.
Select the check box to enable migration of QXO database configuration data from a previously installed QXO database.
Physical Name.
Enter the physical name of the source QXODB database.
Connection Type.
Enter the connection type to use to connect to the source QXODB database.
Multi-user.
If the source QXODB Connection Type is Local, specify whether to connect in multi-user mode. If you use this option, the database must be running when you install QXtend. If you do not use this option, shut down the database before installing QXtend.
Database Directory.
Enter the directory for the source QXODB database. The entry only applies when the Connection Type is Local.
Host.
Enter the name of the host where the source QXODB database is installed.
Service Name.
If Connection Type is Network, specify the service name or service port number to use.
Version.
Select the version being migrated from the drop-down list.
24 If necessary, select the next component to configure from the Modules to Install panel. Otherwise, go to
step 35.
Configure the QXO Server
25 Complete the required fields in the Outbound Server panel.
Destination Directory.
Enter the directory containing the qxo server.
Outbound Database Name.
Enter the Outbound database name.
Connect Using Client/Server
Select this check box to use client/server mode when connecting to the database.
Outbound Database Directory
Enter the Outbound database directory location.
Outbound Database Host.
Enter the Outbound database host name.
Outbound Database Service.
Enter the name of the service for the Outbound database.
Progress Directory.
Enter the Progress location the Progress AppServer uses.
26 Complete the required fields in the Outbound UI AppServer panel.
AppServer Name
Enter the Progress AppServer name.
AppServer Port
Enter the Progress AppServer port number.
AppServer Max Connections
Enter the maximum number of connections this AppServer allows.
AdminServer Port
Enter the port number of the Progress AdminServer.
Name Server
Enter the name of the NameServer.
Update Ubroker Properties
Select this check box for the installer to update the Ubroker Properties. Make sure that the installer has the permissions required to update the file. If you do not select the check box, create the entry manually. The template is located under the scripts subdirectory of the QXO Server directory. The Outbound UI and Outbound SI AppServers are required for correct QXO operation.
27 In the Outbound SI AppServer panel, complete the required fields.
AppServer Name
Enter the name of the Progress AppServer.
AppServer Port
Enter the port number of the Progress AppServer.
AppServer Max Connections
Enter the maximum number of connections this AppServer allows.
Admin Server Port
Enter the port number of the Progress AdminServer.
Name Server
Enter the name of the NameServer.
Update Ubroker Properties
Select this check box for the installer to update the Ubroker Properties. Make sure that the installer has the permissions required to update the file. If you do not select the check box, create the entry manually. The template is located under the scripts subdirectory of the QXO Server directory. The Outbound UI and Outbound SI AppServers are both required for correct QXO operation.
28 If necessary, select the next component to configure from the Modules to Install panel. Otherwise, go to
step 35.
Configure the QXO Servlet
29 In the Outbound Web Application panel, complete the required fields.
WebApp Name
Enter the QXO servlet application name known to the Tomcat application server.
AppServer Name
Enter the Progress AppServer name.
AppServer Host
Enter the name of the host on which the AppServer is located.
Name Server Port
Enter the Progress NameServer port number.
30 In the Tomcat for Outbound panel, complete the required fields. These values are populated automatically if QXO uses the same AppServer configuration.
Port
Enter the Tomcat port number.
Home Directory
Enter the location of the home directory where Tomcat is installed.
Admin Name
Enter the user name for the Tomcat manager role.
Admin Password
Enter the password of the user with the manager role.
If necessary, select the next component to configure from the Modules to Install panel. Otherwise, go to
step 35.
Configure the QXtend QAD .NET UI Plug-in
31 Complete the required fields in the .NET UI Server panel.
Version
Enter the QAD .NET UI version.
WebApp Name
Enter the name of the qad home server.
Port
Enter the Tomcat Port.
Tomcat Home
Enter the Tomcat installation home directory.
Configuration Name
Enter the configuration name set for the .NET UI (the default is qadui).
32 In the Outbound UI AppServer Setting panel, complete the required fields.
Direct Connect
Choose whether the plug-in will connect in Direct Connect mode or via a NameServer.
AppServer Name
Enter the name of the QXO AppServer.
AppServer Host
Enter the host of the QXO AppServer.
Name Server Port
Enter the port of the NameServer (if Direct Connect is not selected).
AppServer Port
Enter the port of the AppServer (if Direct Connect is selected).
33 Complete the required fields in the Include QXtend Menu Entries panel.
Include Inbound
Choose whether to add Inbound to the menu.
Include Outbound
Choose whether to add Outbound to the menu
34 If you have entered all of the parameter settings for the required components, click Next and go to Default Configuration. See
Default Configuration for more information.