Diagnosing the Problem
The Installation Summary screen displays three types of information about the installation or upgrade:
• Status
• Detailed Messages
• Detailed Errors
All system messages generated during installation are recorded in the install log.
Status
The Status screen uses colored symbols to indicate the status of each component:
• A green check mark means that the operation completed successfully (success status).
• A red cross means that non-fatal and fatal errors occurred (failure status).
• A blue double arrow means that you can skip the task (it was previously completed or is irrelevant).
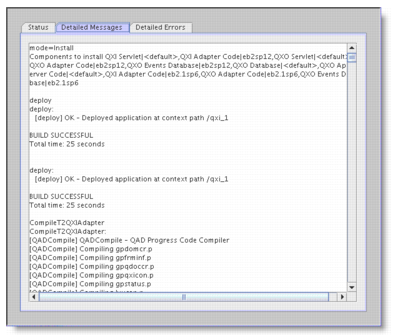
To allow you to easily identify issues, a status also displays for any substeps performed during the installation or upgrade. For example,
Installation Status Screen shows that installing the Inbound Servlet and Outbound Database consists of several substeps (replace token in archive, loading the database schema, and so on). A status displays for each of these substeps.
Installation Status Screen
Detailed Messages
The Detailed Messages screen displays a record of all status messages generated during the installation or upgrade. All of the displayed messages are logged in the install log file.
Installation Detailed Messages Screen
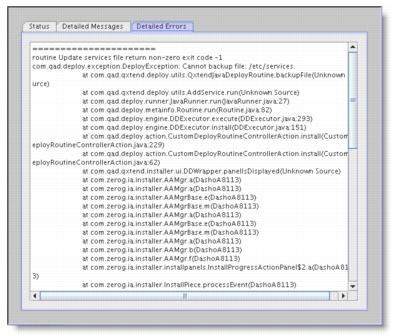
Detailed Errors
The Detailed Errors screen shows a log of any fatal system errors noted during the installation or upgrade. These messages indicate a serious problem with the system (for example, a corrupted Java or Progress executable). Some of these errors are recorded in the log file.
Installation Detailed Errors Screen
Checking repository.xml
The installer keeps the installation configuration and status of all install-related tasks in the install repository.xml file.
The repository.xml file can give you a high-level view of the results of an install, particularly when doing a console install, which presents less information.
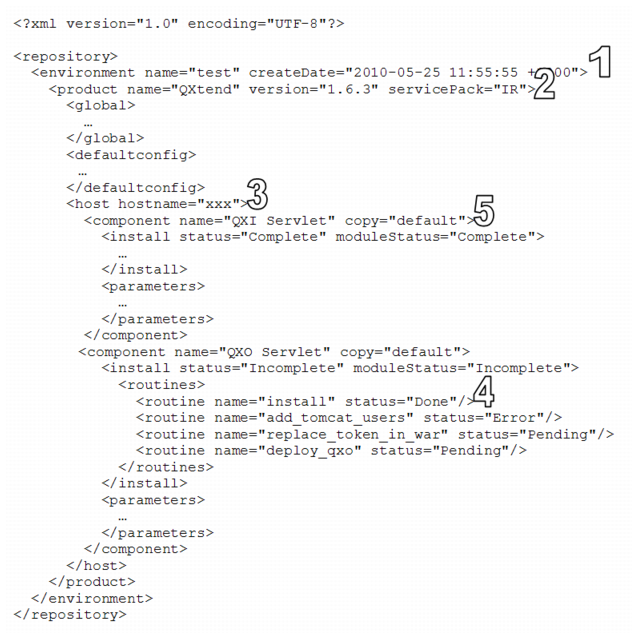
repository.xml File shows the contents of a typical
repository.xml file.
A repository.xmlfile has the following features:
1 Environment: The name attribute is the environment set during the installation.
2 Product: There can be more than one product in the environment. Verify that the name and version match the targeted install.
3 Host: There can be multiple hosts in an installation. Verify that this host is the correct one.
4 Routine: Routines are granular tasks that the installer performs. A group of routines makes up a component. Routines can have a status of Done, Skipped, Error, or Pending.
5 Component: The component node is the parent to the status and the parameters. Check the component name and proceed to observe the install or upgrade nodes.
a Status: The status of that particular component instance (indicated with the copy attribute). It can be:
• Complete if all routines are Done
• Forced Complete if any routine is marked as Skipped
• Incomplete if any routine is marked as Pending or Error
b ModuleStatus: The status of all the instances of a component. If there are three instances (indicated by copy), all three must have a status of Complete or Forced Complete before the ModuleStatus is marked as Complete.
Checking the status of a component (more specifically a routine) leads you to the installation step that failed. This functionality improves installation log navigation because you know what to look for.
The repository.xml file is located under the data directory in the QADDeployService servlet in the tomcat/webapps directory. If you are using a local file, repository.xml is in the location specified during the install.
Reading the Installation Log
The QXtend installation log, named QXTEND-InstallLog-<TimeStamp>.log, resides in the configured directory that was chosen when running the installer. The log file captures all of the standard output from the JVM during the install. If you are running the GUI installer, the information displayed in the Detailed Messages tab is the same as the information in the log file.
If an error occurred, you can read the log file during or after the install. If the pause occurred during installation (see
Process Control), you can look at the file without exiting the installer. In some cases, you can fix the problem and rerun the routine that failed.
If the installation process completed with a non-fatal error, you can identify the error by looking in the
repository.xml file (see
Checking repository.xml). To find the problem, look for the component that owns the failed routine. Then search the log file for the beginning of that component by finding the name followed by the instance in square brackets. For example:
QXtend Inbound Servlet [default]
=============================================
The failed routine has a corresponding ant task. Look for an ant task with a name that is similar to that of the failed routine. For example:
add-tomcat-users:
[copy] Copying 1 file to /qad/tomcat-164-8110/conf
[xslt] Processing /qad/tomcat-164-8110/conf/tomcat-users.xml.bak
to /qad/tomcat-164-8110/conf/tomcat-users.xml
[xslt] Loading stylesheet
/tmp/656641.tmp/resources/Transformations/tomcat-users.xsl
If the routine is successful, you see a message similar to the following:
BUILD SUCCESSFUL
Total time: 1 second
Trying to override old definition of datatype resources
If the routine is unsuccessful, you see a message similar to the following:
BUILD FAILED
java.net.ConnectException: Connection refused
The failure message includes a Java stack trace of the error. Since stack traces are sometimes hard to understand, QAD provides Helpful Hints when the installer pauses for an error.
Reading the steps around the error can provide clues regarding its cause.