QXI APIs (Schemas)
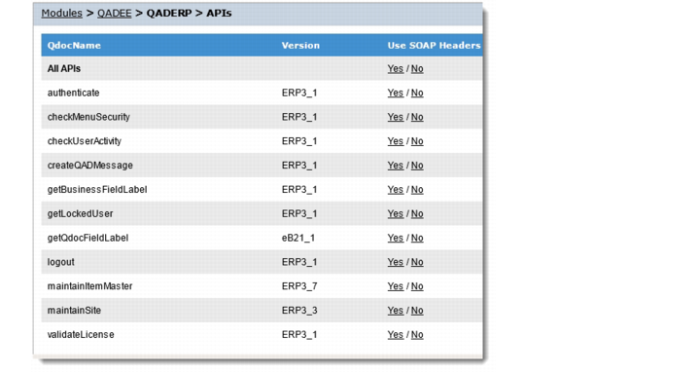
QXI provides access to many APIs; the list of available APIs is maintained in QXtend under the Schemas node on the menu tree on the Configuration tab. QXI allows APIs to be added, modified (only certain details), or deleted.
The schemas define the API. An API has two schemas; one schema defines the content of the request message, the other defines the content of the response message.
API names have two components <apiName>-<apiVersion>; the combination of apiName and apiVersion combine to create a unique identifier for the API. A specific version of an API is linked directly to an adapter; QXtend maintains the list of APIs that are valid for an adapter.
Example: If maintainItem-ERP3_2 is linked to a UI API Adapter, when a maintainItem SI API is created, the new API would be called maintainItem-ERP3_3.
APIs are only valid for the QAD application they were developed for—for example, an API used in QAD EAM is valid only when the receiver is a QAD EAM receiver. When APIs are added to QXtend, they are added for a specific application type and can only be used on receivers that are linked to the same application type.
API Types
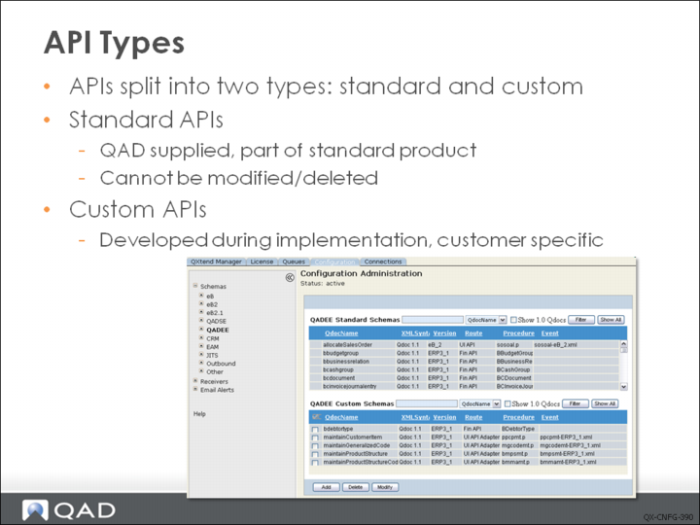
Visible APIs in QXI can be grouped into two types: standard and custom. System APIs are not displayed in Configuration Administration page since users are not expected to use them.
• Standard APIs are either shipped with QXtend, or are supplied later by QAD as part of future QXtend releases. These APIs support the standard functions and are not designed to work with customizations made to the QAD application. Standard APIs cannot be modified or deleted as they are controlled by QAD. When new APIs are added to QXI, you have the option as adding them as either standard or custom.
• Custom APIs allow for APIs that are developed to support the QXtend implementation. These APIs are required to support customizations that have been made to screens during the application implementation, or to provide APIs that are not part of the standard QXtend release. If a standard API is modified and loaded as a custom API, the version number used for the API must be different to the version number of the corresponding standard API. Custom APIs can be modified and deleted once they have been added to QXI.
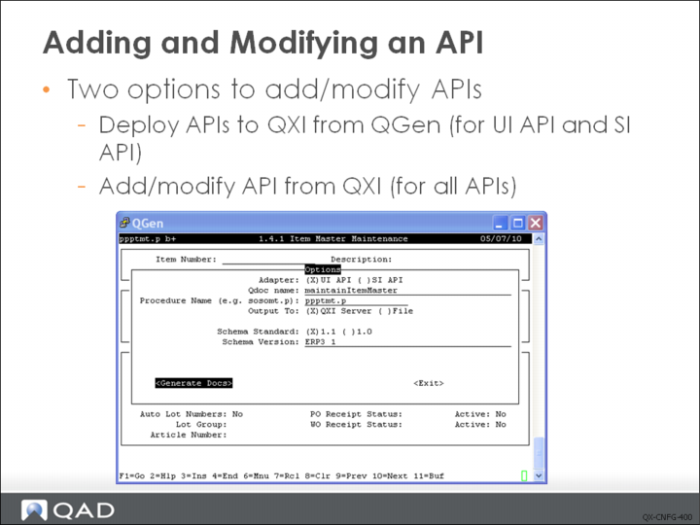
An API can be added/modified in two ways: using QGen to deploy the API, or using QXI to add or modify an API. Using QGen is the recommended way as API can be generated from QGen and deployed to QXI seamlessly.
QGen is a development tool that facilitates the creation and maintenance of QXtend APIs. The UI API adapter uses the character screen within the application to load data. QGen records the structure and field information from QAD EA character UI screens and saves the information to data files. QGen can also generate API required files (schema files and event files) from the data files and deploy them to QXI.
For SI API, QGen can pull the schemas from Native API framework and deploy them to QXI.
To modify an API, redeploy the API from QGen to QXI. Only custom APIs can be modified.
QGen does not work for Fin API. User has to use the QXI function to add/modify Fin APIs.
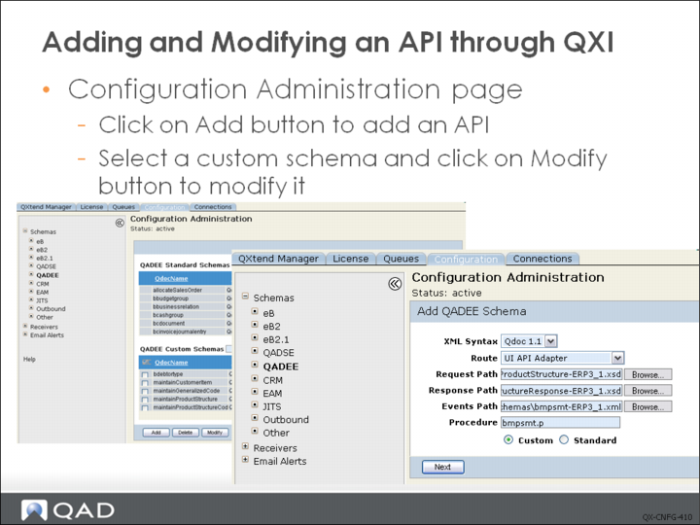
To add/modify API in QXtend, navigate to the configuration tab, select schemas node in tree menu, and then select the application version.
Click on Add button to add an API, or select a custom schema and click on Modify button to modify it.
Here are the steps for adding and API:
A screen displays stating that QXtend is active. Because changing a live running QXtend system is potentially dangerous to your system data, you are given three options to allow you to proceed safely:
• Cancel Update: Stops the requested update. No changes are applied.
• Suspend QXtend: Suspends QXI while the update is made. During suspension, QXI cannot process requests.
• Continue without Suspending: Allows you to continue and make the configuration changes without suspending QXtend. Some changes made will not be applied until QXtend has been restarted, as many of the configuration details are cached at system startup.
After selecting either the Suspend QXtend or Continue without Suspending option, you are prompted to enter details for the API you want to add. Currently you can add APIs for UI API, Fin API or SI API adapter. Each adapter requires different parameters.
Once the details required for the new API have been entered, click Next. You can then select the receivers to automatically add this API to. If you do not want to automatically add it, do not select any receivers from the list, and just click Done. If you choose not to add the API to any receivers, you can add the API to receivers later.
If you selected receivers, the system displays a message confirming the receivers to which the API was added.
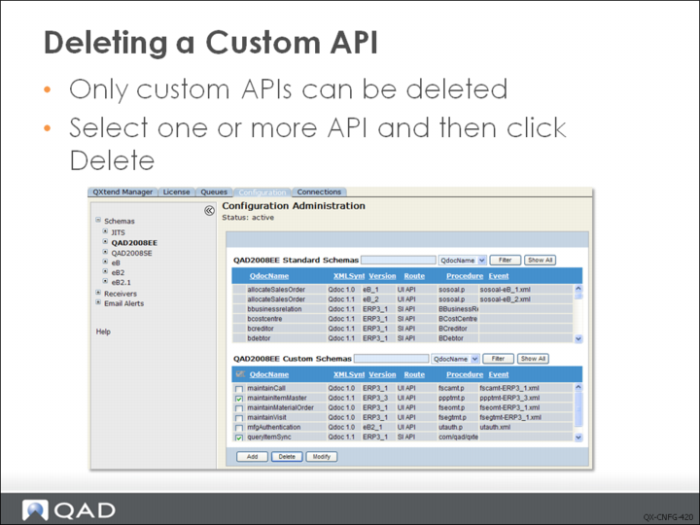
Deleting a Custom API
Custom APIs can be deleted. To delete an API, select an application version from the Schemas node in the tree menu on the Configuration tab. Select the custom API you want to delete from the list of APIs and click Modify. You can delete more than one API at a time.
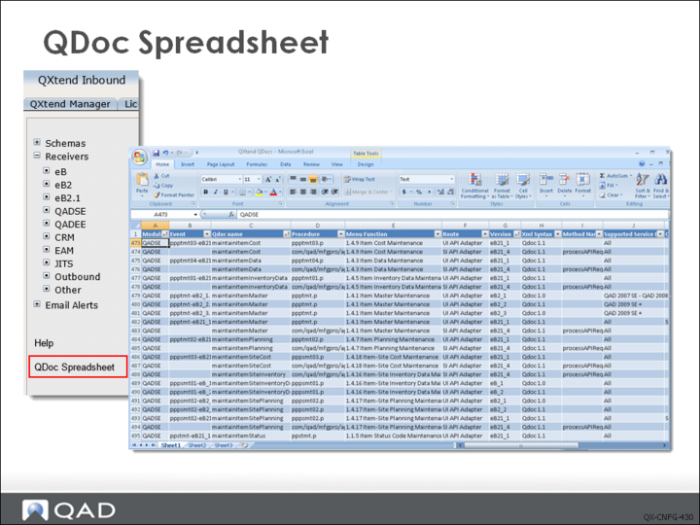
Using QDoc Spreadsheet
You can view detailed reference information about all QAD-supplied standard QDocs in an Excel spreadsheet accessible from the Configuration Manager.
To access the spreadsheet, go to the Configuration tab and click QDoc Spreadsheet in the lower part of the tree view pane. The QDoc spreadsheet elaborates on all standard QDocs for all QAD Enterprise Application versions, allowing you to compare one version of QDoc against another. You can also sort and filter data in the spreadsheet to easily view the QDoc information you want.
Exercise: Schemas
The following list shows a number of key concepts used in schemas in QXI. In each statement below, fill in the correct term from the list.
apiName | application type |
response message | QGen |
receivers | standard |
custom | modified or deleted |
version | request message |
suspend | apiVersion |
Schemas | |
1 An API has two schemas; one schema defines the content of the ______, the other defines the content of the ______.
2 The combination of ______ and ______ combine to create a unique identifier for the API. A specific ______ of an API is linked directly to an adapter.
3 When APIs are added to QXtend, they are added for a specific ______ and can only be used on ______ that are linked to the same application type.
4 APIs in QXI can be grouped into two types: ______ and ______.
5 Standard APIs cannot be ______ since they are controlled by QAD.
6 You are given the option to ______ the QAD QXtend system when adding a new API.
7 There are two ways to add APIs to QXI, deploy APIs through ______, or add ______ in QXI.
Lab: QXI Configuration
The QAD QXtend Fundamentals Training environment has been created exclusively for use with this QAD QXtend course. This environment is provided by QAD Training. Each student has been given a unique user ID and password to access the training image.
QAD QXtend 1.8.4 has been installed. Both QXI and QXO are available but neither are configured. In the following lab exercises, you will configure QXI and process some test transactions to validate the QXI installation and configuration.
<LabHomeDirectory> = C:\QXtendTraining\Labs\02-QXI-Config\
1. Access and Start the Training Environment
1 Log in to the QAD Training Success site using the user ID and password provided to you.
2 Open the QAD QXtend Fundamentals Training image and start the Windows client provided with the image.
3 Open Internet Explorer and verify that QXI and QXO are running. The user for both is admin and the password is mfgpro.
• QXI – http://qaddemo:8080/qxi
• QXO – http://qaddemo:8080/qxo
2. Create the Receiver
Setting up a receiver is the first step in configuring QXI. The receiver identifies the destination application instance, and the APIs that are available and supported. To create a receiver:
1 Open the QXI Web application in Internet Explorer:
http://qaddemo:8080/qxi
2 Select the Configuration tab.
3 Select the Receivers node on the menu tree.
4 Select QADEE from the Receivers menu.
5 Click the Add button.
6 Select the Continue Configuration update without suspending QXtend Inbound option and then click Submit.
7 Set the following values:
Receiver | QADERP |
Description | |
Require Authentication | false |
Licensed Domains | |
8 Click Next to go to the API Selection screen.
9 Enable the maintainSite API (version ERP3_3). Ensure that you select the QDoc 1.1 XML Syntax API.
10 Complete creating the receiver by clicking Done.
11 The following Receiver creation report displays.
Although the receiver has been created, it cannot be used until it can connect to the target QAD Enterprise Applications instance. You’ll now define this connection.
3. Create a Connection Pool
Connection pools in QXI represent the actual connections that are available to QAD QXtend to load data into a specific instance of the QAD Enterprise Application. The connection pool is linked to a specific receiver through its name; therefore the name of the receiver and the name of the connection pool must be identical.
3.1 Create a New Connection Pool
To create a connection pool:
1 Open the QXI Web application in Internet Explorer:
http://qaddemo:8080/qxi
2 Select the Connections tab.
3 Expand the Add Connection Pool node of the menu tree.
4 Select the Add UIAPI Pool option.
5 Set the following values:
Pool Name | QADERP (Must be identical to the receiver name created in the previous step, including letter case.) |
Host | qaddemo |
Protocol | Telnet |
Port | 8080 |
Server Startup Script | login:|mfg|Password:|$PASSWD|$|/dr01/qadapps/qea/qxtend/scripts/client.qxtend |
Server Startup Password | MFGpr0 |
Connection Setup User ID | demo |
Connection Setup Password | qad |
Domain | 10USA (This is only the default domain. The domain can be passed with the request and will override this value when processing the request.) |
6 Click the Save button to create the new connection pool.
3.2 Validate the New Connection Pool
Now that you have created the connection pool, you need to ensure the configuration is correct and that you have idle sessions available.
To verify that you have idle sessions:
1 Open the QXI Web application in Internet Explorer:
http://qaddemo:8080/qxi
2 Select the Connections tab.
3 Expand the View Connection Pool node in the menu tree.
4 Select the QADERP.UIAPI option from the menu tree.
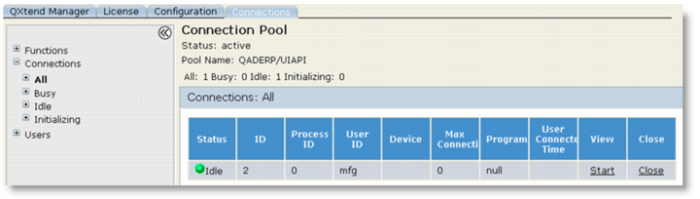
5 Expand the Connections node in the menu tree and select the All option. You should see the connection pool with a single idle connection as shown below. If there is not an idle session, the connection pool has not been configured correctly.
3.3 Verify Configuration
An idle session in a connection pool only confirms that the connection pool can log in and initialize a connection to QAD Enterprise Applications—it does not mean that requests will process successfully. It is only when requests are processed that a program is launched and you are logged into the application properly.
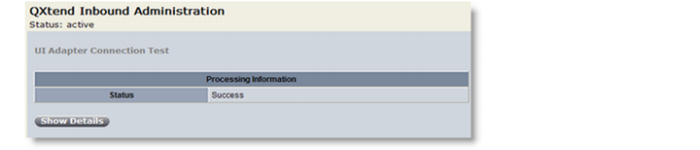
To verify that configuration is correct, you can use the UI Adapter Connection Test function in the Test Harness to test that a program can be started, and that data can be passed from the connection pool to the application.
Important: This verification step is required only for the UIAPI adapter connection pools.
To verify your configuration:
1 Open the QXI Web application in Internet Explorer:
http://qaddemo:8080/qxi
2 Select the QXtend Manager tab, then click the Functions node in the menu tree.
3 Expand the Test Harness node.
4 Select the UI Adapter Connection Test node.
5 In the Receiver field, type QADERP and click the Submit button. A screen displays to indicate the success of the test:
4. Adding APIs to a Receiver
The receiver maintains a list of the APIs that are supported by that receiver; typically a subset of the APIs are supported by QAD QXtend. Only the APIs that are used should be enabled for each receiver. When we created the QADERP receiver earlier, we only added support for the Site Maintenance QDoc. We now also need to add support for the Item Maintenance QDoc.
1 Open the QXI Web application in Internet Explorer:
http://qaddemo:8080/qxi
2 Select the Configuration tab.
3 Select the Receivers node on the menu tree.
4 Select QADEE from the list of receivers.
5 Select the check box next to the QADERP receiver.
6 Click the Modify button.
7 Choose the Continue Configuration update without suspending QXtend Inbound option and click the Submit button.
8 Click the Next button.
9 Click the Add QDoc button.
10 Locate the maintainItemMaster API and select the check box for the ERP3_7 version that uses the QDoc 1.1 XML syntax.
11 Click the Finish button. The receiver update report displays.
5. Processing a Request using the Test Harness
So far we have created the configuration required to process QDoc requests with QAD QXtend—we have not processed any messages. After configuring the receiver, creating the connection pool, and validating the configuration, we are ready to test the APIs within QAD QXtend.
The QDoc SOAP messages that are processed by QAD QXtend have a specific, required format. The content of the API message will, of course, vary by API, so how do you know what data is available for an API? QAD QXtend Inbound has several useful features to help you test your configuration, which are part of the Test Harness.
This exercise describes how to generate a sample message, edit it, and process it using the Test Harness.
5.1 Generate Sample Request QDoc
The QADERP receiver that you created earlier supports two APIs: maintainSite and maintainItemMaster. You need to generate a sample QDoc for the maintainSite API.
1 Open the QXI Web application in Internet Explorer:
http://qaddemo:8080/qxi
2 Select the QXtend Manager tab.
3 Select the Functions node on the menu tree.
4 Expand the Test Harness node.
5 Select the Create Empty QDoc function.
6 Enter the following details:
QDoc Name | maintainSite |
QDoc Version | ERP3_3 |
Receiver | QADERP |
7 Click the Submit button. The following confirmation message displays.
The sample QDoc has been created on the server that is running QXI, and the path shown above indicates where the sample request was created on the server.
5.2 Edit the Sample Request
Editing XML on the Linux server that is running QAD QXtend is possible, but because it is a bit difficult, doing so often results in invalid XML documents that cannot be processed by QAD QXtend. Instead, you can copy the file from the server to a Windows client where the XML can be edited with a free XML editor such as foxe (First Object XML Editor). This freeware application has been loaded onto the image being used for this training.
To transfer the file:
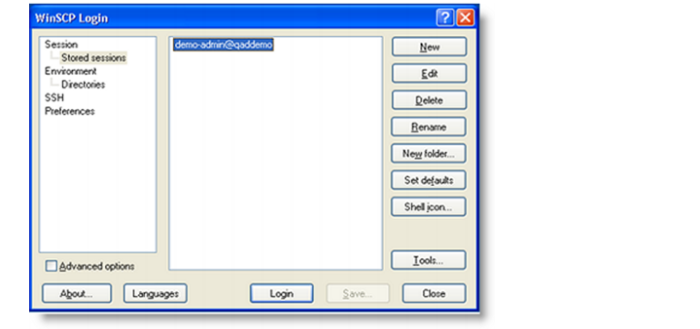
1 Open the Win SCP application that is installed on the Windows image.
2 Click the Login button to open the stored session demo-admin@qaddemo.
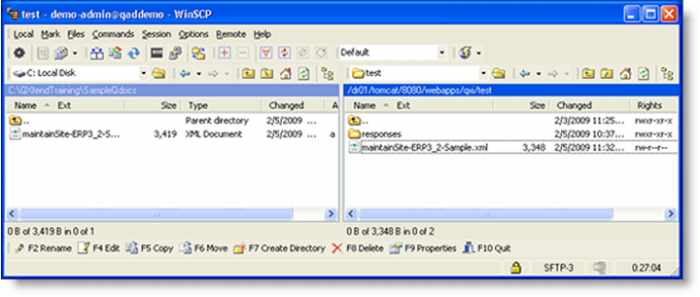
3 Navigate to the location of the generated sample document:
/dr01/tomcat/8080/webapps/qxi/test
4 Copy the sample file to C:\QXtendTraining\SampleQdocs.
5 In Notepad or First Object XML Editor, open the request copied to C:\QXtendTraining\SampleQdocs.
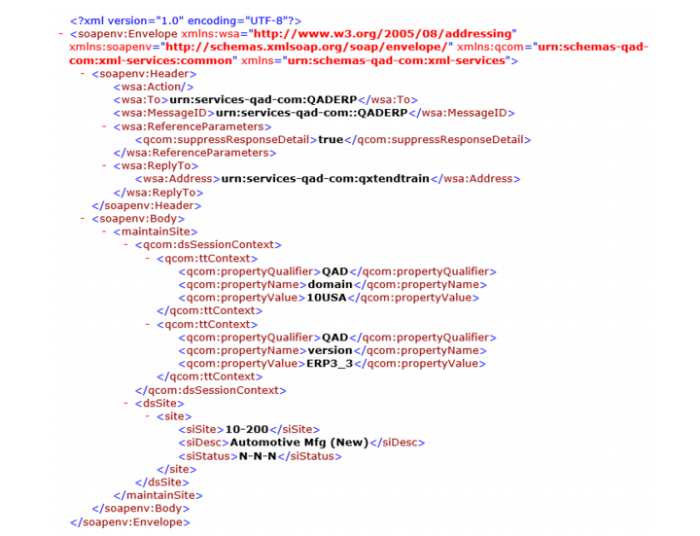
6 Review the contents of the generated QDoc message. Note that the area that contains the application data does not contain valid data and the data must be edited.
The wsa:To node contains the receiver ID that will process the request. This is one of the most important pieces of information as this controls which application instance the message is loaded into.
7 Make the following changes to the XML:
a Change the wsa:Address node to:
<wsa:Address>urn:services-qad-com:qxtendtrain</wsa:Address>
This node contains the sender ID and is required because the QAD QXtend instance we are using at the moment is only available for data synchronization. By setting the sender ID to qxtendtrain, any message with that ID can be processed without raising a licensing exception. The qxtendtrain sender ID is only valid for this image and will not work on other QAD QXtend installations.
b Set the propertyValue element for the domain ttContext parameter to 10USA. Set the version value of ttContext parameter to ERP3_3. Delete the other ttContext parameters because they are not used in this request.
c Delete all the nodes for the site iteration except the siSite, siDesc and siStatus nodes, and set the following values:
| siSite | 10-200 |
| siDesc | Automotive Mfg (New) |
| siStatus | N-N-N |
Your request should now look like this (you can use Internet Explore to view the XML file):
8 Save the file as C:\QXtendTraining\SampleQdocs\SiteReq01.xml.
9 Copy the file just saved onto the Linux machine using WinSCP. The file needs to be copied to:
/dr01/tomcat/8080/webapps/qxi/WEB-INF/receivers/QADERP/requests
This directory is used by the Test Harness to retrieve the test requests.
5.3 Verify QAD Data
Before running the test message through QAD QXtend, log into QAD Enterprise Edition and confirm the description for the 10-200 site you are updating.
5.4 Process Request
Now we process the request using the Process Request option on the Test Harness menu.
1 Open the QXI Web application in Internet Explorer:
http://qaddemo:8080/qxi
2 Select the QXtend Manager tab.
3 Expand the Functions node and then the Test Harness node on the menu tree.
4 Select the Process Request function.
5 Enter the following values:
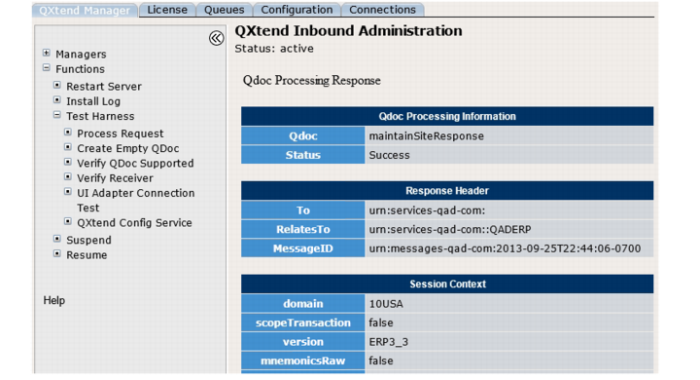
6 Click the Submit button. QAD QXtend processes the response and displays the following screen when the response is received:
7 Check the description of the site in QAD Enterprise Application.
5.5 Process Request with SOAP UI
The Test Harness provides a useful set of tools for processing requests and testing our APIs. However, generating requests, editing them, and moving them around is time-consuming and prone to error. The soapUI product is a free toolset that provides a testing framework for Web services that follow the WS-I specifications. This tool can be downloaded from www.soapui.org. Two versions are available: soapUI, which is a free edition, and soapUI Pro, which provides additional features.
Using soapUI is a fast way to build test SOAP messages using the API WSDL and schemas shipped with the QAD QXtend APIs. It also helps you build a suite of test cases for any API that is supported by QXI.
5.5.1 Use Predefined soapUI Project
The following exercise shows you how to use soapUI to test QXI using a predefined project and set of requests:
1 Open soapUI on the Windows image, use the shortcut on the Desktop.
2 Open the Lab 01 – QXI Configuration workspace.
a File – Switch Workspace.
b Browse to <LabHomeDirectory>
c Select the Lab 01 – QXI Configuration-workspace.xml file.
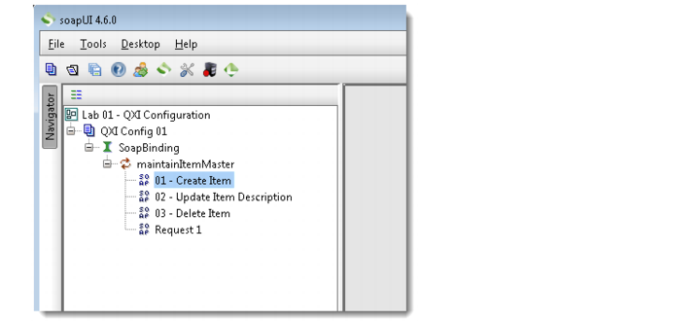
3 Expand the QXI Config 01 project.
4 Expand the SoapBinding level.
5 Expand the maintainItemMaster level.
6 Open the Request 1 message and review the structure of the SOAP message. None of the parameters are prepopulated with data, and no default session context records are created, but the basic structure of the message has been created from the WSDL and the API request schema. The following messages have been created from this raw message and updated with the necessary values for the message to process.
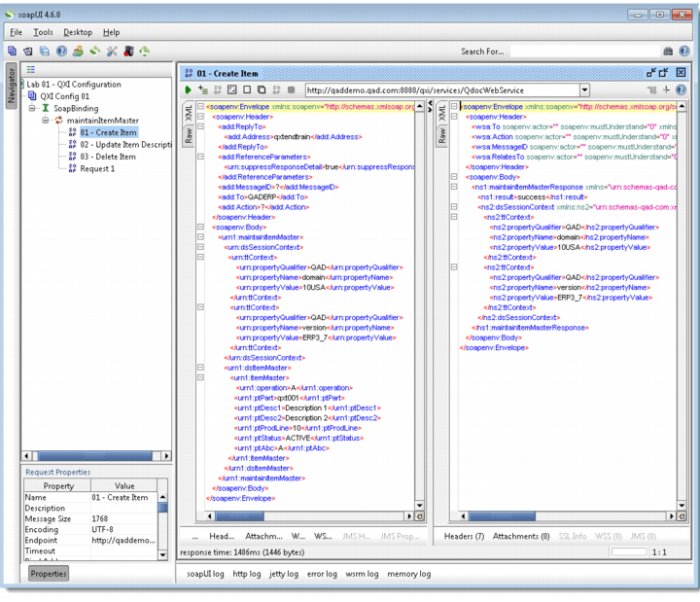
7 Open the 01 – Create Item message and review the contents of the message:
a Locate and validate the receiver ID.
b Locate and validate the sender ID.
c Validate the session context entries.
d Validate the application data section.
e Process the request by clicking the green arrow button in the request window.
f Validate that the item has been created in the application with the values specified in the request.
8 Open the 02 – Update Item Description message and review the contents of the message:
a Repeat the step from the previous message.
b This QDoc updates the item created in the previous message.
c Validate the update is successful.
9 Open the 03 –Delete Item message and review the contents of the message:
a Repeat the step from the previous message.
b This QDoc deletes the item updated in the previous message.
c Validate the delete is successful.
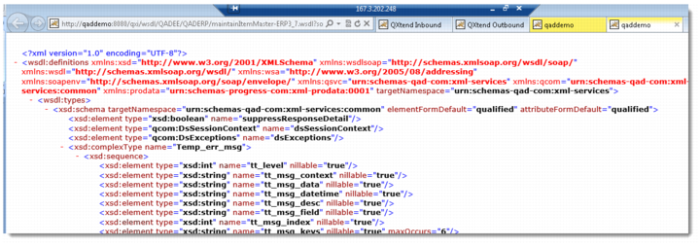
5.5.2 Generate WSDL
1 Open the QXI Web application wsdl page in Internet Explorer:
http://qaddemo:8080/qxi/wsdl
2 Select QADEE from the list of modules.
3 Select the QADERP receiver.
4 Click Yes at the right of maintainItemMaster (ERP3_7).
5 Copy the URL of the wsdl page.
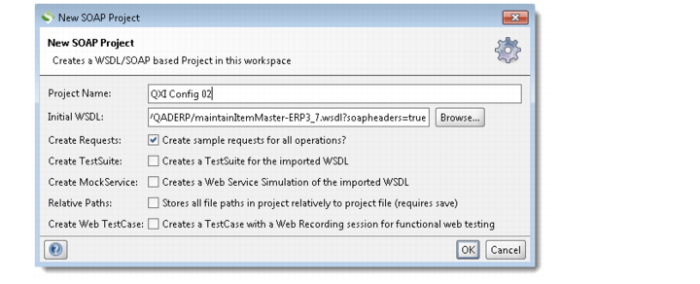
5.5.3 Create a New soapUI Project
From within the Lab 01 – QXI Configuration workspace, do the following to build a new project.
1 Create a new project:
• File – New soapUI Project.
2 Past the wsdl page URL to Initial WSDL.
3 Set Project Name to QXI Config 02.
4 Ensure that the Create Requests check box is selected.
5 Click OK to create the new project.
6 Drill down to the Request 1 message created under the QXI Config 02 project.
7 Right-click Request 1 and select the Clone Request option. Enter a name for the new request.
8 Edit the new request so that it can be processed by QXI. Change the SOAP header:
a Specify the receiver as QADERP.
b Specify the sender to be qxtendtrain.
c Set suppressResponseDetail to true.
9 Create the necessary session context entries:
a Create two ttContext iterations.
b Qualifier = QAD, Name = domain, Value = 10USA
c Qualifier = QAD, Name = version, Value = ERP3_7
Note: If you copy and paste the empty ttContext node and blank lines are created, right-click the request and select the Format XML option. soapUI will remove any blank lines and correct the indentation of the XML.
10 Edit the application data section of the message as follows:
a The dsItemMaster node by default will contain all of the fields available when processing an Item Master update. However, only a few fields are required for a transaction to process successfully. The best way to identify the mandatory fields is to run through the UI and see which fields you have to enter data for.
b Item Master in this instance of QAD EE only has a few mandatory fields. The list of fields may change depending on configuration:
• ptPart
• ptProdLine
• ptStatus
• ptAbc
• Recommended fields are ptUm, ptDesc1, ptDesc2, ptLoc, ptShipWtUm and ptNetWtUm.
c Edit the XML and create a new item QDoc that will be processed successfully by QXI. If you do not want to use a node, delete it from the XML.
You are now ready to process the request that you have created in the SOAP UI project.
11 Process the QDoc message that you created in the new soapUI project and verify that the Item is created successfully.
12 Create and process a new message and update the Item created in the previous step.
13 Verify the changes in QAD EE.
14 Create and process a new message that will delete the item updated in the previous step.
15 Verify the changes in QAD EE.
6. Load New API
New APIs are developed during the implementation phase of QAD QXtend. It is important to understand how these APIs are deployed to QAD QXtend. New APIs could be developed with QGen if it uses the UI API adapter, or a native OpenEdge API that uses the Service Interface adapter. Regardless of the adapter type, each API needs to have a request schema and a response schema.
QGen provides the function to deploy an API to QXtend Inbound directly. Later we will practise that in the lab for QGen. In this lab, we use another approach to load API to QAD QXtend.
The API that you will deploy to QAD QXtend is for the Customer Item Maintenance function and leverages the UI API adapter. This new version needs to be deployed to QADEE. The schema and event files for the API have been provided.
To deploy an API:
1 Open the QXI Web application in Internet Explorer:
http://qaddemo:8080/qxi
2 Select the Configuration tab.
3 Select the Schemas node in the menu tree.
4 Select QADEE.
5 Click the Add button.
6 Choose the Continue Configuration update without suspending QXtend Inbound option and click the Submit button.
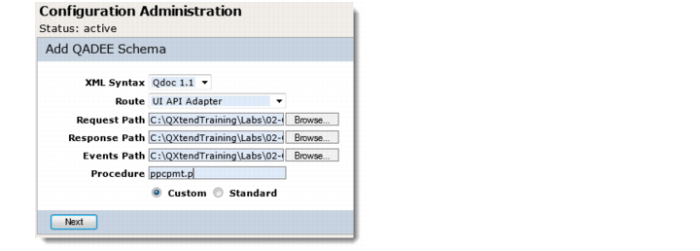
7 Set the following values:
XML Syntax | Qdoc 1.1 |
Route | UI API Adapter |
Request Path | <LabHomeDirectory>\Schemas\maintainCustomerItem-ERP3_2.xsd |
Response Path | <LabHomeDirectory>\Schemas\maintainCustomerItemResponse-ERP3_2.xsd |
Events Path | <LabHomeDirectory>\Schemas\ppcpmt-ERP3_2.xml |
Procedure | ppcpmt.p |
8 Deploy this API as a custom API.
9 Click the Next button.
10 Add the API to the QADERP receiver by selecting the check box. Then click the Done button.
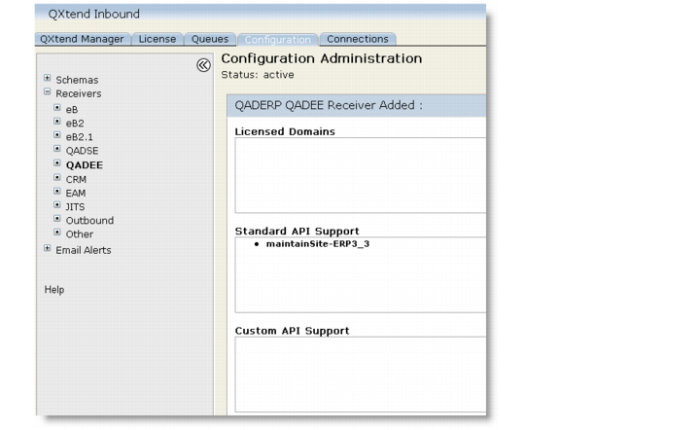
7. Verify the Customer Item API has been added
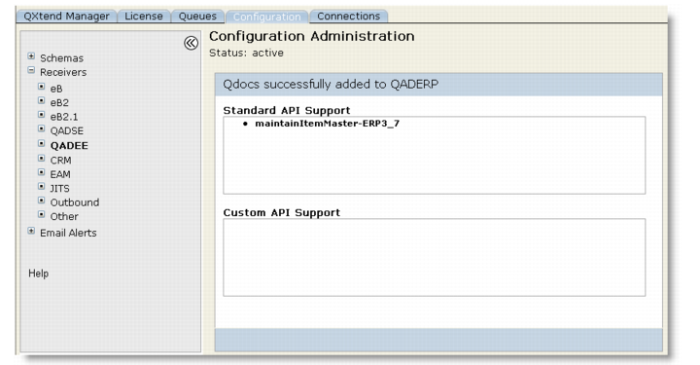
To verify that the Maintain Customer Item API was successfully added to QXI, you need to check two places. First check that the API is available as a custom API for the QADEE application type; second, check it is a supported API on the QADERP receiver.
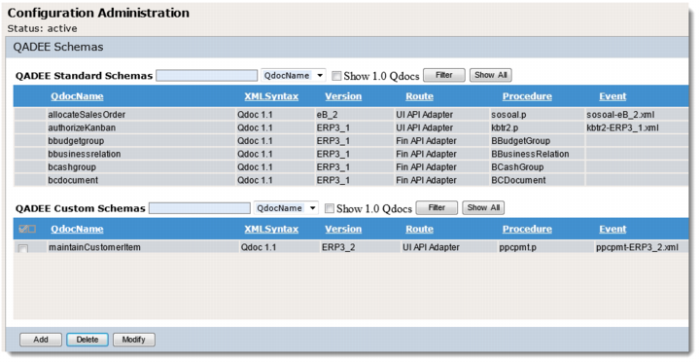
1 Go to QXI > Configuration tab, select the Schemas node on the menu tree.
2 Select QADEE.
The maintainCustomerItem version ERP3_2 should display as the only custom API that is available for the QADEE application type as shown here:
3 Select the Receivers node on the menu tree.
4 Select QADEE.
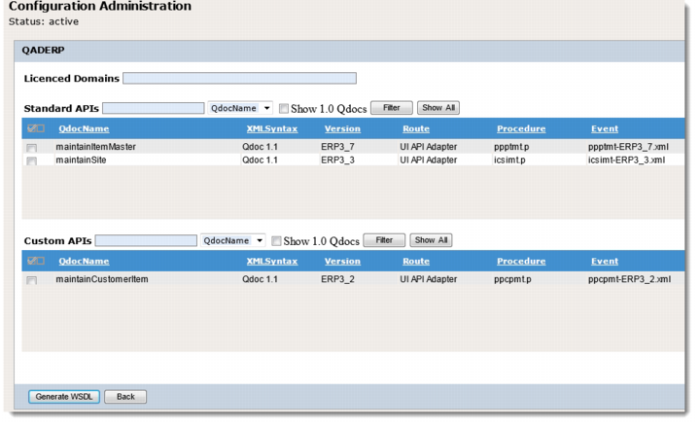
5 Select the check box next to the QADERP receiver and click the View button.
The maintainCustomerItem API version ERP3_2 should display as a supported QDoc for the receiver as shown here:
8. Test the New Customer Item Maintenance API
The new version of the Customer Item Maintenance API has now been successfully deployed to QXI. However, until the new version has been used to process a couple of transactions, you cannot be sure that everything has been uploaded correctly.
To test a QAD QXtend API, you should use soapUI to build a WSDL project, create some requests, and process those requests using soapUI.
8.1 Locate the WSDL Page
1 Open the QXI Web application wsdl page in Internet Explorer:
http://qaddemo:8080/qxi/wsdl
2 Select QADEE from the list of modules.
3 Select the receiver QADERP.
4 Click Yes at the right of maintainCustomerItem (ERP3_2).
5 Copy the URL of the wsdl page.
8.2 Create a soapUI Project and Test the API
1 Open soapUI.
2 Create a new workspace:
a Choose File|New Workspace.
b Set the workspace name to Lab 02 - QXI Schemas.
c Save the workspace file in <LabHomeDirectory>.
3 Create a new WSDL project.
a Right-click the workspace name.
b Select New soapUI Project.
c Paste the URL of wsdl page to Initial WSDL.
d Set the Project Name to QXI Schema 02.
e Click OK to create the project
4 Drill down to the Request 1 message created under the QXI Schema 02 project.
5 Right-click Request 1 and select the Clone Request option. Enter a name for the new request.
6 Edit the new request so that it can be processed by QXI.
7 Change the SOAP header:
a Set the receiver to QADERP.
b Set the sender to qxtendtrain.
c Set suppressResponseDetail to true.
8 Create the necessary session context entries:
a Create two ttContext iterations.
b Qualifier = QAD, Name = version, Value = ERP3_2.
c Qualifier = QAD, Name = domain, Value = 10USA.
Note: If you copy and paste the empty ttContext node and blank lines are created, right-click the request and select the Format XML option. soapUI will remove any blank lines and correct the indentation of the XML.
9 Edit the application data section of the message:
a The dsCustomerItem node by default will contain all the fields available when processing a Customer Item Master update. However, only a few fields are required for an transaction to process successfully. To identify the mandatory fields, run through the UI and see which fields you have to enter data for.
b Edit the XML and create a new Customer item QDoc that will be processed successfully by QXI, use the following values:
cpCust | 10C1000 |
cpCustPart | Roxy-2134-Y |
cpPart | 01010 |
cpComment | QXtend Training Customer Item |
cpCustPartd | Roxy Component |
cpCustEco | 35GY-001 |
10 Process the QDoc message that you have created in the new soapUI project and verify that the item is created successfully (in 1.16 Customer Item Maintenance).
11 Create and process a new message, and update the Customer Item created in the previous step so that the Display Customer Item (cpCustPartd) is Roxy Component 2134-Y.
12 Verify the changes in QAD EE.
13 Create and process a new message that will delete the Customer Item updated in the previous step.
14 Verify the changes in QAD EE.