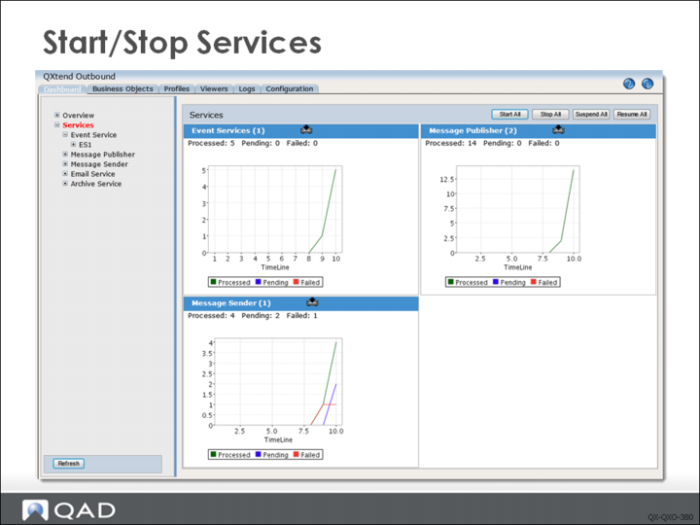
Viewing and Controlling Services
You can view services by using the QXO Dashboard. Select the Dashboard tab, and then select the Services node in the tree menu to display a summary of service types and a visual summary of their operation. You can use the Start All, Stop All, Suspend All, and Resume All buttons to control your services as required:
• Start All: Start all services if not already started.
• Stop All: Stop all services if not already stopped.
• Suspend All: Suspend all services if not already suspended.
• Resume All: Resume all services that have been suspended.
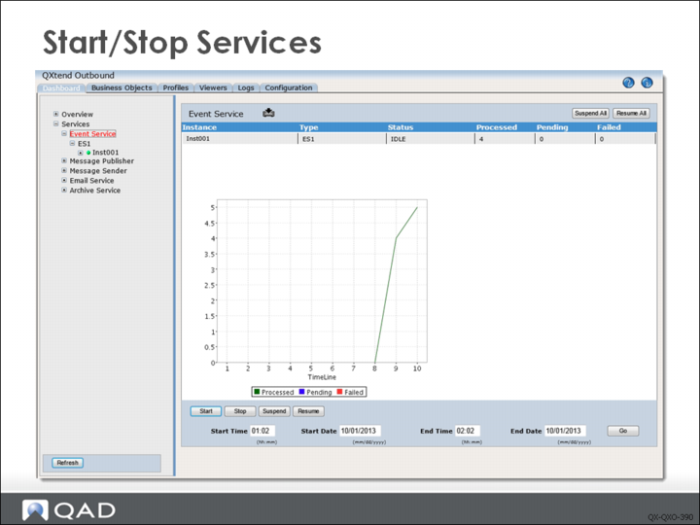
You can view the status of an individual service by selecting the name of the service type in the tree menu. The slide here shows the status of the Inst001 instance of the event service named ES1. The table at the top of the screen shows data for this service: the instance name, type, status, and the number of messages processed, pending, and failed.
Use the Start, Stop, Suspend, and Resume buttons to control the current instance of the event service.
You also can start or stop QXO services—for example, either all services or a particular service such as the Event Service or the Message Publisher—from the command line by using the session control tool. Using this tool you can shut services down cleanly as part of a scheduled backup process, and then start them again once the qxodb server is running.
The sess-control.sh file is located in the scripts directory; the control.p file is located in the src directory.
To operate services, enter the following at the command line:
./sess-control.sh {QUERY|START|STOP|SUSPEND|RESUME} {SERVICES|ES|MP|MS|SA|SB} {service-name}
where {QUERY|START|STOP|SUSPEND|RESUME} is the command you want to execute, {SERVICES|ES|MP|MS|SA|SB} specifies the service type and {service-name} is the name of the service you want to use.
For example, to start all services, enter the following:
./sess-control.sh START
To stop all services, enter the following:
./sess-control.sh STOP
For example, to start a service named ES1, you would enter the following:
./sess-control.sh START ES1
To stop the service named ES1, you would enter the following:
./sess-control.sh STOP ES1
Controlling Source Applications and Subscribers
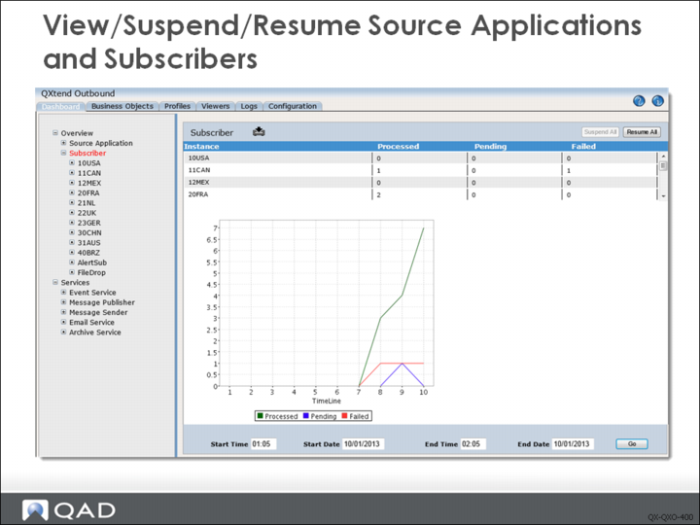
You can also monitor source applications and subscribers through the QXO Dashboard. In the Dashboard tab, select the Overview node in the tree menu and then select Source Application or Subscriber nodes to display a summary of source applications or subscribers and a visual summary of their operation. You can use the Suspend All or Resume All buttons to control them as required.
If a source application is suspended, events or messages of this source application will not be processed by any QXO services. When the source application is resumed from the suspended status, its events and messages will be processed by QXO services automatically (without restart of the services).
If a subscriber is suspended, Message Sender will not send messages to this subscriber. When the subscriber is resumed, Message Sender will resume the sending of messages to it.
From the QXO Dashboard you can also click on an individual source application or subscriber and view/suspend/resume it.
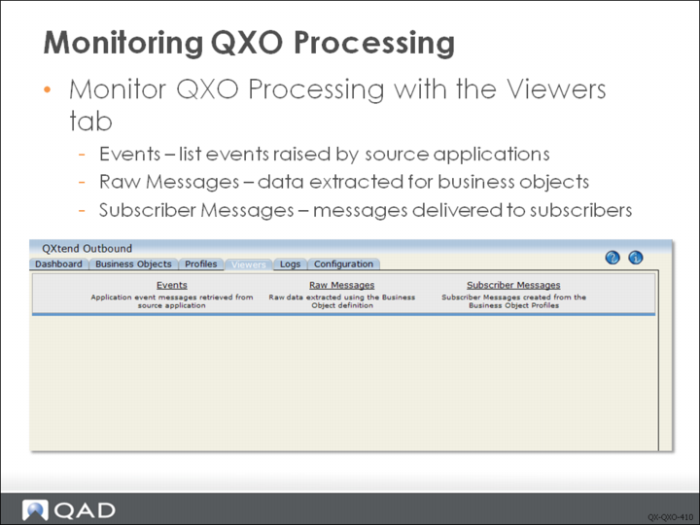
Monitoring QXO Processing
You can monitor the three phases of the QXO message lifecycle by using the three screens available from the Viewers tab:
• Events: Shows all events raised by the source applications being monitored by QXO.
• Raw Messages: Shows all event messages extracted by QXO. This view displays the raw application data extracted, shown as XML.
• Subscriber Messages: Shows all subscriber messages and their processing status. You can view the request data sent to the subscriber and any response message that is returned.
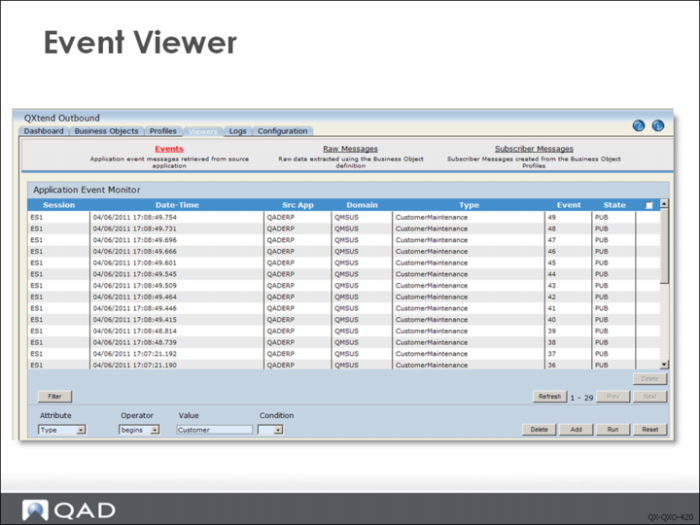
Event Viewer
The Event Viewer displays details of all events raised by source applications being monitored by QXO. You can see the event service that processed the event, the source application, the domain that raised the event, the event type and the status.
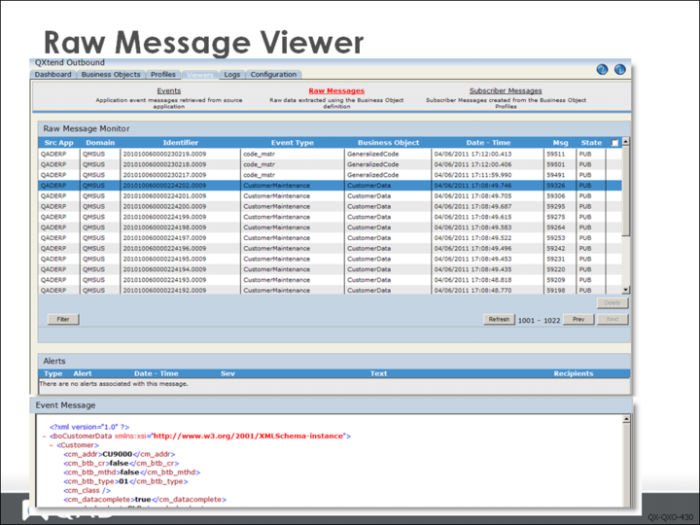
Raw Messages Viewer
The Raw Messages viewer allows you to see the event data extracted from the source application. The source application and domain are shown, as well as the unique identifier for the business object instance.
The state of the raw message indicates the current state within the publishing process. Pending messages have an empty string state value, which is used by the message publisher to identify the messages that need publishing. When the messages have been published, their state is set to PUB.
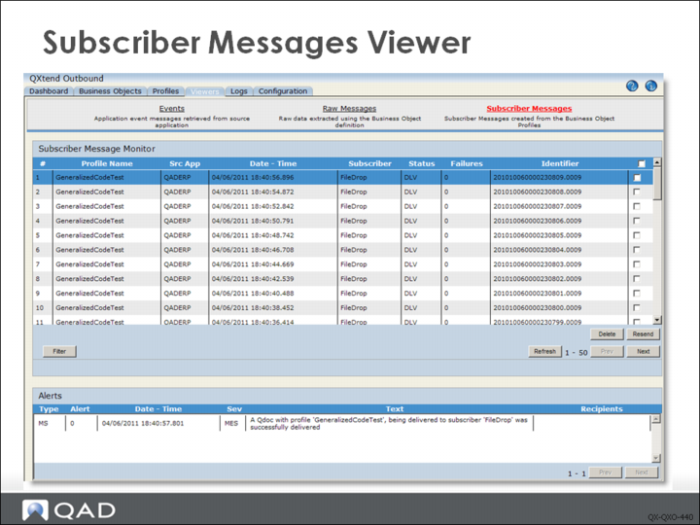
Subscriber Messages Viewer
The Subscriber Messages viewer shows all the messages for each subscriber configured within QXO, along with the message status:
• PEND: Indicates the message has not yet been delivered to the subscriber by a message sender instance.
• SOAPERR: SOAP errors are returned from the QXtend Web Service to indicate there is a problem with either the configuration of QXI or the data submitted–for example, the receiver is invalid. A SOAPERR status indicates that the request failed the initial validation stage in QXI, and that the message was rejected before being passed to the target application.
• SENDERR: Indicates that QXO could not deliver the message to the target subscriber using the current subscriber configuration. This could be caused by an invalid URL for a web service, the user does not have permission to create files in the specified directory on a file drop subscriber. Anything that prevents QXO from delivering the message will result in a SENDERR status.
• APPERR: Indicates the message was passed to the application for processing, but the business logic of the application raised an error during processing. These types of errors are errors you would expect to see if a user enters data into an application. For example, if you supply a customer number that does not exist, an APPERR error is returned.
• WRN: Indicates that the message was successfully delivered to the subscriber; however, during the processing of the request, Warning messages were raised and require investigation.
• DLV: Indicates the message was successfully delivered to the subscriber. Note that if the profile does not have a response parser associated to it, all messages are set to DLV since it is the response parser’s responsibility to read the response that is received from the target application to determine the result processing and the status to assign to the subscriber message.
• SUP: Indicates a subsequent message for this particular message instance was received before this message was delivered to the subscriber, and the Allow Superseded option on the subscriber was enabled. Effectively, this message was not delivered to the subscriber because it was superseded by a later message.
• HOLD: Indicates messages that are on HOLD have been prevented from being sent to the subscriber because an earlier message for the same data instance returned an error during the delivery phase, and the Allow Superseded option on the subscriber was not enabled. When the Allow Superseded option is not enabled, QXO deliver all messages for a particular data instance in the order in which those messages are created in QXO. If a message fails, QXtend puts current and subsequent messages on HOLD until the previous message is corrected and processed successfully.
• WAITACK: The message has been sent to the subscriber and is waiting for acknowledgement from the subscriber.
You can use the Delete button to delete a message record.
You can use Resend button to resend a message to the corresponding subscriber, no matter whether the message has been successfully sent. A resend changes the status to PEND. After delivery, the status changes to ERR or OK depending on the success of the delivery.
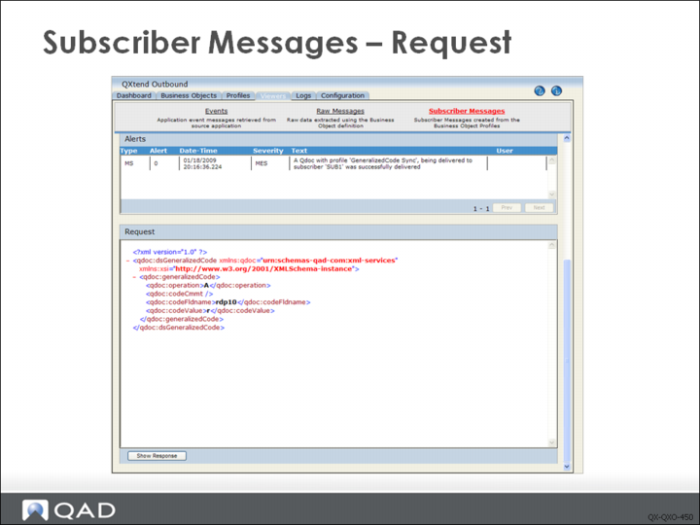
Subscriber Messages - Request
For each of the Subscriber Messages you can view the request sent to the subscriber and the response that is returned. By default the request is displayed. To view the response, click Show Response.
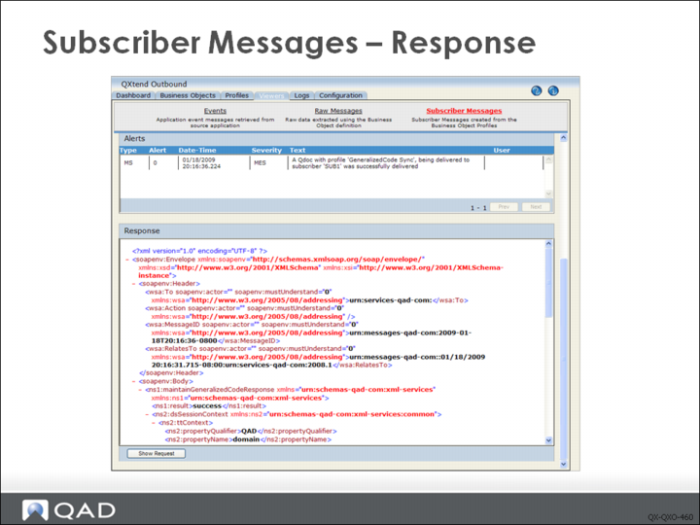
Subscriber Messages - Response
When the viewer displays the response, it shows the entire message returned by the subscriber. If the subscriber was QXI, the result tag contains the overall status of the request processing. To view the request again, click Show Request.
Lab: QXO Configuration
QAD QXtend 1.8.4 has been installed. Both QXI and QXO are available but neither has yet been configured. In this lab, we will configure QXO and process some test transactions to validate its installation and configuration.
QAD QXtend 1.8.4 has been installed with both QXI and QXO components. In the previous labs you performed the basic configuration required to enable requests to be processed by QXI. In the following lab, you will configure QXO to process data changes within the QAD Enterprise Applications. You also will configure the data synchronization of master data from a source domain to a set of target domains.
The QXO installation installs the application but does not apply any automatic default configuration. The training describes how to configure QXO to process events raised by QAD Enterprise Applications.
1. License Manager Configuration
QAD QXtend uses a License Manager to control and track QAD QXtend usage. The License Manager component is hosted with QXI, and QXO must be told where to find the QXI that hosts the License Manager it is using. The first step in configuring QXO is configuring this information.
1 Open the QXO Web application in Internet Explorer:
http://qaddemo:8080/qxo
2 Select the Configuration tab.
3 Select the Outbound Settings node in the menu tree.
4 Select the License Manager option and enter the following:
Tomcat Host | qaddemo |
Tomcat Port | 8080 |
Webapp Name | qxi |
5 Click the Save button.
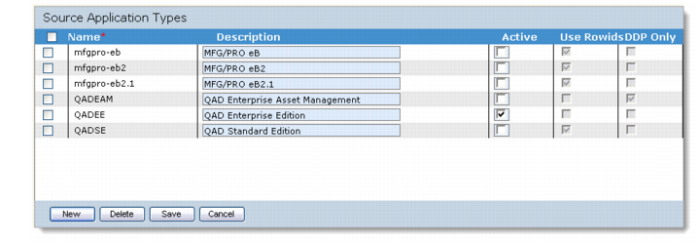
2. Source Application Types
QXO ships with several predefined source application types; by default these are all inactive. The first step in QXO configuration is to enable the source application types that the QXO instance is going to support. In this training, you will only need to support integration to QAD Enterprise Edition (QADEE).
Enable the QADEE source application type:
1 Open the QXO Web application in Internet Explorer:
http://qaddemo:8080/qxo
2 Select the Configuration tab.
3 Select the Source Applications node on the menu tree.
4 Select the Active check box for the QADEE source application type.
5 Click the Save button.
3. Source Application
The source application in QAD QXtend is conceptually similar to the receiver in QXI: it identifies a QAD application instance that will act as the source of events and data. The definition of the source application includes the database set and the types of events that can be raised.
To create a new source application instance:
1 Open the QXO Web application in Internet Explorer:
http://qaddemo:8080/qxo
2 Select the Configuration tab.
3 Select the Source Applications node on the menu tree.
4 Select QADEE.
5 Click the New button.
6 Set the name of the source application to QADERP; the name is stored in the Code field.
7 Click the Save button.
8 Expand the Source Applications - QADEE node; the new source application instance is listed. Select the QADERP source application.
Creating the source application creates a placeholder for the source application with no configuration details. To be able to use the source application, further configuration is required.
1 Select the Databases menu option from the QADERP source application menu.
2 Create a database connection for the core QAD application database:
a Click the New button.
b Set the following values:
| Name | /dr01/dbs/live/qaddb |
| ID | qaddb |
c Click the Save button.
3 Create a database connection for the core QXEvents database. This database is used by source application to register events that have been raised.
a Click the New button.
b Set the following values:
| Name | /dr01/dbs/live/qxevents |
| ID | qxevents |
c Click the Save button.
4. Load Default Business Objects and Profiles
QXO ships with approximately 130 predefined business objects for QADEE. Each of these has one or more default profiles provided. These business objects and profiles are not loaded as part of the standard QXO installation. The default business objects can be loaded one at a time or all at once, and are stored as XML files in the QXO installation.
The definition XML files are in the QXO Server installation directory. Review the business object and profile XML files:
1 Open PUTTY by using the icon on the training Windows machine Desktop.
2 Double-click the qaddemo saved session.
3 Log in as user demo-admin, password qad.
4 Change directory to the QXO Server installation directory
cd /dr01/qadapps/qea/qxtend/qxo
The boXML/QADEE directory contains the XML definitions for the QADEE business objects. Any subdirectories are used to hold the profile definitions for the business object.
To load all the business objects and profiles into QXO, do the following:
1 Open the QXO Web application in Internet Explorer:
http://qaddemo:8080/qxo
2 Select the Configuration tab.
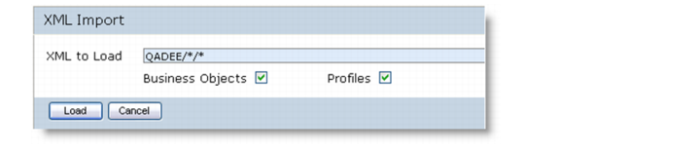
3 Select the Utilities node on the menu tree.
4 Select XML Import. The system prompts you for the XML to load in the format <AppTypeName>/BusinessObjectName>/<ProfileName>
5 To load all for QADEE, enter:
QADEE/*/*
6 Ensure that the Business Objects and Profiles check boxes are selected.
7 Click the Load button.
QXO loads all the business objects and profiles, and reports the success/failure of the operation.
5. Review Business Objects and Profiles
The previous steps in this lab loaded the default business objects and profiles that are shipped with QXO. They are loaded for a certain source application type. In your scenario they were loaded for the QADEE source application type.
To review the business objects loaded:
1 Open the QXO Web application in Internet Explorer:
http://qaddemo:8080/qxo
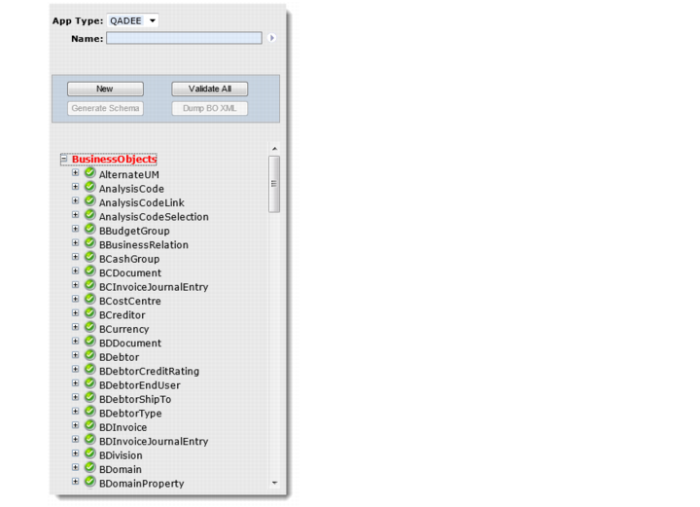
2 Select the Business Objects tab.
3 Ensure that the App Type field is set to QADEE.
4 To load the list of available business objects, click the arrow to the right of the Name field.
QXO retrieves the list of available business objects and displays them as a menu tree on the left-hand side of the page.
5 Review the Shipper business object. Expand each level in the business object and click each of the data objects. Review the details that display in the right-hand window.
Note: The labs for the business object and profile section describe this functionality in detail.
The Profiles screen follows the same interface design. Select the Profiles tab and review some profile definitions.
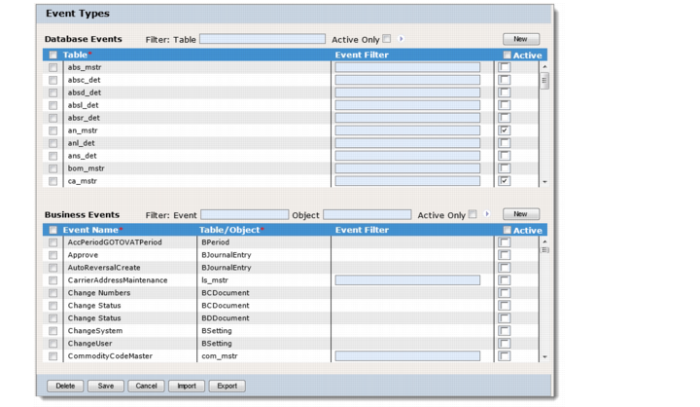
6. Load Source Application Event Types
The source application definition also includes the details of all events that can be raised. For each source application type that is defined by QXtend, QXtend provides an initial list of event types that can be imported for source applications.
To import source application event types for source application QADERP:
1 Open the QXO Web application in Internet Explorer:
http://qaddemo:8080/qxo
2 Select the Configuration tab.
3 Select the Source Applications node on the menu tree.
4 Select QADEE.
5 Select QADERP.
6 Select Event Types.
7 Click the Import button. You should see event types imported.
You will configure the active events for this source application later, but for now review the list of default events. To review the events for a source application, select the Event Types node under the source application instance in the Source Application menu tree.
7. Create QXO Services
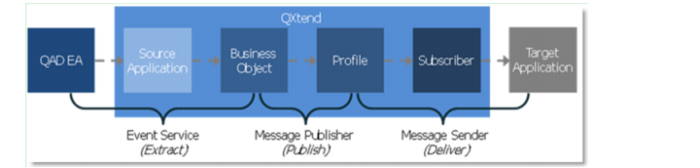
Message processing in QXO has three phases: extract, publish, and deliver. Each phase has a service that is configured to process messages through it. The event service handles the extract, the message publisher handles the publishing, and the message sender delivers the message.
7.1 Create Event Service
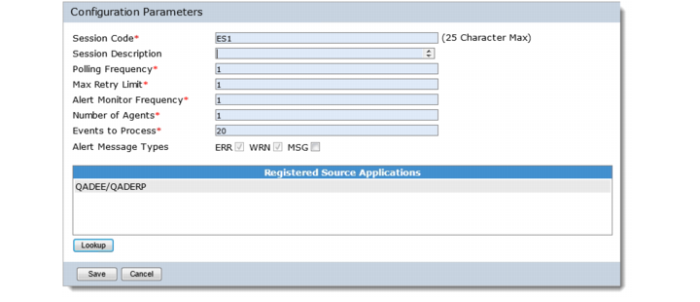
The event service connects to source applications to extract data related to specific events. To create an event service:
1 Open the QXO Web application in Internet Explorer:
http://qaddemo:8080/qxo
2 Select the Configuration tab.
3 Select the Event Service node on the menu tree.
4 Click the New button.
5 Create a new event service with the following settings:
• Session Code = ES1
• Leave all other options set to the default values.
• Register the QADERP source application with the event service. The event service instance only processes events for those source applications registered with it.
6 Click the Save button.
7.2 Create Message Publisher
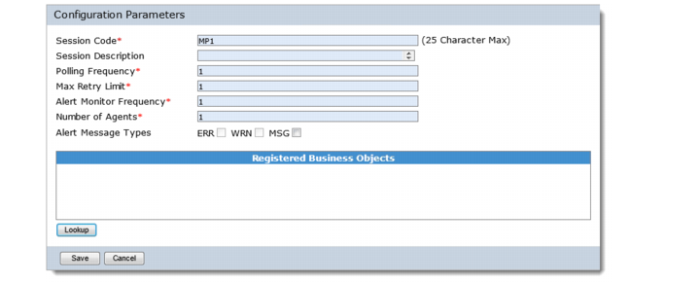
The message publisher maps the data extracted from the business objects into the format defined in each of the profiles. To create a message publisher:
1 Open the QXO Web application in Internet Explorer:
http://qaddemo:8080/qxo
2 Select the Configuration tab.
3 Select the Message Publisher node in the menu tree.
4 Click the New button.
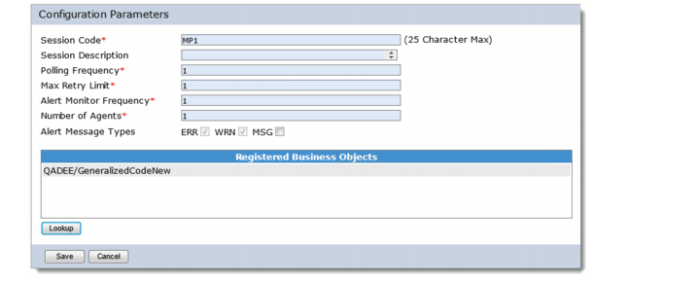
5 Create a new message publisher with the following settings:
• Session Code = MP1
• Leave all other options set to the default values.
• Do not register any business object with the publisher.
6 Click the Save button.
7.3 Create Message Sender
The message sender delivers the messages generated by the publisher to the registered subscribers. To create a message sender:
1 Open the QXO Web application in Internet Explorer:
http://qaddemo:8080/qxo
2 Select the Configuration tab.
3 Select the Message Sender node on the menu tree.
4 Click the New button.
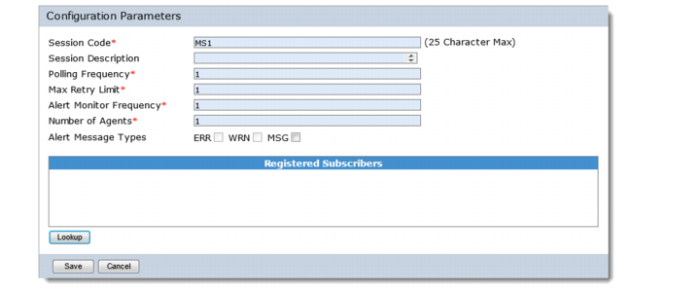
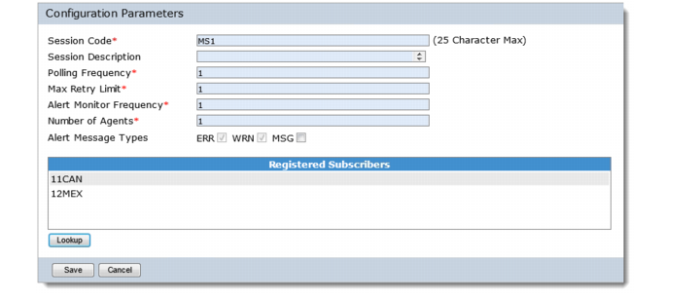
5 Create a new message sender with the following settings:
• Session Code = MS1
• Leave all other options set to the default values.
• Do not register any subscribers with the sender.
6 Click the Save button.
8. Configure Generalized Code Data Synchronization
The configuration described in Section 6 of this lab created the basic services required to process messages through the QXO message process flow. However, further configuration is required to start processing messages through QXO. The messages that can be processed by QXO are currently restricted because the license in QAD QXtend only supports automatic synchronization of master data between domains.
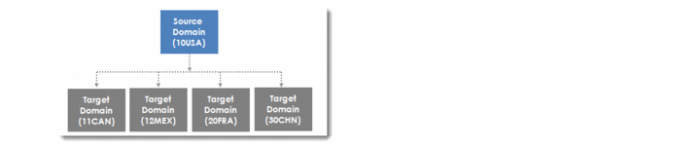
Configuring data synchronization is a straightforward task. When configuring data synchronization, you must define the domain that will maintain the master set of data. In this scenario the master domain is 10USA. The next step is to determine which domains are going to receive updates from the master domain; in this scenario the target domains are 11CAN, 12MEX, 20FRA, etc.
Finally you must identify the master data objects that you want to synchronize between from the master domain to the target domains. In this training scenario we will start by synchronizing the Generalized Codes data object.
Several configuration steps are required for the scenario above:
1 Enable QXO in QAD Enterprise Edition.
2 Enable the event type in the source application.
3 Link the business objects being published to the message publisher.
4 Define subscribers for each of the target domains.
5 Link the subscribers to the message sender.
8.1 Enable QXO in QAD Enterprise Edition
When QXO is installed in the QAD EE, the publishing of events by default is disabled, meaning that business objects are not created as data changes. To enable the creation of events, you must first enable QXO.
To enable QXO:
1 Open the QAD Enterprise Applications from the Windows Desktop.
2 Log in with user ID demo, password = qad.
3 Open the QXtend Outbound Control (36.16.19) function.
4 Ensure that the Enable QXtend Outbound check box is selected.
5 Save the changes.
8.2 Enable Event Types in QXO
The event types in QXO are maintained on the source application instance under the Event Types node on the menu tree. By default all events are not activated when QXO is installed. In the scenario you are implementing, you know you will monitor the Generalized Code event, so you must enable the code_mstr event type.
To enable the code_mstr event type:
1 Open the QXO Web application in Internet Explorer:
http://qaddemo:8080/qxo
2 Select the Configuration tab.
3 Select the Source Applications node on the menu tree.
4 Select QADEE.
5 Select the QADERP source application instance.
6 Select the Event Types option.
7 Locate code_mstr and select the Active check box.
8 In the Data Object Listening dialog, select the Listen check box for GeneralizedCodeNew/GeneralizedCode.
9 Click the Save button.
Note: Since QAD 2012 EE, a new field “Group” has been added to generalized codes. Business object GeneralizedCodeNew has this field and should be used here.
8.3 Update Message Publisher
In Section 6 you created a message publisher called MP1; this needs to be updated with the business objects that we want to publish from the source application. In this scenario we want to publish data from the Generalized Code business object. The following steps show how to configure the publisher to publish data for Generalized Codes:
1 Open the QXO Web application in Internet Explorer:
http://qaddemo:8080/qxo
2 Select the Configuration tab.
3 Select the Message Publisher node on the menu tree.
4 Select the MP1 message publisher instance on the menu tree. Click the Lookup button to register business objects with the publisher.
5 Ensure the App Type is set to QADEE.
6 Click the fetch button next to the Business Object Filter prompt to display a list of available business objects.
7 Select the QADEE/GeneralizedCodeNew business object.
8 Click the Add button.
9 Click OK to return to the publisher configuration screen.
10 Click the Save button.
8.4 Create Subscribers
The subscriber links QXO to the target applications that data is being delivered to. In the data synchronization scenario each of the target domains is a target application, so you need to create a subscriber for each of target domain.
Follow these steps to create the subscribers:
1 Open the QXO Web application in Internet Explorer:
http://qaddemo:8080/qxo
2 Select the Configuration tab.
3 Select the Subscribers node on the menu tree.
4 Click the New button.
5 To configure the subscriber, do the following:
a In the Subscriber Code field enter 11CAN.
b In the Source Domain field enter 10USA.
c Set the Communication Method to QXtend Web Service.
d Set the Subscriber Type to QAD QXtend.
e Set the XML Syntax to QDoc 1.1.
f Select the Allow Superseded check box.
g In the Tomcat Host field enter qaddemo.
h In the Tomcat Port field enter 8080.
i In the Webapp Name field enter qxi.
j In the Receiver field enter QADERP (the receiver configured in the QXI Configuration lab).
k In the Destination Domain field enter 11can (the domain to load data into).
l To register the profile messages that are sent to the subscriber, click the Register Profiles button.
m Ensure the App Type is set to QADEE.
n Click the fetch button next to the Filter prompt to display a list of available profiles.
o Select the QADEE/GeneralizedCodeNew/MaintainGeneralizedCode profile.
p Click the Add button.
q Click OK to return to the subscriber configuration screen.
r Click the Save button.
6 Repeat Steps 4 and 5 for the 12MEX domain. Ensure that the destination domain is set to the target domain being processed.
You have now created all the subscribers required for the scenario.
8.5 Add Subscribers to Message Sender
Now you assign the subscribers created in Step 7.4 to the message sender. A message sender instance will only deliver messages to subscribers that are registered with it.
To register subscribers with the message sender:
1 Open the QXO Web application in Internet Explorer:
http://qaddemo:8080/qxo
2 Select the Configuration tab.
3 Select the Message Sender node on the menu tree.
4 Select the MS1 message publisher instance in the menu tree.
5 Click the Lookup button to register subscribers with the sender.
6 Select 11CAN and 12MEX from the Registered Subscribers list.
7 Click the Add button.
8 Click OK to return to the publisher configuration screen.
9 Click the Save button.
9. QXI Receiver Configuration
The maintainGeneralizedCode profile that the subscribers are configured to receive generates a maintainGeneralizedCode QDoc with the version ERP3_1. The QADERP receiver that is configured in QXI must have this API enabled in order for messages to be successfully processed from QXO to QXI; otherwise, the messages will fail with a QDoc not supported error.
Using the process used in the QXI Configuration lab, add support for the maintainGeneralizedCode-ERP3_1 API to the QADERP receiver.
10. Start the QXO Services
QAD QXtend Outbound is now configured to perform data synchronization of Generalized Code data from the 10USA domain to the other domains configured in QADEE. However, before you start to synchronize data between domains we need to make sure that all of the QXO services are running.
To start the QXO Services:
1 Open the QXO Web application in Internet Explorer:
http://qaddemo:8080/qxo
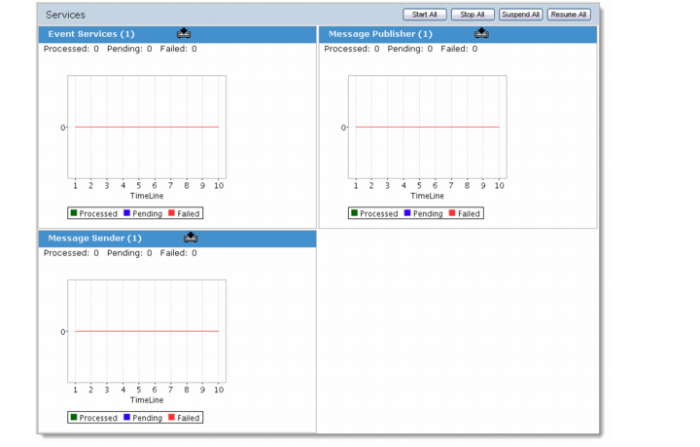
2 Select the Dashboard tab.
3 Select the Services node on the menu tree.
4 Click the Start All button to start the QXO services. The number shown on the graphs next to each of the services should change from 0 to 1.
11. Test the Data Synchronization Configuration
Now that we have finished configuring QXO and QXI, you can now create a new Generalized Code in the 10USA domain.
11.1 Create New Generalized Code
1 Open the QAD Enterprise Applications from the Windows Desktop.
2 Log in with user id = demo, password = qad.
3 Open the Generalized Codes Maintenance function (36.2.13).
4 Check the generalized codes in the target domains (11CAN and 12MEX).
5 Create a new generalized code entry in the 10USA domain that is not present in any of the target domains.
11.2 Check QXO Viewers
Once the new Generalized Code has been created, QXO will pick up the event and move it through the message lifecycle of QXO. To validate that the message has been picked up and passed to the target domains, follow these steps:
1 Open the QXO Web application in Internet Explorer:
http://qaddemo:8080/qxo
2 Select the Viewers tab.
3 Select the Subscriber Messages view.
4 You should see two Generalized Code Sync messages that have been delivered to the target domains.
5 In the Subscriber Messages view, examine the details of the request message sent to each subscriber. Also examine the response message that is returned.
11.3 Check Target Domains
Verify the new Generalized Code has been populated into each of the target domains.
11.4 Data Synchronization Delete
1 Modify the comments field of the Generalized code that was created in 10.1.
2 Verify the messages were generated and processed in QXO.
3 Verify the data in target domains has been modified