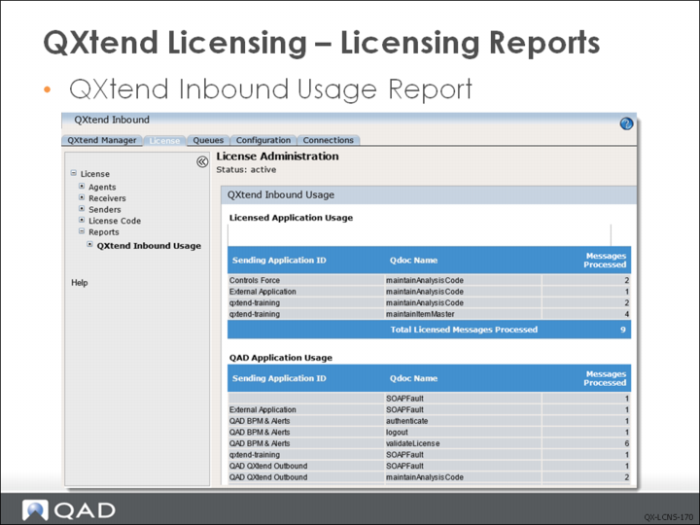
Licensing Reports
The QXtend Inbound Usage report displays the number of messages processed through QXI. The report indicates which messages originated from licensed applications and which are free QAD messages.
Exercise: QXtend Licensing
The following list shows a number of key concepts used in licensing in QXtend. In each statement below, fill in the correct term from the list.
License code | QXtend Inbound Usage Report |
License Manager | QAD & Approved QAD Partner Free Use |
Message-based | Receivers and agents |
Exception | Free |
Not free | |
1 In order for QXtend to communicate with other products, a ______ issued by QAD must be submitted.
2 A license code encodes the number of ______ that are available for each QXtend installation.
3 QXtend has three types of license: standard, enterprise, and ______.
4 When QXtend is first installed, it defaults to a ______ license.
5 The ______ controls the release of receivers and agents; it also lets you limit the number of licensed agents, monitor the release of licenses, and track the number of receivers in use.
6 If, during the processing of a QDoc, there is no agent available, the system returns an ______ and processing stops for that QDoc.
7 ______ allows you to monitor messages processed.
8 Transactions from QAD EAM to QADEE through QXtend are ______; data synchronization between QADEE and third party product through QXtend are ______.
Lab: QAD QXtend Licensing
QAD QXtend 1.8.4 has been installed with both QXI and QXO components. In the previous labs you performed the basic configuration that is required to enable requests to be processed by QXI and QXO. In the following lab exercises you will see the impact of the different QAD QXtend licenses on the processing within QAD QXtend.
<LabHomeDirectory> = C:\QXtendTraining\Labs\04-Licensing\
The QAD QXtend instance you have been using for the labs so far does not have a specific license installed. When no license is installed, you get the default license "QAD & Approved QAD Partner Free Use", which restricts the types of transactions that can be processed. The following lab will show these restrictions, describe how to install new licenses, and explain the configuration that is required depending on the license type.
1. License Exceptions
In the previous lab exercises you could process requests to QXI without receiving any exceptions. No exceptions were encountered because of the sender ID qxtendtrain that has been used on each of the requests. This sender ID is valid within QAD QXtend and allows any messages to be processed. If we process requests without a sender ID, license exceptions will be returned when processing the requests.
1.1 QXI Licensing Exception
Create a new soapUI Workspace and soapUI.
1 Open soapUI on the Windows image, use the shortcut on the Desktop.
2 Create a new workspace
a File – New Workspace.
b Set the workspace name to Lab 04 – Licensing.
c Save the workspace file in <LabHomeDirectory>.
3 Create a new WSDL project.
a Right-click the workspace name.
b Select the New soapUI Project.
c Set the project name to Licensing 04.
d Set the WSDL file to:
<LabHomeDirectory>/Schemas/maintainCustomerItem-ERP3_2.wsdl
e Click OK to create the project.
4 Drill down to the Request 1 message created under the Licensing 04 project.
5 Right-click Request 1 and select the Clone Request option. Enter a name for the new request.
6 Edit the new request so that it can be processed by QXI. Change the SOAP header:
a Set the receiver to QADERP.
b Leave the Sender ID blank.
c Set suppressResponseDetail to true.
7 Create the necessary session context entries:
a Create two ttContext iterations.
b Qualifier = QAD, Name = version, Value = ERP3_2.
c Qualifier = QAD, Name = domain, Value = 10USA.
Note: If you copy and paste the empty ttContext node and blank lines are created, right-click the request and select the Format XML option. soapUI will remove any blank lines and correct the indentation of the XML.
8 Edit the application data section of the message:
a The dsCustomerItem node by default will contain all the fields available when processing a Customer Item Master update. However, only a few fields are required for a transaction to process successfully. The best way to identify the mandatory fields is to run through the UI and see which fields you have to enter data for.
b Edit the XML and create a new Customer item QDoc that will be processed successfully by QXI. Use the following values:
| cpCust | 10C1000 |
| cpCustPart | SC-2134-Y |
| cpPart | 01010 |
| cpComment | QXtend Training Customer Item |
| cpCustPartd | Standard Connector |
| cpCustEco | 35GY-001 |
9 Process the QDoc message that you have created in the new soapUI project.
10 Review the response. You will see that a licensing exception was returned by QXI. The exception should be QXtend is not licensed for this type of QDoc Message.
2. Standard License Type
The standard QAD QXtend license restricts the number of receivers and agents available to QAD QXtend to process transaction from external systems.
2.1 Load Standard License Code
The license codes that are delivered for QAD QXtend have data encoded in them that controls the number of agents and receivers that are available for that customer.
Load a QAD QXtend license code:
1 Open the QXI Web application in Internet Explorer:
http://qaddemo:8080/qxi
2 Select the License tab.
3 Select the License node on the menu tree.
4 Select the License Code option. You will see License Type: QAD & Approved QAD Partner Free Use.
5 In the License Code Entry field, enter the license code (type is standard) from the License.txt file on the Windows Desktop.
6 Click the Submit button.
7 Select the License tab.
8 Select the License node on the menu tree.
9 Select the License Code option. You will see License Type: Standard.
Reprocess the transaction created in soapUI in Section 1.1
1 Reprocess the request. A different exception is received:
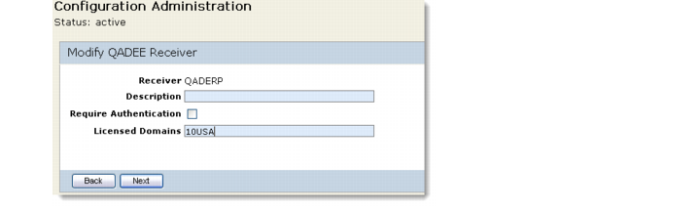
No Domain in this Receiver is licensed.
2 Each Receiver must maintain a list of domains that can process licensed transactions.
a Open the QXI Web application in Internet Explorer:
http://qaddemo:8080/qxi
b Select the Configuration tab.
c Select the Receivers node on the menu tree.
d Select the QADEE option.
e Select the check box for the QADERP receiver.
f Click the Modify button.
g Select the Continue Configuration update without suspending QXtend Inbound option and click the Submit button.
h Enter 10USA into the Licensed Domains field and click the Next button.
Reprocess the transaction created in soapUI in section 1.1
1 Reprocess the request. This time the request processes successfully.
2 Validate that the transaction has been processed and that the customer item has been created.
3. QXO Licensing
Certain messages processed by QAD QXtend are processed free of charge and do not require a license code:
• When the subscriber type is QAD QXtend. In this case, sending messages from QXO to QXI is considered a free operation and thus not restricted by the number of licensed agents.
• When other (valid) applications are registered in QXI. In this case, messages can be sent to a Web service or file drop.
Every file drop/standard Web service subscriber that is created is included in the receiver count, and each message sender agent consumes a licensed agent.
Add a File Drop Subscriber to QXO
1 Open the QXO Web application in Internet Explorer:
http://qaddemo:8080/qxo
2 Select the Configuration tab.
3 Select the Subscribers node on the menu tree.
4 Click the New button.
5 Use the following values for the subscriber configuration:
Subscriber Code | FileDrop |
Source Domain | 10USA |
Select the Allow Superseded check box | |
Communication Method | File Directory Service |
XML Syntax | QDoc 1.1 |
Target Directory | /dr01/temp/qdocs |
a Do not select the Include Soap Envelope check box.
b To register the profile messages that are sent to the subscriber, click the Register Profiles button.
c Ensure the App Type is set to QADEE.
d Select the fetch button next to the Filter prompt to get a list of the available profiles.
e Select the QADEE/GeneralizedCodeNew/GeneralizedCode profile.
f Click the Add button.
g Click OK to return to the subscriber configuration screen.
h Click the Save button.
Create a new message sender and add the FileDrop subscriber to the Message Sender MS2:
1 Open the QXO Web application in Internet Explorer:
http://qaddemo:8080/qxo
2 Select the Configuration tab.
3 Select the Message Sender node on the menu tree.
4 Click the New button.
5 Call the Message Sender MS2.
6 Click the Lookup button to register subscribers with the sender.
7 Select the FileDrop subscriber from the list.
8 Click the Add button.
9 Click OK to return to the sender configuration screen.
10 Click the Save button.
To see the effect of the changes, the QXO services need to be restarted
1 Open the QXO Web application in Internet Explorer:
http://qaddemo:8080/qxo
2 Select the Dashboard tab.
3 Select the Services node on the menu tree.
4 Click the Stop All button to stop all QXO services.
5 Click the Start All button to start all QXO services.
4. Monitoring License Usage
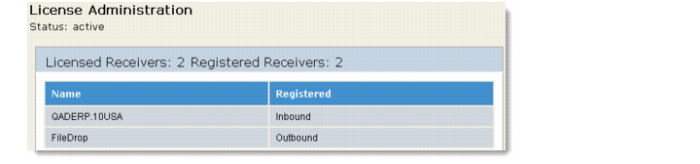
The License pages of QXI allow you to monitor the use of agents and receivers:
1 Open the QXI Web application in Internet Explorer:
http://qaddemo:8080/qxi
2 Select the License tab.
3 Select the License node on the menu tree.
4 Select the Receivers option. The number of receivers currently used is displayed and where they are registered (QXI or QXO).
5 Select the Agents option to see how many agents are currently busy.
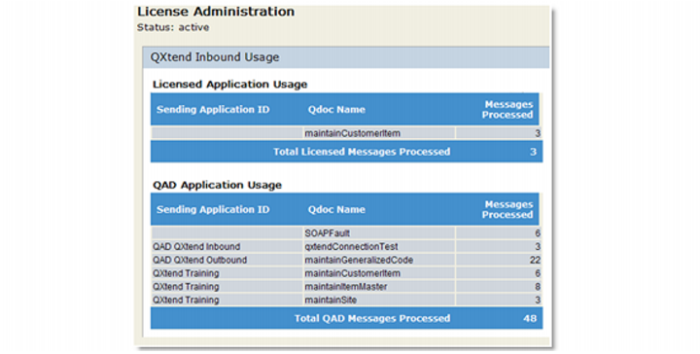
QAD QXtend Inbound and Outbound both track the number of messages that have been processed. In QXI you can view the number of messages that have been processed by:
1 Open the QXI Web application in Internet Explorer:
http://qaddemo:8080/qxi
2 Select the License tab.
3 Select the Reports tab.
4 Select the QXtend Inbound Usage option.
5 Click the Get Usage button. The transaction count for messages processed displays.
5. QAD QXtend Enterprise License
The Enterprise license type allows you to process requests without restrictions through QXI and QXO. With the Enterprise license there is no need to configure the list of licensed domains because the number of receivers being used and the number of agents does not have to be tracked.
5.1 Process Test Request
With the standard license, process a request to the 11CAN domain without adding the domain to the list of licensed domains.
1 Right-click the request created in Section 3 and select the Clone Request option. Enter a name for the new request.
2 Edit the new request so that it can be processed by QXI. Change the SOAP header:
a Set the receiver to be QADERP.
b Leave the Sender ID blank.
c Set suppressResponseDetail to true.
3 Create the necessary session context entries:
a Create two ttContext iterations.
b Qualifier = QAD, Name = version, Value = ERP3_1.
c Qualifier = QAD, Name = domain, Value = 11CAN.
Note: If you copy and paste the empty ttContext node and blank lines are created, right-click the request and select the Format XML option. soapUI will remove any blank lines and correct the indentation of the XML.
4 Edit the application data section of the message:
a The dsCustomerItem node by default will contain all the fields available when processing a Customer Item Master update. However, only a few fields are required for an transaction to process successfully. The best way to identify the mandatory fields is to run through the UI and see which fields you have to enter data for.
b Edit the XML and create a new Customer item QDoc that will be processed successfully by QXI, use the following values:
cpCust | 10C1000 |
cpCustPart | 2134-Y |
cpPart | 01010 |
cpComment | QXtend Training Customer Item |
cpCustPartd | Standard Connector |
cpCustEco | 35GY-001 |
5 Process the request from soapUI. The response returned has this licensing error:
Request’s domain is not in receiver’s licensed domain list
5.2 Load Enterprise License Code
The license codes delivered for QAD QXtend have data encoded in them that controls the number of agents and receivers that are available for that customer.
To load a QAD QXtend license code:
1 Open the QXI Web application in Internet Explorer:
http://qaddemo:8080/qxi
2 Select the License tab.
3 Select the License node on the menu tree.
4 Select the License Code option. The indicator License Type: Standard is displayed.
5 In the License Code Entry field enter the license code (type is Enterprise) from the License.txt file on the Windows Desktop, and click the Submit button.
6 Select the License tab.
7 Select the License node on the menu tree.
8 Select the License Code option. The indicator License Type: Enterprise is displayed.
5.3 Process Test Request
Now that you have loaded an Enterprise type license, there are no restrictions on the types of messages that can be processed. You can process a request to any domain without receiving any licensing exceptions. The QADERP receiver currently only has the 10USA domain listed as a licensed domain. You will now reprocess the Customer Item create message from Step 5.1.
1 Process the create Customer Item message used in step 5.1 using soapUI. QXI successfully processes the message and returns a Success message.
2 Verify that the new Customer item has been created in the 11CAN domain.