Modify and Delete Examples
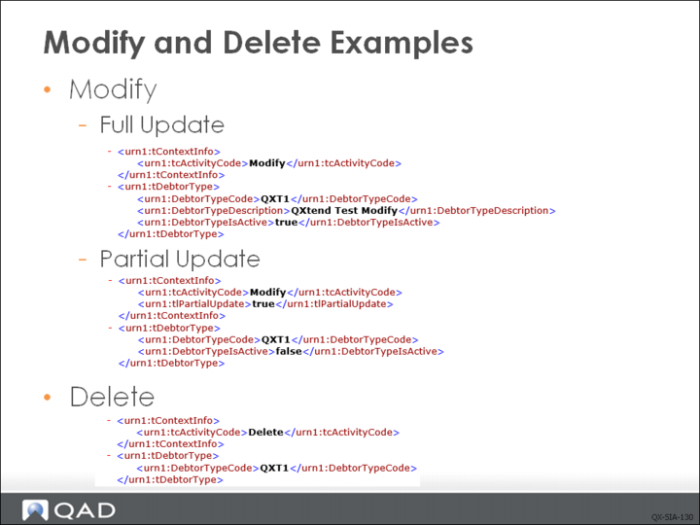
Performing a modification requires a similar request message as the create transaction but tcActivityCode must be set to Modify. If processing a delete, set it to “Delete”.
Empty nodes in the Financial API behave differently according to whether a “Create” action or a Modify action is being performed—it is crucial that you understand the difference:
• In a create message, omitted nodes are assigned a default value.
• In a modify message, if Partial Update is not set or set to false, the value in the application is overwritten with a blank value.
• In a modify message, if Partial Update is set to true, the value in the application will not be changed.
Therefore, when processing an update, if Partial Update is not set or set to false, make sure that all nodes are included in the request QDoc to prevent application data from being overwritten mistakenly. If Partial Update is set to true, you can only provide the primary key fields and the fields that need to be changed.
In the Partial Update case, if you do not set tlPartialUpdate to true, system will return error:
<ns3:tt_msg_desc>You must enter this field. Internal message type (E) - severity(3)</ns3:tt_msg_desc>
<ns3:tt_msg_field>Description (tDebtorType.DebtorTypeDescription)</ns3:tt_msg_field>
Since the program will try to update DebtorTypeDescription with a blank value but it is not accepted.
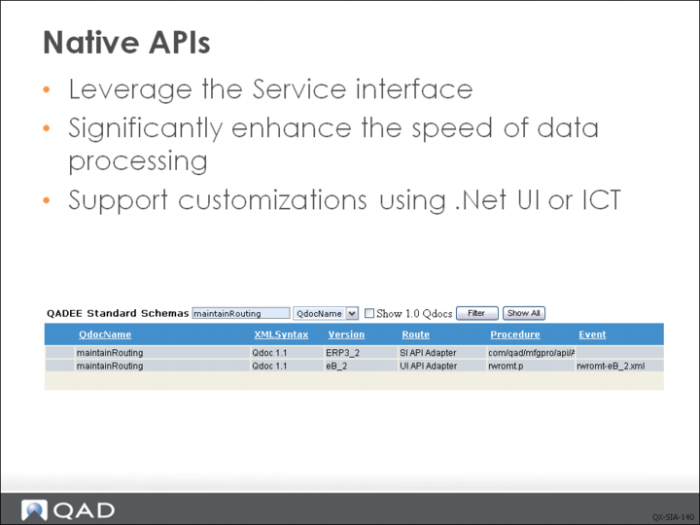
The UI API adapter is the primary method used by QXI to load data into QAD applications. However, UI API adapter performance may be unacceptable when processing high volumes of data or real-time transactions.
You can use native APIs to leverage the SI interface and significantly enhance the speed of data processing. Native APIs provide a set of development patterns that can be used to wrapper existing character screens and execute the underlying business logic independent of the user interface, resulting in faster processing. Bulk loads can be performed faster, which is particularly useful when processing large business objects such as Item and Product Structure.
To use Native APIs, you need to set up the SIAPI connection pool and connect to Native API AppServer. Also, you need to use the APIs with Route “SI API Adaptor”. A Native API can have the same name as UIAPI but different version number.
Native APIs are available from the QAD QXtend 1.6 version; they are not available in earlier versions.
The Navtive API framework now supports customizations using either the .NET UI or the Integration Customization Toolkit (ICT). The framework supports features such as default values, disabled fields, custom validations, additional fields and frames, shadow tables, and custom programs.
For details on Native APIs, see User Guide: QAD QXtend.
Exercise: Service Interface Layer
The following list shows a number of key terms and concepts for the service interface layer and service interface adapter. In each statement below, fill in the correct term from the list.
OpenEdge AppServer | host |
port | business logic |
blank | default value |
service oriented architecture (SOA) | AppServer |
telnet connection | SI API adaptor |
Fin API adaptor | |
1 The SI enables the development of applications that follow ______ design principles.
2 APIs provided via the SIAPI are pure ______ and do not depend on the UI.
3 In the UI API, messages are processed via a ______. In the SI API, messages are processed using an ______.
4 When configuring an SI API connection pool, you need to provide the name of the ______, the ______, and the ______ number.
5 In a create message, omitted nodes are assigned a ____. In a modify message the value in the application is overwritten with a ______ value.
6 For QAD Enterprise Application, the ______ calls Financials AppServer (only available in QADEE) and ______ calls Native API AppServer (available in both QADSE and QADEE).
Lab: Service Interface Layer
QAD QXtend 1.8.4 has been installed with both QXI and QXO components. In the previous labs you performed the basic configuration that is required to enable requests to be processed by QXI and QXO. In the following lab exercises you will see how to use APIs that are implemented with the service interface. For our exercises you will use some of the QADEE Financials APIs.
<LabHomeDirectory> = C:\QXtendTraining\Labs\08-ServiceInterface\
1. Fin API
1.1 Create Fin API Connection Pool
So far you have exclusively used the UI API adapter to process requests. The UI API adapter connection pool establishes a telnet connection and cannot be used to execute service interface APIs. Instead you need to create a new SI or Fin API connection pool. The new connection pool can be assigned to the same receiver as it is a different type.
1.1.1 Create New Connection Pool
Create an Fin API connection pool for the QADERP receiver:
1 Open the QXI Web application in Internet Explorer: http://qaddemo:8080/qxi
2 Select the Connections tab.
3 Expand the Add Connection Pool menu.
4 Select the Add FinAPI Pool option.
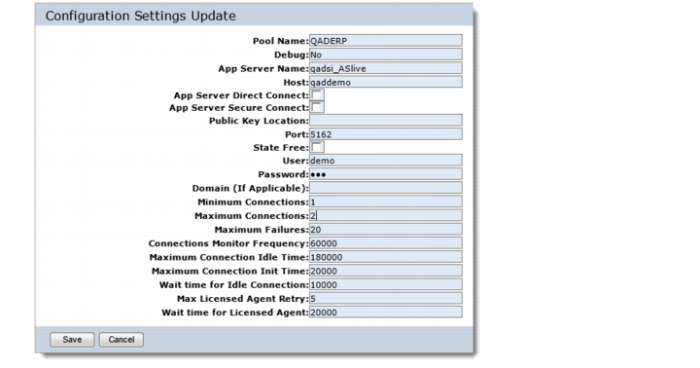
5 Set the following values:
Pool Name = QADERP (must be identical to receiver name created in the previous step)
App Server Name = qadfinlive
Host = qaddemo
Port (NameServer): 5162
User = demo
Password = qad
Domain = 10USA (this is only the default domain, the domain can be passed with the request and will override this value on when processing the request).
Minimum Connections = 1
Maximum Connections = 2
6 Click the Save button to create the new connection pool.
1.1.2 Validate New Connection Pool
Now you need to check your configuration is correct and that you have idle sessions available.
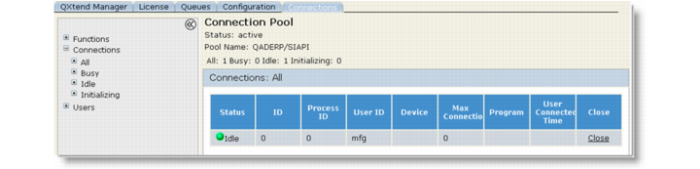
1 Open the QXI Web application in Internet Explorer: http://qaddemo:8080/qxi
2 Select the Connections tab.
3 Expand the View Connection Pool menu.
4 Select the QADERP.FinAPI option from the menu.
5 Expand the Connections menu and select the All option.
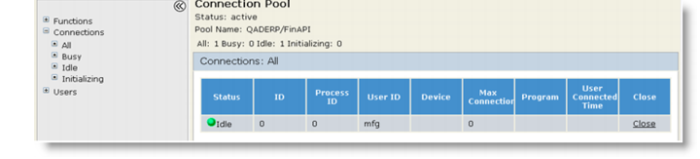
You should see the connection pool with a single idle connection as shown below. If there are no idle sessions, your configuration is incorrect.
1.2. Deploy Financials API to QXI
The API that we are going to use for the lab is the Debtor Type API or Customer Type. This is a simple API and covers the basics of how Financials APIs are used by QAD QXtend. The Debtor Type API is one of the APIs that is installed with QXI, so you can simply add this API to the receiver. However, in this lab, let's try to manually add this API as a custom API. This applies to all APIs that are not installed with QXI.
Deploy the new Schema to QAD QXtend Inbound as a Custom schema
1 Open the QXI Web application in Internet Explorer: http://qaddemo:8080/qxi
2 Select the Configuration tab.
3 Select the Schemas node in the menu tree.
4 Select QADEE from the Schemas menu.
5 Click the Add button.
6 Choose the Continue Configuration update without suspending QXtend Inbound option and click the Submit button.
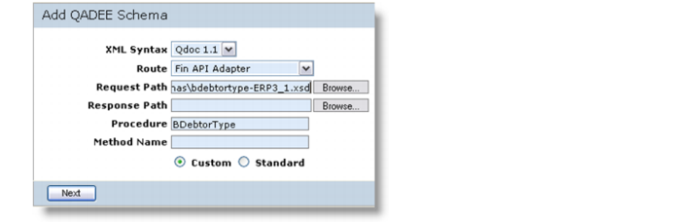
7 Set the following values:
XML Syntax = Qdoc 1.1
Route = Fin API Adapter
Request Path = <LabHomeDirectory>\Schemas\bdebtortype-ERP3_1.xsd
Procedure = BDebtorType
8 Deploy this API as a custom API.
9 Click the Next button.
10 Add the API to the QADERP receiver by selecting the check box and clicking the Done button.
1.3 Test the New API
The Debtor Type API has now been successfully deployed to QAD QXtend Inbound. However, until the new version has been used to process a couple of transactions, you cannot be sure that everything has been uploaded correctly.
The best way to test a QAD QXtend API is by using the soapUI product to build a WSDL Project and create some requests and process those requests using soapUI.
Locate the WSDL page first.
1 Open the QXI Web application wsdl page in Internet Explorer:
http://qaddemo:8080/qxi/wsdl
2 Select QADEE from the list of modules.
3 Select receiver QADERP.
4 Click on Yes link at the right of bdebtortype (ERP3_1).
5 Copy the URL of the WSDL page.
Create the soapUI project.
1 Open soapUI on the Windows image using the shortcut on the Desktop.
2 Create a new workspace.
a File – New Workspace.
b Set the workspace name to Lab 08 – Service Interface.
c Save the workspace file in <LabHomeDirectory>.
3 Create a new WSDL Project.
a Right-click the workspace name.
b Select the New soapUI Project option.
c Paste the URL of WSDL page to Initial WSDL
d Set the project name to Service Interface 08 - FinAPI.
e Click OK to create the project.
1.3.1 Process a Create Transaction
Create a new Debtor Type in QAD EE
1 Drill down to the Request 1 message created under the Service Interface 08 project.
2 Right click Request 1 and select the Clone Request option. Enter a name for the new request.
3 Edit the new request so that it can be processed by QXI.
4 Change SOAP header:
a Set the receiver to QADERP.
b Set suppressResponseDetail to true.
5 Create the necessary session context entries. Create three ttContext iterations:
c Qualifier = QAD, Name = version, Value = ERP3_1
d Qualifier = QAD, Name = entity, Value = 10USACO
e Qualifier = QAD, Name = action, Value = save
Note: If you copy and paste the empty ttContext node and blank lines are created, right-click the request and select the Format XML option, soapUI will remove any blank lines and correct the indentation of the XML.
6 Edit the application data section of the message:
a The BDebtorType node by default will contain all of the fields available when processing a Debtor Type transaction. However, only a few fields are required for a transaction to process successfully. The best way to identify the mandatory fields is to run through the UI and see which fields you have to enter data for.
b Edit the tContextInfo:
• Remove all nodes except tcActivityCcode.
• You are creating a new Debtor Type so set the tcActivityCode = Create.
c Edit the tDebtorType information:
• Remove all nodes except DebtorTypeCode, DebtorTypeDescription and DebtorTypeIsActive. When processing a create using a Financials API, any values not provided in the request message will be defaulted.
• Set the following node values:
DebtorTypeCode = QXT1
DebtorTypeDescription = QXtend Training Type
DebtorTypeIsActive = true
• Remove tTransString, tCustomTable0, tCustomTable1, and tCustomTable2.
7 Process the QDoc message that you have created in the new soapUI project and verify that the Debtor Type (Customer Type) is created successfully.
1.3.2 Process an Update Transaction
When QAD QXtend processes update transactions for a Financials API, if tlPartialUpdate in tContextInfo is set to false, then the request must contain all of the fields on the object that contain data-not just the fields required for the update to succeed. If a data element for the object is not included in the XML request to QAD QXtend, the Financials API will remove any data that was present in that field; this is also true of child iterations. For example, if a business relation has five addresses but you send in an XML with only one address defined, the other four addresses will be deleted. You must supply the full object and all data.
If tlPartialUpdate is set to ture, then the request can only contain fields that required for the update (include the fields in primary key and fields need to be updated). The Financials API will keep original values for the fields that are not contained in the request.
To demonstrate this, you will modify the Debtor Type you created in Step 1.3.1:
1 Right-click the request created in Step 1.3.1 and select the Clone Request option. Enter a name for the new request.
2 Edit the application data section of the message:
a The BDebtorType node by default will contain all the fields available when processing a Debtor Type transaction. However, only a few fields are required for a transaction to process successfully. The best way to identify the mandatory fields is to run through the UI and see which fields you have to enter data for.
b Edit the tContextInfo.
Remove all nodes except tcActivityCcode and tlPartialUpdate.
You are modifying an existing Debtor Type so set tcActivityCode = Modify
Set tlPartialUpdate to true.
c Edit the tDebtorType information (change it from active to inactive).
Remove all nodes except DebtorTypeCode and DebtorTypeIsActive. When processing a create using a Financials API, original values for the fields that not provided in the request message will be kept.
Set the following node values:
| DebtorTypeCode | QXT1 |
| DebtorTypeIsActive | false |
3 Process the QDoc message that you have created in soapUI and verify that update in QAD EE.
1.3.3 Process a Delete Transaction
To create a delete request message:
1 Right-click the request created in Step 1.3.2 and select the Clone Request option. Enter a name for the new request.
2 Edit the application data section of the message: edit the tContextInfo and set the tcActivityCode to Delete.
3 Process the QDoc message that you have created in the new soapUI and verify that update in QAD EE.
2. SI API
2.1 Create SI API Connection Pool
The FinAPI adapter connection pool establishes a connection to the Financials AppServer. Now we are going to create a SIAPI adapter which establishes a connection to the Native API AppServer. The new connection pool can be assigned to the same receiver as it is a different type.
2.1.1 Create New Connection Pool
Create an SI API connection pool for the QADERP receiver:
1 Open the QXI Web application in Internet Explorer: http://qaddemo:8080/qxi
2 Select the Connections tab.
3 Expand the Add Connection Pool menu.
4 Select the Add SIAPI Pool option.
5 Set the following values:
Pool Name = QADERP (must be identical to receiver name created in the previous step)
App Server Name = qadsi_ASlive
Host = qaddemo
Port (NameServer): 5162
User = demo
Password = qad
Domain = 10USA (this is only the default domain, the domain can be passed with the request and will override this value on when processing the request).
Minimum Connections = 1
Maximum Connections = 2
6 Click the Save button to create the new connection pool.
2.1.2 Validate New Connection Pool
Now you need to check your configuration is correct and that you have idle sessions available.
1 Open the QXI Web application in Internet Explorer: http://qaddemo:8080/qxi
2 Select the Connections tab.
3 Expand the View Connection Pool menu.
4 Select the QADERP.SIAPI option from the menu.
5 Expand the Connections menu and select the All option.
You should see the connection pool with a single idle connection as shown below. If there are no idle sessions, your configuration is incorrect.
2.2. Adding APIs to a Receiver
Now we add maintainRouting SIAPI (which was shipped with QXtend) to QADERP receiver.
1 Open the QXI Web application in Internet Explorer:
http://qaddemo:8080/qxi
2 Select the Configuration tab.
3 Select the Receivers node on the menu tree.
4 Select QADEE from the list of receivers.
5 Select the check box next to the QADERP receiver.
6 Click the Modify button.
7 Choose the Continue Configuration update without suspending QXtend Inbound option and click the Submit button.
8 Click the Next button.
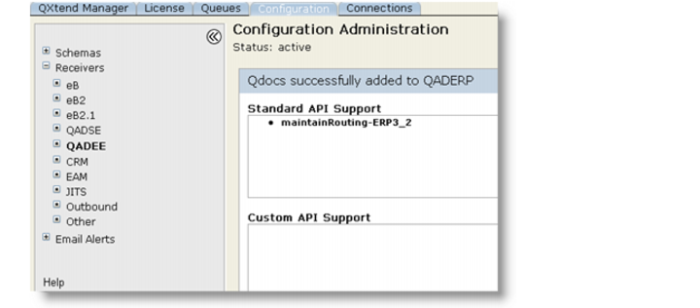
9 Click the Add QDoc button.
10 Locate the maintainRouting API and select the check box for the ERP3_2 version that uses the QDoc 1.1 XML syntax.
11 Click the Finish button. The receiver update report displays.
2.3 Test the New API
The Routing API has now been successfully added to QADERP receiver. However, until the new version has been used to process a couple of transactions, you cannot be sure that everything has been uploaded correctly.
The best way to test a QAD QXtend API is by using the soapUI product to build a WSDL Project and create some requests and process those requests using soapUI.
Locate the WSDL page first.
1 Open the QXI Web application wsdl page in Internet Explorer:
http://qaddemo:8080/qxi/wsdl
2 Select QADEE from the list of modules.
3 Select receiver QADERP.
4 Click on Yes link at the right of maintainRouting (ERP3_2).
5 Copy the URL of the WSDL page.
Create a soapUI project
1 Open soapUI on the Windows image using the shortcut on the Desktop.
2 Open file Lab 08 - Service Interface.
3 Create a new WSDL Project.
a Right-click the workspace name.
b Select the New soapUI Project option.
c Paste the URL of WSDL page to Initial WSDL.
d Set the project name to Service 08 - SIAPI.
e Click OK to create the project.
Process a Create Transaction
To create a new routing maintenance in QAD EE:
1 Drill down to the Request 1 message created under the maintainRouting project.
2 Right click Request 1 and select the Clone Request option. Enter a name for the new request.
3 Edit the new request so that it can be processed by QXI.
4 Change SOAP header:
a Set the receiver to QADERP.
b Set suppressResponseDetail to true.
5 Create the necessary session context entries. Create three ttContext iterations:
c Qualifier = QAD, Name = version, Value = ERP3_2
d Qualifier = QAD, Name = domain, Value = 10USA
Note: If you copy and paste the empty ttContext node and blank lines are created, right-click the request and select the Format XML option, soapUI will remove any blank lines and correct the indentation of the XML.
6 Edit the application data section of the message:
a The deRouting node by default will contain all of the fields available when processing a Routing Maintenance transaction. However, only a few fields are required for a transaction to process successfully. The best way to identify the mandatory fields is to run through the UI and see which fields you have to enter data for.
b Edit the XML and create a new Routing record, use the following values:
• Routing.operation = A
• routing.roRouting = q1000
• routing.roOp=10
• routing.roStart=2010-12-01
• routing.roWkctr=1000
7 Process the QDoc message that you have created in the new soapUI project and verify that the Routing record is created successfully.