Using Web Service
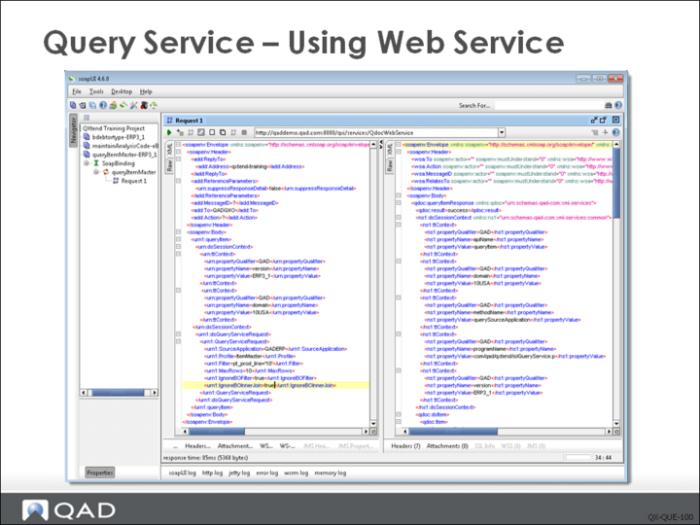
The simplest way to test the Query Service functionality once it has been deployed is to use the SOAP UI toolset to build some test cases. The Generate WSDL button in QXI can be used to generate WSDL and schemas which are used to generate the new WSDL project in SOAP UI.
Once a new project has been built in SOAP UI, new requests can be created and executed against the APIs deployed in QXI. For details on using SOAP UI, see the section “Testing QXI with SOAP UI” in the training guide.
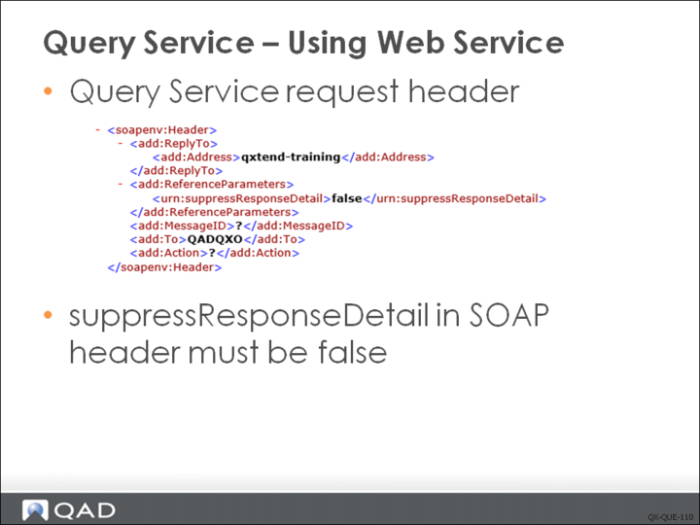
The header parameters in the SOAP envelope are identical to all other QXI requests. However, the suppressResponseDetail parameter must be set to false.
The suppressResponseDetail parameter controls whether or not details are returned on the response. If the parameter is set to true, only the request processing status and exceptions are returned, so data returned from the Query Service will not be part of the response message from QXI.
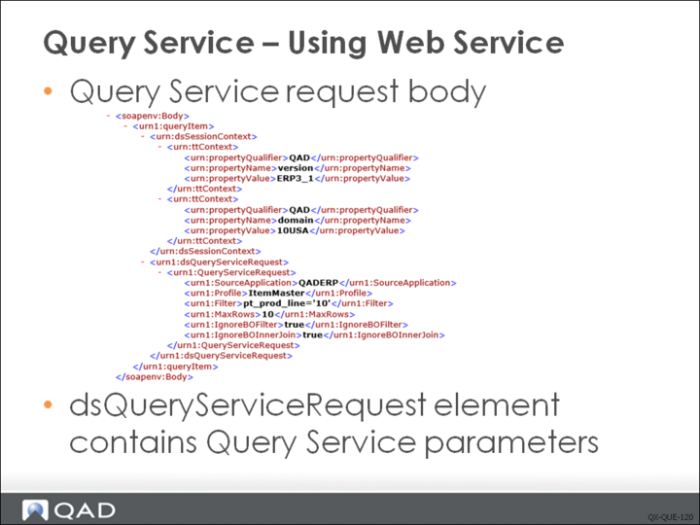
The body part of the SOAP message is where the actual request data that is passed to the Query Service is populated.
Session context parameters of Query Service engine:
• Version: This context entry is mandatory since all requests to QXI use this to determine the version of the API to use when processing the request.
• Domain: The QXO query service only allows querying from one domain at a time. If a business object is domain-enabled, the domain must be passed in the request; otherwise, an error is returned.
The data that drives the Query Service is provided in the dsQueryServiceRequest element; this applies for any Query Service regardless of the business object being queried. The Query Service is a generic routine and exposes a standard interface for other applications to leverage. The advantage of this is that external applications can build a Query Service caller mechanism to execute all queries if necessary, since the interface stays the same and only the data changes.
Six parameters drive the Query Service engine:
• SourceApplication: Name of the source application instance in QXO that you want to query data from. This identifies the data source for the query. The name must not point to a DDP source application.
• Profile: The name of the profile in QXO. This identifies the business object being queried and the profile used to control the format used to return the query result.
• Filter: Valid OpenEdge where clause without the where statement. This filters the data returned by the query. The filter only restricts the data that is returned in the top-level table of the business object; it does not affect the child records that are returned. The filter can only be against data in the data source for the top-level table in the business object. That is, if the top level is so_mstr, you can only filter on data from so_mstr; you cannot include other child tables in the filter.
• MaxRows: Controls the maximum number of rows returned for the top-level buffer in the business object. If the business object is defined with child tables, all child records are returned for all records in the top buffer. That is, if a sales order query is limited to a max of ten rows, ten sales orders will be extracted. If each order has ten lines, all 100 lines also will be returned. Setting MaxRows to 0 returns all data that matches the filter criteria.
• IgnoreBOFilter: When set to true, ignores any filters defined against the top-level table in the business object definition.
• IgnoreBOInner Join: When set to true, ignore any inner join defined against the business object.
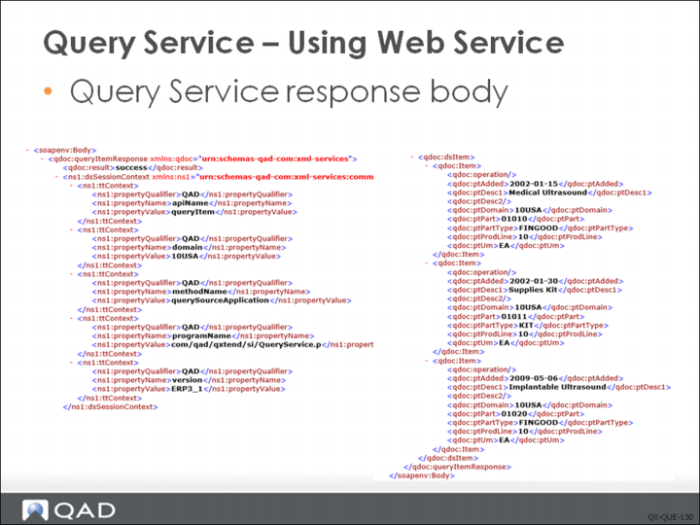
The data that is returned from the Query Service is returned from QXI as the Web service response message. The response data is part of the response SOAP body in an element called query<ProfileName>Response where ProfileName is the name of the profile defined in the Query Service request message.
The format and contents of the Query Service response is controlled by the profile definition in QXO. The response is returned as a hierarchical XML document that visually shows all parent-child relationships in the returned data.
Exercise: Query Service
The following list shows a number of key concepts used in the Query Service in QAD QXtend. In each statement below, fill in the correct term from the list.
native Progress call | generate WSDL |
Profile | deploy query |
single-character expression | external application |
ProDataSet | Source Application |
1 The QAD QXtend Query Service is a QXO service that allows an ______ to access data stored in a QAD application.
2 The Query Service connects to the source application database, extracts and packages the data, and returns it to the calling application as XML or as a ______.
3 The Query Service can be invoked in any of three ways: ______ (direct connection), Progress AppServer call, or XML Web Service call.
4 A calling application can specify filter conditions to control the data returned by the Query Service. These are defined as a ______ or string.
5 To use Query Service through third party application like SOAPUI, you must first ______ from QXO to QXI and then ______ for the API in QXI.
6 The ______ and ______ in Query Service request QDocs are used to specify the data source.
Lab: Query Service
QAD QXtend 1.8.4 has been installed with both QXI and QXO components. In the previous labs you performed the required tasks to allow QAD QXtend to work with the Financials module in QAD Enterprise Edition. The Query Service allows you to query application data from external applications using QXO business objects and profiles. This lab describes how to use the Query Service from external applications.
<LabHomeDirectory> = C:\QXtendTraining\Labs\10-QueryService\
External non-QAD applications that need to integrate with QAD EA often need to access QAD Enterprise Applications data. Typically this is done via ODBC connections to the database or native database connections. These connections can be troublesome, especially ODBC. The Query Service can be used to provide more effective access to QAD EA data.
1. QXO Configuration
Several steps must be followed to configure QXO.
1.1 Configure QXO Service Interface AppServer
Accessing the Query Service from an external application requires a Progress AppServer that is used to host the Query Service API. The AppServer must have the Service Interface enabled.
Verify that there is a QXO AppServer available that is Service Interface enabled. The AppServer has been configured during QXtend installation; and it's the same AppServer used in previous Lab, Direct Data Publish.
1 Open PUTTY by using the icon on the training Windows machine Desktop.
2 Double-click the qaddemo saved session.
3 Log in as user demo-admin, password qad.
4 View the following file:
/progress/dlc/properties/ubroker.properties
5 Search for com/qad/qxtend/si/AppServerStart.r
6 Note the AppServer name.
1.2 Create Business Objects
The queries that are executed by the Query Service are controlled by the business object definition in QXO. You need to build a business object that contains all the data you want to query. Remember that a business object has multiple levels. The business object definition gives you complete control over the data returned.
1.2.1 Item Inventory Business Object
In this scenario, we have an external application that needs to access information about an item and the inventory levels of that item across the system. Use the following information to build the business object:
BO Name = ItemInventory
Top Level Table = pt_mstr
Fields
oid_pt_mstr
pt_desc1
pt_desc2
pt_domain
pt_part
pt_part_type
pt_price
pt_status
pt_um
Child Table = in_mstr
Parent table = pt_mstr
Join = pt_domain,in_domain,pt_part,in_part
Fields
in_domain
in_site
in_loc
in_loc_type
in_part
in_qty_all
in_qty_avail
in_qty_oh
in_qty_ord
oid_in_mstr
Validate the business object and ensure that it validates without any errors or warnings.
1.3 Create Profile
1 Copy the current profile and call it ItemInventoryDetail.
2 Set the QDoc name to ItemInventoryDetail.
Now update XML names of data objects and fields using the following details:
1 Rename pt_mstr data object to item.
2 Rename the pt_mstr fields to:
• pt_part to item
• pt_part_type to itemType
• pt_desc1 to primaryDescription
• pt_desc2 to secondaryDescription
• pt_um to unitOfMeasure
• pt_status to itemStatus
• pt_price to itemPrice
3 Exclude oid_pt_mstr and pt_domain.
4 Rename the in_mstr data object to itemInventory.
5 Rename the in_mstr fields to:
• in_part to item
• in_site to site
• in_loc to itemLocation
• in_loc_type to locationType
• in_qty_all to quantityAllocated
• in_qty_avail to quantityAvailable
• in_qty_oh to quantityOnHand
• in_qty_ord to quantityOrdered
6 Exclude oid_in_mstr and in_domain.
2. Query Service – Call from QXI
You can call the Query Service in three ways:
• QXI Web Service
• Progress AppServer
• Direct Progress connection
In this lab, you will access the Query Service using the QXI Web Service method. For details on the other methods, refer to User Guide: QAD QXtend.
2.1 Deploy Query to QAD QXtend Inbound
2.1.1 Create New Receiver in QXI
The receiver that you have used in previous labs has been communicating with the QAD EE instance, but for the Query Service you need to direct the requests to the QXO instance. You need to create a new receiver and a new SIAPI connection pool. The Connection Pool connects to the QXO AppServer instance that was identified in Step 1.1 and should be an SI-enabled AppServer.
To create a new receiver:
1 Open the QXI Web application in Internet Explorer: http://qaddemo:8080/qxi
2 Select the Configuration tab.
3 Select the Receivers menu option.
4 Select Outbound from the Receivers menu.
5 Click the Add button.
6 Choose the Continue Configuration update without suspending QXtend Inbound option and click the Submit button.
7 Set the Receiver Name to QADQXO and leave the Licensed Domains field empty.
8 Continue to the API Selection screen.
9 Do not select any APIs; these will be added later.
10 Complete the transaction by clicking the Done button.
The receiver has been created but it is not yet ready to use; you first have to define a way to connect to the target QXO instance.
To create a connection pool:
1 Open the QXI Web application in Internet Explorer http://qaddemo:8080/qxi
2 Select the Connections tab.
3 Expand the Add Connection Pool menu.
4 Select the Add SIAPI Pool option.
5 Set the following values:
• Pool Name = QADQXO (must be identical to the receiver name created in the previous step)
• App Server Name = qxosi_ASlive
• Host = qaddemo
• Port = 5162
• User = demo
• Password = qad
• Minimum Connections = 1
• Maximum Connections = 2
6 Click Save to create the new connection pool.
Now check that you have configured it correctly and have idle sessions available:
1 Open the QXI Web application in Internet Explorer: http://qaddemo:8080/qxi
2 Select the Connections tab.
3 Expand the View Connection Pools menu.
4 Select the QADQXO.SIAPI option from the menu.
5 Expand the Connections menu.
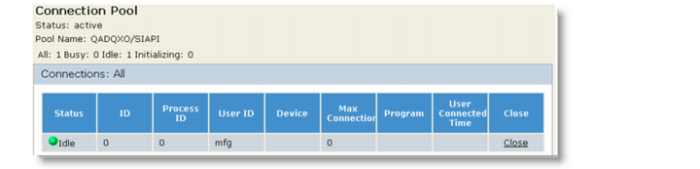
6 You should see the connection pool with a single idle connection as below. If there is not an idle session, the connection pool has not been configured correctly.
2.1.2 Deploy Query API to QXI
Deploy the new Query API schema and WSDL to QXI as a custom schema.
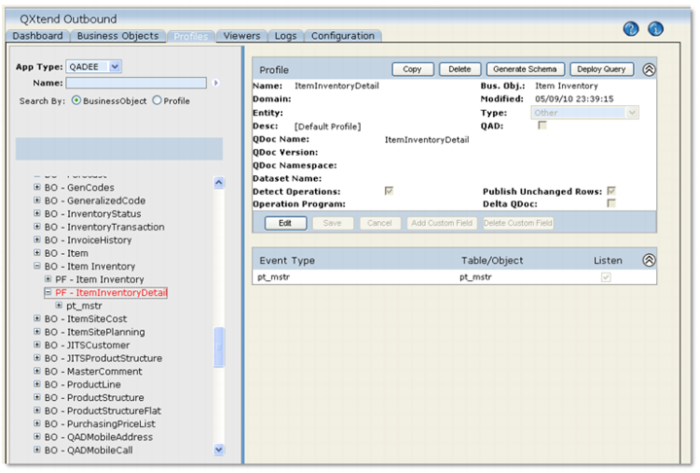
1 Open the QXO Web application in Internet Explorer: http://qaddemo:8080/qxo
2 Select the Profiles tab.
3 Ensure that the App Type is set to QADEE.
4 Click the fetch button to get all profiles.
5 Select the ItemInventoryDetail profile under the ItemInventory business object.
6 Click the Deploy Query button.
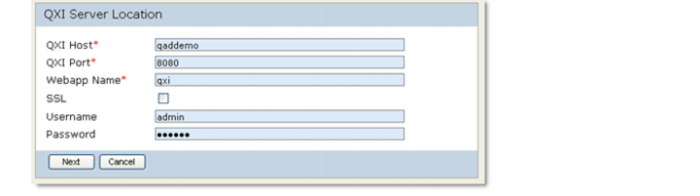
7 Set the following values:
QXI Host | qaddemo |
QXI Port | 8080 |
Webapp Name | qxi |
SSL | no |
Username | admin |
Password | mfgpro |
8 Click Next button.
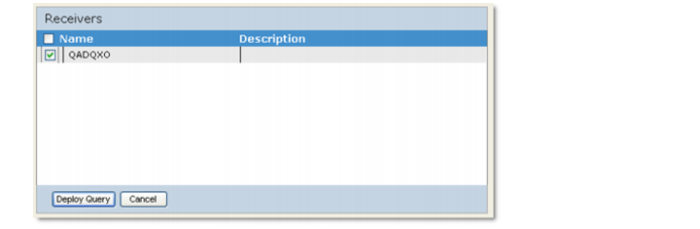
9 Choose QADQXO and click Deploy Query button.
2.1.3 Verify the queryItemInventoryDetail API has been added
To verify that the queryItemInventoryDetail API was successfully added to QXI, you need to check two places. First check that the API is available as a custom API for the Outbound application type; second, check it is a supported API on the QADQXO receiver.
1 Open the QXI Web application in Internet Explorer: http://qaddemo:8080/qxi
2 Select the Configuration tab.
3 Select the Schemas node on the menu tree.
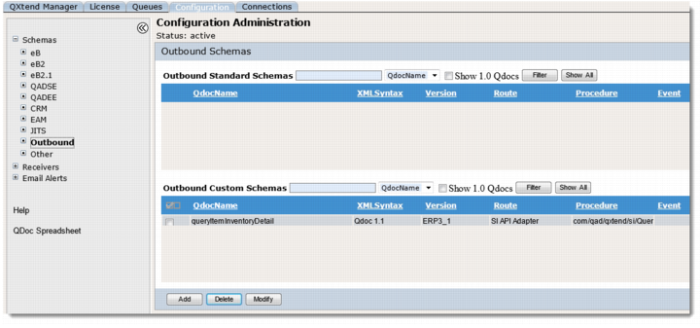
4 Select Outbound.
The queryItemInventoryDetail version ERP3_1 should display as the custom API that is available for the Outbound application type as shown here:
5 Select the Configuration tab.
6 Select the Receivers node on the menu tree.
7 Select Outbound.
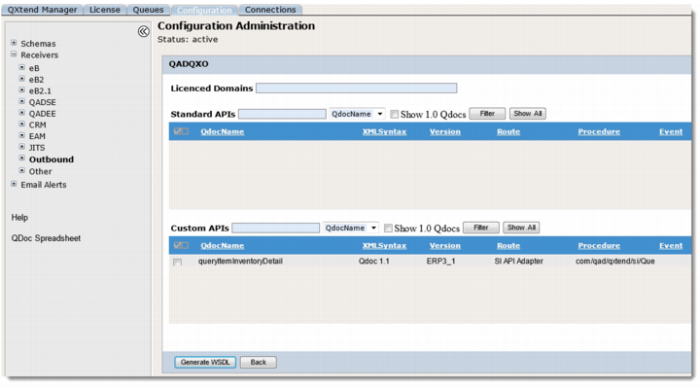
8 Select the check box next to the QADQXO receiver and click the View button.
The queryItemInventoryDetail API version ERP3_1 should display as a supported QDoc for the receiver as shown here:
2.2 Test the Query API
The Query ItemInventoryDetail API has now been successfully deployed to QXI. However, until you use the new version to process a couple of transactions you cannot be sure that everything has been uploaded correctly. Use soapUI to build a WSDL project, create some requests, and process those requests using soapUI.
Locate the WSDL page first.
1 Open the QXI Web application wsdl page in Internet Explorer:
http://qaddemo:8080/qxi/wsdl
2 Select Outbound from the list of modules.
3 Select receiver QADQXO.
4 Click on Yes link at the right of queryItemInventory (ERP3_1).
5 Copy the URL of the WSDL page.
Create the soapUI project.
1 Open soapUI on the Windows image using the shortcut on the Desktop.
2 Create a new workspace.
a File – New Workspace.
b Set the workspace name to Lab 10 – Query Service.
c Save the workspace file in <LabHomeDirectory>.
3 Create a new WSDL Project.
a Right-click the workspace name.
b Select the New soapUI Project option.
c Paste the URL of WSDL page to Initial WSDL
d Set the project name to Query Service 10.
e Click OK to create the project.
4 Drill down to the Request 1 message created under the Query Service 10 project.
5 Right click Request 1 and select the Clone Request option. Enter a name for the new request.
6 Edit the new request so that it can be processed by QXI and change SOAP header:
a Set the receiver to QADQXO.
b Set suppressResponseDetail to false (this value must be false, otherwise, the result of the query will not be returned).
7 Create the necessary session context entries. Create three ttContext iterations:
a Qualifier = QAD, Name = version, Value = ERP3_1
b Qualifier = QAD, Name = domain, Value = 10USA
8 Edit the application data section of the message:
a The dsQueryServiceRequest node contains the fields available when processing a query.
b Edit the XML and use the following values:
• SourceApplication = QADERP
• Profile =ItemInventoryDetail
• Filter = (blank)
• MaxRows = 10
• IgnoreBOFilter = false
• IgnoreBOInnerJoin = false
9 Process the QDoc message you created in the new soapUI project and review the response message. Examine the data that is returned.
Modify the filter condition to return different data.
1 Clone the request created in the previous step.
2 Set the filter to pt_part_type = “COMP”.
3 Process the request and review the response. The returned set of data is different.
Change the configuration of the Profile in QXO.
1 Modify the profile in QXO so that the itemInventory data object is not included in the profile.
2 Clone the request created in the previous step.
3 Process the request and review the response. The returned set of data is different.
Change the configuration of the profile in QXO.
1 Modify the profile in QXO:
a Set the itemInventory data object back to being included in the profile.
b Add a filter to the itemInventory data object so that only inventory records with a non-zero quantity on hand are returned in the query.
2 Process the request and review the response. The returned set of data is different.
Try changing the query to see what other filters can be applied using the Query Service.