Configuring a Menu
To remove a main menu from the home page, perform the following steps:
1 Take note of the position of MAIN -MENU 1 on the home page. This is the Base menu.
2 On the System Value Setup page, on the Look and Feel tab, click the MAIN - MENU 1 item.
3 In the Global area, note the Value is currently blank. To enable this blank value, select the Is Set field.
4 Click Save Values.
5 Open the home page. The Base menu is no longer displayed because you selected a blank value for this menu. The other main menus have been pushed across to the left.
You can also modify the contents of a main menu. For example, to configure the Base main menu at a global level:
1 In the Global area, select the Is Set field. This activates the Value field. Is Set controls if a value is written to the database. If the Is Set field is not selected, there is no corresponding value stored in the database and the default is used. In Use means the value is written to the database but a field on the record is set so the record is flagged not to be used. This is useful if you want to disable a value without deleting it completely from the system.
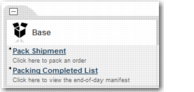
2 In the Value field, to set the contents of the menu, type the following:
title=Base
image=menu9.gif
link1=<b>Pack Shipment<b>:Click here to pack an order:/htm/scan-pack-ship.htm
link2=<b>Packing Completed List<b>:Click here to view the end-of-day manifest:/htm/eod-manifest.htm
3 Click Save Values and open the home page. It should look like this:
Base Main Menu Example
To set a value for a menu item, the syntax is in the format:
title=[category title]
image=[myImage.gif]
link1=[link name]:[link description]:[link url]
link2=[link name]:[link description]:[link url]
In this syntax,
title is the name of the menu. You can choose any name. However, it is recommended that you use only the default menu names. This ensures that the main menu matches the left pane. The
image keyword references the picture to be displayed next to the menu name. There are twelve images provided by default, which are listed in
Available Icons. The
link is made up of the link name, the description, and the URL.
Note: To find the URL of any page you want included in your menu, click the page link. The URL is displayed in the Address field of your browser. Alternatively, right-click the link and choose Properties.
As an alternative to using the full URL, you can use a standard URL format followed by an option code. For example, to set a link to Manual Shipment, use this URL and option code:
link1=Manual Shipment:Create a shipment:/htm/optionrun.htm?optionCode=MANSH
Available Icons
Icon | Name |
| menu1.gif |
| menu2.gif |
| menu3.gif |
| menu4.gif |
| menu5.gif |
| menu6.gif |
| menu7.gif |
| menu8.gif |
| menu9.gif |
| menu10.gif |
| menu11.gif |
| recent.gif |
Default Categories
You can use default categories to automatically display certain menus. There are four default categories:
• BASE
• TC
• TMS
• TT
For example, to display the Transportation Tracking menu in MAIN - MENU 4, perform the following steps:
1 In System Value Setup, under Look and Feel, click MAIN - MENU 4.
2 In the Global area, select the Is Set field.
3 Set the Value field to defaultcategory=TT and click Save Values.