Tasks Area
The Tasks area displays a list of tasks, or the workflow associated with the transaction selected in the Transaction panel. You can add tabs to the Tasks area and assign different tasks to each tab. You can give different users access to different tabs to prevent unauthorized or untrained users from carrying out certain tasks.
Assigning Tasks to Tabs in the Tasks Area
Tasks can be divided into categories based on different criteria, with these categories appearing as tabs in the Tasks area.
Tasks Area Tabs
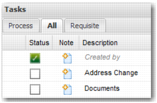
All tasks appear in the All tab, while required tasks appear in the Requisite tab. Looking at the All tab gives you an overview of the entire workflow and the business process behind it. Tasks shown in gray are Windows UI tasks and are not accessible from the Web UI. To configure the tabs that appear in the Tasks area, edit the TASK CATEGORIES - <TRANSACTION_TYPE_LETTER> system value, where <TRANSACTION_TYPE_LETTER> is replaced by the letter that represents a particular transaction type. For a full list of transaction types, use the Z9 option in the Windows UI. You can create a system value for other transaction types by copying one of the existing system values.
Enter a comma-separated list of category names in the system value. The order of the list determines the order of the tabs in the tasks area. You can choose any category names you want. To associate a task with a particular category, enter the category name or names in the Categories field of the workflow task. Creating workflow tasks is described later in this chapter.
You can configure this system value on a user level, client level, or client/user level if necessary. It is possible to remove the All tab, but it is not possible to remove the Requisite tab.