Creating and Modifying Rules
In the RULES option, on the Rules tab, the rules grid displays all rules, and enables you to search for a particular rule. When you select a rule, you can update the rule description, end date, and associated workflow by updating the fields to the right of the grid and clicking Update.
To create a new rule, click the New button below the grid, complete the fields to the right of the grid, and click Create.
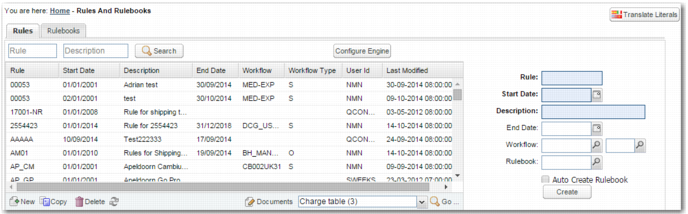
Rules Grid, Creating a Rule
Rule
Use up to ten alphanumeric characters to specify the rule name; choose a name that is easily understood and makes the purpose of the rule clear. This field is mandatory.
Start Date
Specify the date when the rule comes into effect. This field is mandatory, and the value is checked against the shipment despatch date. The start date allows you to create multiple rules in one sitting, even if they are applicable to different time frames.
Note: When you select the current date as the start date, the rule does not come into effect until the following day. This behavior protects current transactions in the event that a rule is created in error.
Description
Add a description of the rule. This field is mandatory.
End Date
Specify the last effective date of the rule. If you do not specify an end date, then the rule applies indefinitely.
Workflow code
If you want to associate a particular workflow with the rule, then specify the workflow code in this field. When the rule is applied to a shipment, it attaches the workflow to the shipment.
Workflow type
If you want to associate a particular workflow type with the rule, then specify the workflow type in this field. When the rule is applied to a shipment, it attaches the workflow type to the shipment.
Rulebook
Select an existing rulebook to which you want to attach this rule.
Auto Create Rulebook
Select this field to automatically create a rulebook with the same name as the rule, and to attach the rule to that rulebook.