Search Panel
The Workflow Portal Search panel allows you to search for a transaction or group of transactions. To perform a basic search, you complete the relevant search fields and click the Search button.
Search Panel
There are five columns on the Search panel. The first column contains the following fields that are always displayed:
Reference No.
You can type the full transaction number in this field. If you are searching for a series of transactions or you only know a partial number, you can use the * wildcard. For example, if you are searching for all shipments beginning with 004, type 004* and click Search. In some environments, especially those using scanner input, the Reference No field can be set to trigger an autosearch after you input a particular number of characters.
Group.
This list displays the user groups that you belong to. You can search for transactions for a particular group. You only see the user groups you belong to.
Note: In the Windows UI, it is possible to use a wildcard character in this field. In the Web UI, you can only select from the list.
Client.
You are assigned a default client by your administrator. However, you may have access to other clients, depending on your role. Select the client from this list.
The first column also enables you to select whether you want to search for an open or closed shipment.
Note: It is important that users close shipments when they are finished with them, so that searching through an ever-increasing number of open shipments does not become unacceptably slow.
The Search button performs a search based on the criteria you have selected. The Clear button clears the current search.
The Export button enables you to display the results of a search in an Excel spreadsheet rather than in the Transaction panel. Do not use the Export button without first specifying some search criteria. If you fail to narrow the export criteria, you export all transactions in the system to an Excel file. This can take several minutes to complete and consumes a lot of memory. It is possible for the administrator to disable the Export button.
You can configure the contents of the second, third, and fourth columns in the Search panel. By default, the second column contains the following fields:
Carrier.
If you are searching for a shipment sent with a particular carrier, you can enter the carrier name in this field.
User ID
You can search by the ID of the user who created the shipment.
Customer
You can search by customer.
Consignee
You can search by consignee.
Workflow
You can search by workflow.
By default, the third column contains the following fields:
Despatch Date (From/To)
If you are searching for a shipment due for despatch in a particular time frame, you can enter the data range in these fields.
Status.
The Status lookup field enables you to specify transactions with a particular status from the pop-up Status list. The second field enables you to widen your search using the <, >, and = operators. The operators allow you to return transactions that have already achieved the specified status, transactions that have not yet reached that status, or transactions with that status. You can type [blank] to retrieve transactions without a status.
Invoice No
The Invoice Number lookup field allows you to choose a particular transaction from the pop-up Invoice Number list.
Booking Number.
If you know a booking number, you can enter it here.
By default, the fourth column is empty. The fifth column enables you to save search criteria as a template so you do not need to complete the same fields each time. To create a template, type an appropriate name for your search criteria in the Enter a template name field and click the Save button.
You can retrieve the template at any time from the templates drop-down list. To perform a template-driven search, select the template from the Select a template to load list and click the Search button. This displays a list of shipments that match your search criteria in the Transaction panel. If you want to remove a template that you no longer use, select the template from the list and click the Delete button.
There are three additional buttons in the fifth column:
• The More button allows you to select further fields to search on.
• The Config button allows you to configure the contents of columns 2, 3, 4, and the More pop-up.
• The Defaults button restores the Search panel factory settings.
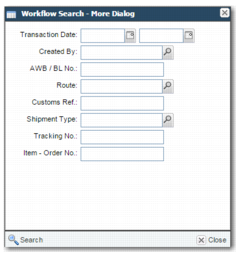
The More button enables you to select from a broader list of search criteria. When you click this button, the Workflow Search - More pop-up window is displayed. Typically, the fields in this pop-up window are rarely used search criteria.
To configure the fields displayed in the Workflow Search - More Dialog, choose More from the Choose Column to Configure list in the Workflow Search - Configurator pop-up window.
Workflow Search - More Dialog
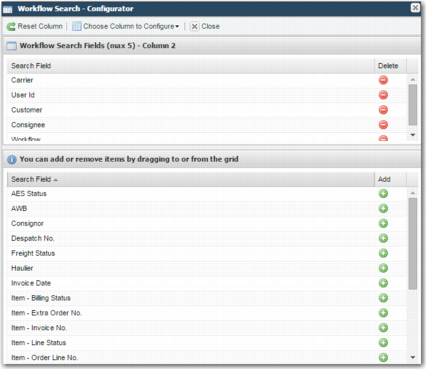
To add or remove fields from your screen, click the Config button. The Workflow Search - Configurator pop-up window displays.
Workflow Search - Configurator
In the pop-up window, click the green plus icon to add a field to the Search panel. To remove a field, click the red minus icon. Further configuration is possible using the tools at the top of the pop-up window:
• The Reset Column button clears any field additions or deletions you have made since you opened the pop-up window.
• The Choose Column to Configure list enables you to choose the Search panel column you want to configure.
• The Close button enables you to exit the pop-up window and automatically saves your configuration.