Creating a Manual Shipment in the Workflow Portal
If your system is configured to display the Create Shipment toolbar button, you can create a manual shipment from the Workflow Portal. To open the Workflow Portal, on the left pane menu on the home page, choose Base|Workflow Portal. On the Workflow Portal page, click the Create Shipment

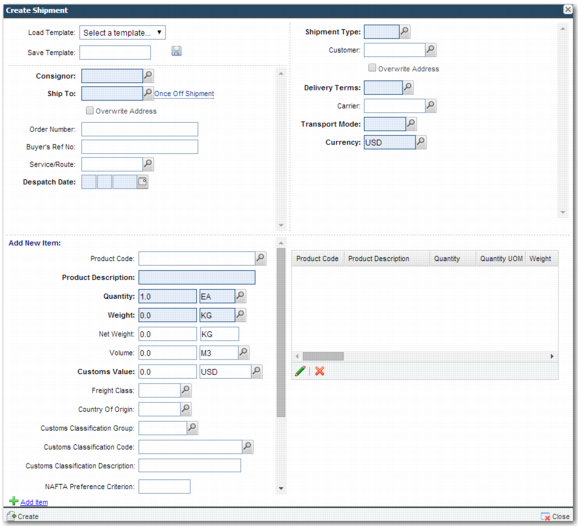
button on the toolbar. The Create Shipment pop-up window is displayed.
Create Shipment Pop-up Window
The Create Shipment pop-up window in the Workflow Portal provides more functionality than the stand-alone Create Manual Shipment screen. It allows you to create a manual shipment and save the shipment as a template, so you can create similar manual shipments in the future. It also allows you to update line items after you have created them.
Create Shipment Fields describes the fields in the Create Shipment pop-up window.
Create Shipment Fields
Field | Explanation |
Consignor | The person or company shown on the bill of lading as the shipper. |
Ship To | This is the partner that the shipment is being sent to. Select the partner using the lookup button, or click Once Off Shipment if this is a once-off shipment to a company that is not a partner. You might use the Once Off Shipment option if you are sending a sample to a prospective partner. Select the Overwrite Address field if you want to amend the address. |
Overwrite Address | Select this field if you would like to update the ship to address and telephone number. The address and telephone fields will appear on the screen so that you can update them. |
Order Number | The order number associated with the shipment. |
Buyer’s Ref No | The reference number associated with the buyer. |
Service/Route | The service or route by which the shipment is to be sent. |
Despatch Date | The date when the shipment is to be despatched. |
Shipment Type | The type of shipment; for example, an export shipment. |
Customer | The customer the shipment is being sent to. |
Overwrite Address | Select this field if you would like to update the customer address and telephone number. The address and telephone fields will appear on the screen so that you can update them. |
Delivery Terms | Terms attached to the shipment’s delivery; for example, Delivery Duty Paid. |
Carrier | The company transporting the shipment. |
Transport Mode | The mode of transport; for example, air or sea. |
Currency | The currency in which the shipping transaction is being conducted. |
The Add New Item section allows you to provide information on a shipment item line.
Add New Item Fields
Field | Explanation |
Product Code | The product code for the items being shipped. Use the lookup field to specify the product code. |
Product Description | A description of the product being shipped. |
Quantity | The number of items in the line item. Use the lookup field next to the Quantity field to specify the unit of measure (UOM). |
Weight | The weight of the line item. Use the lookup field next to the Weight field to specify the UOM. |
Net Weight | The net weight of the line item. Use the lookup field next to the Weight field to specify the UOM. |
Volume | The volume of the line item. Use the lookup field next to the Volume field to specify the UOM. |
Customs Value | The customs value of the line item. Use the lookup field next to the Volume field to specify the currency. |
Freight Class | The freight class associated with the shipment. |
Country of Origin | The country where the line item originated. |
Customs Classification Group | The customs classification group associated with the line item. |
Customs Classification Code | The customs classification code associated with the line item. |
Customs Classification Description | A description of the customs classification that applies to the line item. |
NAFTA Preference Criterion | North American Free Trade Agreement (NAFTA) criterion. |
NAFTA Producer | North American Free Trade Agreement (NAFTA) producer. |
NAFTA Net Cost | North American Free Trade Agreement (NAFTA) net cost. |
NAFTA Country of Origin | North American Free Trade Agreement (NAFTA) country of origin. |
Domestic/Foreign | Specify whether the shipment associated with the line item is domestic or foreign. |
Type of Export | Specify whether this is a permanent export, a temporary export, or another type of export. |
Most mandatory fields appear in blue, with the exception of the Code field in the line items section. You will see a validation error if you do not fill in all mandatory fields before clicking Next.
When you have filled in the details for a line item, you can add it to the shipment by clicking the Add Item icon, or by using the shortcut Ctrl+F2. The line item will appear in the list to the right of the line item fields.
To update a line item, select it in the product list and click the Update

button. Update the contents of the line item fields and click Update to save your changes. To discard your changes, click Cancel.
To remove a line item from the list, select the item and click the Delete

button, or press the Delete button on your keyboard. A message is displayed, asking if you are sure you want to delete the item. Click OK.
When you complete the details of the manual shipment, click the Create button at the bottom of the screen or use the shortcut key F2 to create the shipment. A confirmation message is displayed at the top of the Create Shipment pop-up window.
Create Shipment Confirmation Message
To close the Create Shipment pop-up window and display the shipment in the Workflow Portal, click the message or click the Close button at the bottom of the screen.