Configuring QAD CRM on Deployment Server
Maintaining and Validating QAD CRM AppServer Information
Perform the following steps on the CRM Deployment Server:
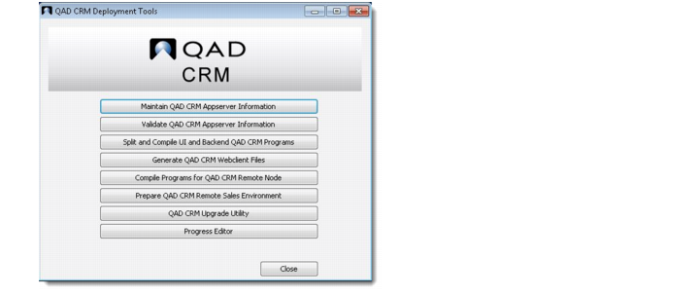
1 From the QAD CRM Deployment Utility screen, click the Maintain QAD CRM AppServer Information button.
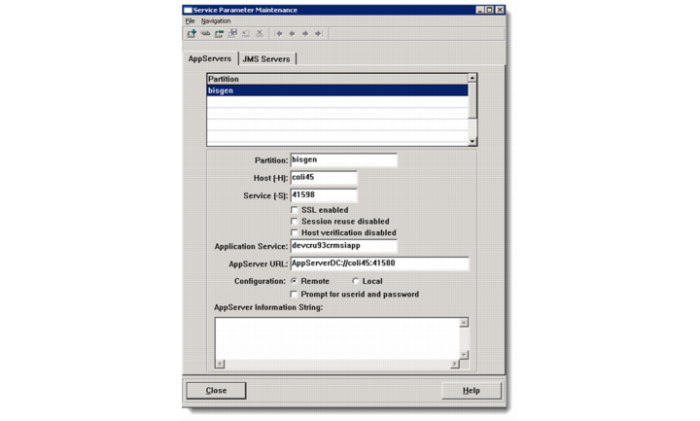
2 In the Service Parameter Maintenance window, configure appropriate parameter values.
Partition
Do not modify the default partition value of bisgen, even if you intend to set up multiple CRM systems on the same deployment server.
Host (-H)
Enter the host name or IP address of the NameServer that provides the AppServer connection.
Service (-S)
Enter the service name or port number of the NameServer that provides the AppServer connection. The port number of the NameServer being used by your AppServer is referenced in its corresponding NameServer log file, whose location is specified in the Progress ubroker.properties file.
Application Service
Enter the name of a valid AppServer application service supported by the NameServer. The NameServer chooses an AppServer that supports this application service for the partition connection.
Use different Application Service names to distinguish between various CRM environments such as Test and Prod environments. For example, it could say TestCRM_AS for the Test CRM system and ProdCRM_AS for the Production CRM system.
AppServer URL
Specify the URL for connecting to the AppServer; for example, coli45 is the name of the host and 41580 is the broker port number through which to connect to the AppServer. Your CRM AppServer port number is defined in the Progress ubroker.properties file.
Note: You are advised to use the DirectConnect method to connect to the AppServer through a URL similar to the AppServer URL, as shown in the screenshot.
Configuration
Choose Remote to connect to an AppServer using the connection information specified for this partition.
3 Save your changes and exit the Progress session completely.
4 Run the QAD CRM Deployment Utility and click the Validate QAD CRM AppServer Information button.
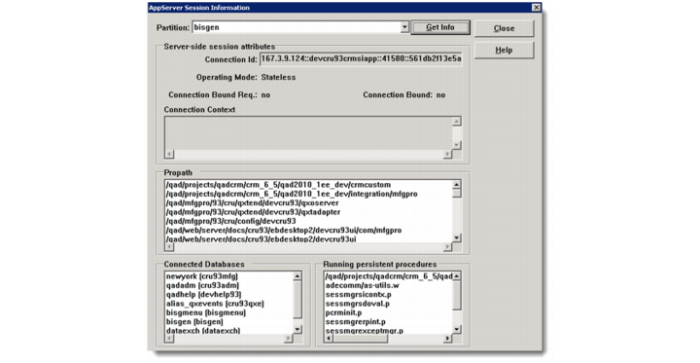
5 In the AppServer Session Information window, click Get Info and make sure that the AppServer connection information such as PROPATH and databases information is correct as per your CRM environment configuration.
If the connection is successful, you will see a connection string in the connection Id fill-in beginning with the Host IP address that hosts the appserver.
6 A file called appsrvtt.d has now been updated to record the AppServer information you have set up.
Copy this newly updated appsrvtt.d file from the folder QADCRMInstallDir\ to the folder QADCRMInstallDir\webclient\frontend\ before proceeding to the generation of the CRM cab files in the next section.
Compiling Encrypted Files
QAD CRM in a YAB environment supports only one scenario:
• QAD CRM Integrated with QAD Enterprise Applications (Enterprise Edition)
To integrate QAD CRM with QAD Enterprise Applications (Enterprise Edition):
1 Copy the 32-bit version of proxy.pl from QADERPInstallDir/fin to QADCRMInstallDir\mfgsrv.
You can get the location of the proxy.pl file by reviewing the Propath of the as-mfg appserver in the ubroker.properties file.
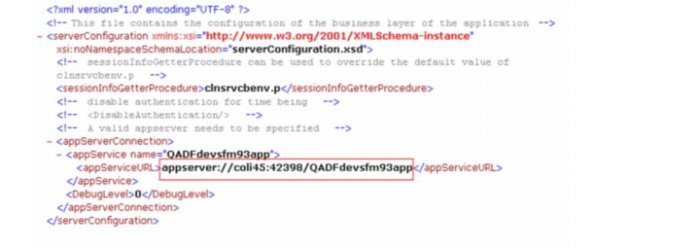
2 Open cbserver.xml under QADCRMInstallDir\integration\mfgpro in Notepad and modify appServiceURL with QAD Enterprise Applications Financials AppServer details. In the following example, coli45 is the AppServer host name, 42398 is the NameServer port number, and QADFdevsfm93app is the QAD EE Financial AppServer broker name.
Compilation Procedure
1 Create a word break rule file for the CRM Unicode databases.
a Start a command window (cmd.exe) and set the DLC and PATH variables.
set DLC=ProgressInstallDir
set PATH=%PATH%;%DLC%;%DLC%\bin
b Change the current directory to the Progress installation directory.
cd %DLC%
c Compile the new word break rule file using the following command.
proutil -C wbreak-compiler %DLC%\prolang\convmap\utf8-bas.wbt 1
d Double check that the file created in the previous step named proword.1 now exists in the %DLC% folder.
2 Modify the parameter file.
For a Unicode environment, you must perform the following additional steps:
a Update or add the following parameter values in QADCRMInstallDir\qadsfamaupgrade.pf:
-cpinternal UTF-8
-cpstream UTF-8
-cpcoll ICU-UCA
-cpcase Basic
b For Unicode compilation, modify qadsfamaupgrade.pf to connect to the Unicode databases in the QADCRMInstallDir\db\demo\unicode folder; for example:
-db db\demo\unicode\bisgmenu -1
-db db\demo\unicode\bisgen -1
-db db\demo\unicode\dataexch -1
3 Choose Start|All Programs|QAD CRM 6.7.2|QAD CRM Deployment Utility. The following screen appears.