Adding Contacts
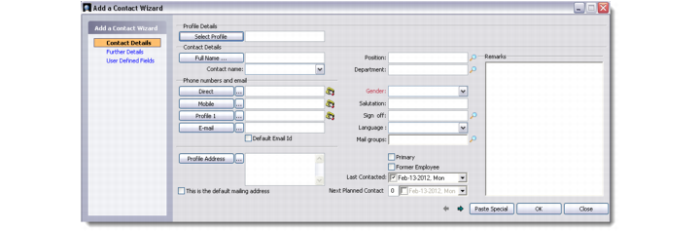
You can add details for a new contact in two different ways. One method is to click the New Contact from a Different Profile button on the toolbar. This displays the Add a Contact Wizard with the following tab links:
• Contact Details
• Further Details
• User-Defined Fields
The Add a Contact Wizard lets you select the associated profile by searching through the list of profiles in the database.
Add a Contact Wizard
Note: Conversely, while adding details for a profile through the Profile Add Wizard, you specify details of its contact persons. You can also view, edit, and add details for contact persons through the All Profiles module. For details, see
Maintaining Profiles.
The second method is to click the New Contact From the Same Profile button on the toolbar. This opens the bottom half of the Contact Persons screen in add mode. You can also choose this option from the right-click menu or the File menu.
Details
Use the Details tab to record basic information about a new contact.
Full Name
Enter the full name of the new contact.
Show as
Enter the contact name in the format as you want it to display in all lists.
Phone numbers and Email
In this section, enter all the different phone numbers of the new contact. Enter the Email address and set it as default by selecting the Default Email Id check box.
Address
This field refers to the profile address, and is populated automatically by the system.
Note: If you click on the drop-down button in this field, the system lets you select which address you want to record and display here. You can choose Other Site Address, Personal Address, or Native Address instead of Profile Address.
Position, Department, Gender, and other fields
Enter these details for the new contact through the look-ups and drop-down lists provided.
Primary or Former Employee
Select the relevant check box to indicate whether the new contact is an existing employee or a former one.
Contact Dates
Indicate the dates when this contact person was last contacted, and when the next contact is planned.
Notes
Enter any notes you want to record for this contact.
Further Details
Use this tab to enter further details such as inputs regarding methods of communication. Select the preferred means of communication from the drop-down list available. This tab also lets you add personal information for the new contact.
Activities
You can use this tab to view and manage activities associated with the contact. You can add, edit, copy, delete, or process activities from this tab directly.
Two views at the bottom of this window let you view both planned activities and activity history.
You can choose the View Reading Pane option if you want to see the comments recorded with each activity record. To access this option, either right-click the Activity tab area and select from the menu, or choose from the Options button.
Mailing List
The Mailing List tab displays the defined Inclusion list in the left side and the defined Exclusion list on the right. Those lists that the selected contact is in appear with the check box selected.
To attach an inclusion or exclusion mail list to a contact, select the adjoining check box and click Save. Similarly, to detach an inclusion or exclusion mail list from a contact, clear the adjoining check box and click Save.
For details about inclusion and exclusion lists, as well as defining mailing contact preferences, see
Maintaining Contact Mailing Preferences.
Relationships
The Relationships tab screen has two parts—Relationship with Our Account Managers and Relationship with Other Profiles. You can add profile details to any of these areas. You can also edit, copy, or delete any of the existing details.
When you right-click in the Relationship with Our Account Managers area and select Add from the menu, the Internal Associates window displays. Click the User ID look-up to open the Select Associated ID search window. Choose the required name from here. You can select between current employees and past employees.
The two views in the Relationship with Other Profiles area lets you see attached profiles from both the previous company and the currently associated company.
Campaigns
Use this tab to view and edit campaign details related to selected contacts. The campaign tab screen has two parts. The left side displays the Campaign IDs of the campaigns associated with the selected contacts. The right side lists the associated campaigns by stage.
You can add more targets to the listed campaigns or edit stages for the listed contacts from this tab. For more details, see
Sending Contacts to Campaigns.
Analysis Codes
Use the Analysis Codes tab to set codes and groups for the new contact. A contact can have multiple analysis codes and analysis groups.
To add a group, select an option from the Select an Analysis Group drop-down list and click the Add button next to it. This displays the associated codes. If you want to select all available groups in the system, click the Select All Groups button.
Select or clear the group code check boxes as required. Click the save button to record your selection in the system.
Select your view options from the radio buttons provided. To view all group codes, select All.
User-Defined Fields
If user-defined frames and fields are set up for contact persons, you can view or edit them through this tab. User-defined frames and fields give you the flexibility to add parameters to each record based on your unique requirements.
Note: Only a system administrator can create user-defined frames and fields through Settings|System|User-Defined Fields. For more details, see QAD Customer Relationship Management Administration Guide.
Attachments
The Attachments tab lets you attach a document from your hard disk to the system. Right-click and select Attach Document from Hard Disk from the menu to attach a document of your choice. You can also choose the display view of the attachments by selecting from the options available in the right-click menu.
You can also detach, open, or view the properties of a selected attachment. Right-click and choose the required option from the menu.
Note: In order to share documents from the Attachment tab and view them successfully, make sure that the documents are attached from a shared network drive that is accessible to all users in a team or business unit. If any user attaches a document from their local hard drive to QAD CRM through the Attachment tab, it will not be accessible to others.
Scripts
Use this tab to add new scripts, and process or delete existing ones. You can also replace script codes or other columns that display here.
When you right-click and select Add from the menu, the Script Details window displays. Choose the script code you want to attach to the selected contact with the help of the look-up provided.
When you choose to process a script, the Processing Script window opens. This window displays all the questions that form part of the selected script. You can directly enter the customer responses in this window and save them.
You can create scripts through the stand-alone Scripts module. For more details, see
Maintaining Scripts.