Maintaining Profiles
Use the Profile Details screen to maintain information related to a specific profile.
Click the Profile drop-down button on the system toolbar, and select the tab you want to view or edit. The Profile Details screen displays with the selected tab open.
Note: The Profile drop-down button is not available when you are using the Profile module itself but it is available on the system toolbar at all other locations where profiles are used.
Profile Details
Note: The Profile Details screen is identical to the tabs that display in the lower area of the All Profiles screen. You can also access the Contact Details screen from the Profile Details screen by clicking the Contact button on the bottom left corner. This is the same as the Contact Persons screen. For details, see
Adding Contacts.
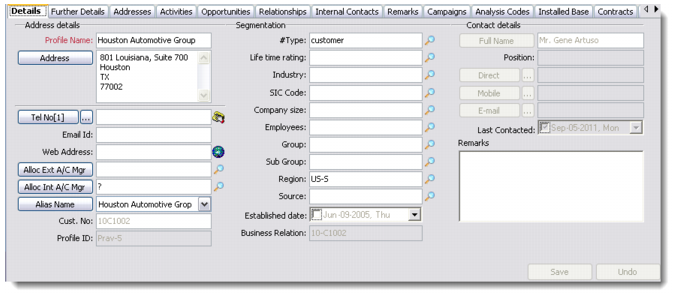
Details
Use the Details tab to record basic information about a new profile.
Profile Name
Enter the profile name of the new record. This is a mandatory field.
Address
Click the Address button to open the address dialog box. Enter address details in the dialog box and save. If some address style is already defined by your system administrator, the information displayed in the address dialog box reflects the defined address style. For more details on the Address Style option, see QAD Customer Relationship Management Administration Guide.
Telephone Number, Email ID, Web Address
Enter these other contact details in these fields. You can click the Tel No[1] button to enter more details. The ... button lets you add up to three telephone numbers and one fax number.
Allocate Account Managers
Choose the external and internal account managers through the buttons and look-ups provided.
Note: Internal and external account managers are pre-assigned in the system based on certain criteria such as Region, Country, Profile Type, and so on. They are allocated through the Territory Management module. For details, see QAD Customer Relationship Management Administration Guide.
Example: If you click the Alloc Ext A/C Mgr or Alloc Int A/C Mgr buttons, the system displays the names of the account managers who are allocated to this profile, depending on the criteria and settings defined in Territory Management. However, if you click the look-ups, the names of all account managers in the system display. If you choose an account manager from the look-up list, that name overrides the account manager suggestion given by the system.
Alias name
Click the Alias button to enter an alias name for the new profile record. You can create multiple aliases for a profile.
Customer Number
Enter a customer number for the profile. This number can be used later as a reference for billing and finance purposes, and for tracking opportunities and sales.
Note: The Customer Number field is editable only if QAD ERP integration is not enabled. Otherwise, the customer number is assigned from QAD Enterprise Applications directly once the information between the two applications is synchronized. When QAD ERP integration is enabled, this field cannot be updated.
Important: In the current release of CRM it is not possible to set the Enterprise Applications Customer Number manually. If a stand-alone profile record is integrated with QAD Enterprise Applications at a later date, the value for the Customer Number field is over-written by the value assigned by the creation of the customer record in Enterprise Applications.
Profile ID
The system assigns a unique number to each new profile record. While the Profile ID field is non-updateable, the profile number sequence is configurable. You can change or set the number to a particular sequence, if required. Contact your system administrator for any changes.
To generate Profile IDs, the system picks the next number available in its records and prefixes the company ID to it.
Example: If the company ID is Sports and the next available number is 3562, the profile ID generated would be Sports-3562.
Segmentation
The fields in this section pertain to marketing-related information for the new profile. You can use the look-ups provided to classify the new profile based on industry, rating, company size, and other such details.
Business Relation
This field only appears if the integrated Enterprise Applications system is the Enterprise Edition. The business relation code is either copied from Enterprise Applications when the profile has been created in response to a customer supplier or end-user created in Enterprise Applications, or the value is generated in response to sending a profile from CRM to become a customer in Enterprise Applications.
Contact Details
The fields in this section display contact-related details such as name, contact number and email address.
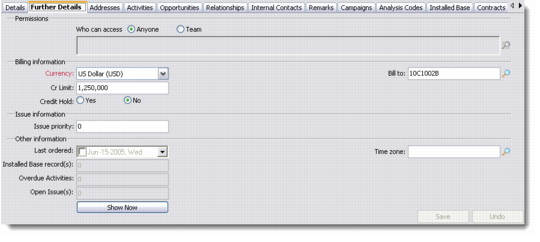
Further Details
Use this tab to enter further details such as viewing permissions, billing information, and issue information. This tab also lets you view other information through counters for installed base records, overdue activities, and open support issues.
Profiles: Further Details
Who Can Access
In the Permissions area, specify the access rights to the profile you are creating. If the profile is being created for a team, any end user who is logged in but not a part of the team will not be able to view this profile. If you click the Anyone option then the profile record can be accessed by all logged-in users.
Bill To
Use the look-up to specify a value for this field. The Bill To field stores the customer number of the profile you choose as the billing party. After specifying a value for this field, if you add opportunity quotes for this profile, the bill to information is automatically picked by the system from this field.
Issue Priority
Enter an issue priority value for all issues related to the current profile record.
Note: You can assign a default priority to issues from a particular profile by assigning the issue priority value in the Further Details tab in All Profiles. When you create a new issue record for the profile at a later date, the system automatically assigns the priority value you mention in the Issue Priority field here.
The following fields appear in the Other Information section of the Further Details tab.
Installed Base Records
The value for this field is picked by the system from the Installed Base module. If a customer has an existing installed base record then it will display here.
Overdue Activities
The value for this field is picked by the system from the Activities module. It provides a count of the number of activities that are overdue for a particular profile.
Note: An activity becomes overdue when it has passed its due date but has not been processed.
Open Support Issues
This field displays the number of open support issues against the selected profile. The value for this field is picked by the system from the Issue Management module.
Time Zone
Select the appropriate time zone for the profile record from the look-up provided here.
Addresses
The Addresses tab screen has three parts. One part lists all the addresses recorded for a profile. This area lets you add, edit, copy, or delete any address details listed. The second part displays contacts associated with a particular profile address. This is a view-only area. The third part lets you add additional addresses to the selected profile record.
You can set up multiple address types—Default, Ship-to, Bill-to, and Branch—for a single profile record. For example, when customers place an order for a product, they can have the invoicing and the delivery at different addresses. So while you would send the invoice to the Bill-to address, the product delivery could be made at the Ship-to address.
Select the Default Mailing Address check box if you want to set the selected address as default. The default mailing address marked through the Addresses tab shows up in the profile records displayed in the browser, and not the primary address that you enter through the Details tab.
Activities
You can use this tab to view and manage activities associated with the selected profile. You can add, edit, copy, delete, or process activities from this tab directly.
Two views at the bottom of this window let you view both planned activities and activity history.
Note: The History view here functions at the profile level, and not at the activity level. So you can view all the activities planned or performed for a selected profile.
You can choose the View Reading Pane option if you want to see the comments recorded with each activity record. To access this option, either right-click the Activity tab area and select from the menu, or choose from the Options button.
Opportunities
Use the Opportunities tab to view and manage opportunities associated with the selected profile. You can add, edit, copy, or delete opportunities from this tab directly.
Two views at the bottom of the right side of this window let you view both description and opportunity lines.
For more details on opportunities, see
Working with Opportunities.
Relationships
You can use this tab to manage the hierarchical relationship details of the selected profile. This tab lets you view, add, attach, or delete organizational hierarchy for the selected profile.
The tab screen area has two parts—hierarchical and sub-hierarchical relationships within an organization display in the left side of the screen while profile, contact, opportunity, and installed base details associated with each hierarchy entry display in the right side.
The two views at the bottom left let you view a list of all the hierarchies associated with the profile, as well as the direct one-to-one relationships shared by this profile with others.
Internal Contacts
Use the Internal Contacts tab to add, edit, copy, or delete details of contacts within your organization. While adding an internal contact, you can also assign the contact as a specified customer service representative for your organization. To do so, select the CSR check box and the Default CSR check box, if required.
Remarks
The Remarks tab lets you add any notes that you may want to record for the selected profile. You can also insert profile or contact names, keywords, or the date and time, or import a file into the notes you are making. A spelling and grammar check option is also available.
Campaign
Use this tab to view and edit campaign details associated with the contacts of the selected profiles. The campaign tab screen has two parts. The left side displays the Campaign IDs of the campaigns associated with the selected profiles. The right side displays the associated campaigns, listed by stage.
You can click the appropriate radio button below to choose whether to display details of all the contacts of the selected profiles, or only of a particular contact. You can also add more targets to the listed campaigns or edit stages for the listed profiles from this tab.
Analysis Codes
Use the Analysis Codes tab to set codes and groups for the selected profile. A profile can have multiple analysis codes and analysis groups. Analysis codes and groups are set up by the system administrator. For details, see QAD Customer Relationship Management Administration Guide.
To add a group, select an option from the Select an analysis group drop-down list and click the Add button next to it. This displays the associated codes. If you want to select all available groups in the system, click the Select All Groups button.
Select or clear the group code check boxes as required. Click the save button to record your selection in the system.
Choose your view options from the radio buttons provided. To view all group codes, select All.
Installed Base
Installed bases are collections of locations where the products or services of your organization are implemented and used. If a profile uses more than one product or service, multiple installed base records are associated with it. Installed Base information is replicated from the Service and Support module in Enterprise Applications when the customer uses the Service and Support capability.
The Installed Base tab screen has two parts. The left side displays a list of the sites and products that are associated with the profile while the right side displays any notes that are on record. The Profile Details screen lets you add, edit, copy, and delete details of locations where the products and/or services are implemented.
Contracts
Use this tab to view or maintain service contracts for the selected profile. The Contracts tab screen has two parts. One part lists the contracts or contract quotes associated with the selected profile; the other part displays the contract lines. Select the appropriate radio button to choose between contracts and quotes.
To add a new contract or a new quote, right-click the left side of the screen and choose Add from the menu. The Service Contract Details screen displays. Enter the contract number and other details regarding contact, billing information, pricing, and so on, and save the record.
Note: The Contract Number that you enter while adding a new contract is used as a unique identifier for each contract. However, once it is saved you cannot edit the contract number.
To add Contract Lines, right-click the right side of the screen and select Add Line from the menu. The Contract Line Details screen opens where you can select the end user and define service type, price, and billing information. You can add multiple contract lines for a single contract or quote.
User-Defined Fields
You can set user-defined frames and fields for profiles, and view them through this tab. User-defined frames and fields let you add parameters to each record as required.
Note: Only a system administrator can create user-defined frames and fields through Main Menu|Settings|System|User-Defined Fields. For details, see QAD Customer Relationship Management Administration Guide.
Attachment
The Attachment tab lets you attach a document from your hard disk to the system. Right-click and select Attach Document from Hard Disk from the menu to attach a document of your choice. You can also choose the display view of the attachments by selecting from the options available in the right-click menu.
You can also detach, open, or view the properties of a selected attachment. Right-click and choose the required option from the menu.
Note: In order to share documents from the Attachment tab and view them successfully, make sure that the documents are attached from a shared network drive that is accessible to all users in a team or business unit. If any user attaches a document from their local hard drive to QAD CRM through the Attachment tab, it will not be accessible to others.
Script
Use this tab to add new scripts and process or delete existing ones. You can also replace script codes or other columns that display here.
When you right-click and select Add from the menu, the Script Details window displays. Choose the contact and the script code you want to attach to the selected contact, with the help of the look-up provided.
When you choose to process a script, the Processing Script window opens. This window displays all the questions that form part of the selected script. You can directly enter the customer responses in this window and save them.
You can create scripts through the stand-alone Scripts module. For more details, see
Maintaining Scripts.
Issues
This tab lets you maintain issue-related information for the selected profile. To log details for a new issue, right-click and choose Add from the menu. This displays the Issue Details screen, where you can enter the Product ID, Assigned To, Service Queue, and other fields with the help of the look-ups and drop-down lists provided.
For more details regarding the Issue Details screen, see
Defining Issue Details.