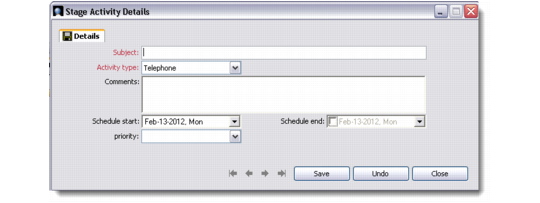
Adding Stage Activities
To add an activity to a selected stage, right-click and choose Add Stage Activity. The Stage Activity Details window opens.
Details
Subject
Enter a name or description for the new stage. This is a mandatory field.
Activity type
Select the activity type from the drop-down list provided. This is a mandatory field.
Comments
Record optional comments regarding the campaign stage.
Schedule start, Schedule end
Enter the start and end dates of the stage activity, if known.
Priority
Select the activity priority from the drop-down list provided.
Stage Activity Details
When you save the information you entered in the Stage Activity Details window, the new activity associated with a stage displays in the bottom left of the Campaign Processing screen.
The left part of the Campaign Processing screen lets you add, edit, copy, and delete campaign stages and stage activities. The right part lets you manage campaign targets and tasks. For more details on managing tasks, see
Managing Tasks.
You can also perform any of the following functions from the right part of the Campaign Processing screen. These functions are available in the right-click menu.
Copy To Campaigns
You can copy selected targets from the current campaign to another campaign in the database through this option. Use the look-ups provided to select the campaign and stage to which you want to copy the targets.
Copy Targets To Another Campaign
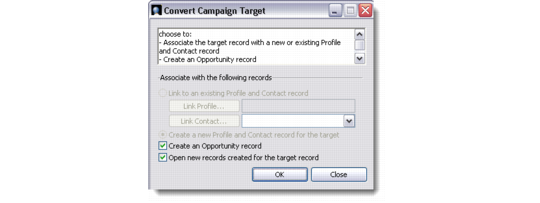
Convert Campaign Target
Choose this option to associate a manually created target with an existing profile, contact, or opportunity. You can also create a new profile or contact record for a target from this window.
Convert Campaign Target
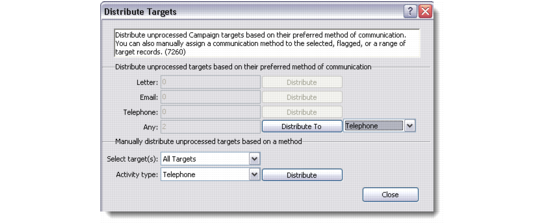
Distribute Targets
Use this option to distribute selected targets according to their preferred method of communication. You can also manually assign a communication method to a selected target.
Distribution of targets works only from the stage level, and not at the activity level. Activity options are enabled in the Distribute Targets window only when they have been selected for the particular campaign.
Distribute Targets
Note: Only unprocessed targets can be distributed.
Clear
Use this option to directly promote selected targets to the next logical stage in the campaign. You can also select a stage of your choice from the drop-down list provided.
Clear Targets To Selected Stage
On Hold
Choose this option to put a hold on selected targets associated with a campaign. When a target is on hold, the On Hold field is set to Yes. The system does not let you process targets that are on hold until you clear them or remove the hold.
Selected Target On Hold
Process
This option lets you process the activities of selected targets from this module directly. For details, see
Processing Activities.
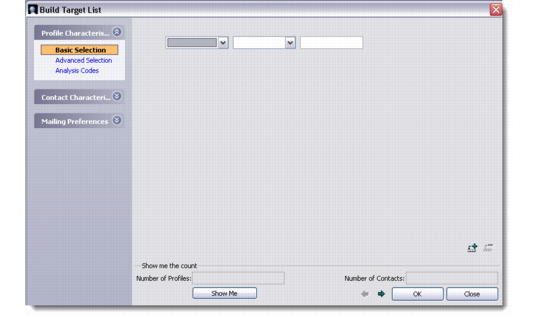
Build Target List
Use this option to create a target list for a campaign from the data available in the system database. The Build Target List screen lets you define selection criteria based on which targets are associated with a campaign or its stages. You can make your selection based on profile and contact characteristics, or according to mailing preferences.
Build Target List
Click the Show Me button to see a count of the profiles and contacts shortlisted as targets based on your criteria. The system displays a confirmation message when the list is created.
Build Target List - Confirmation Message
The Build Target List option is available from both parts of the Campaign Processing screen.
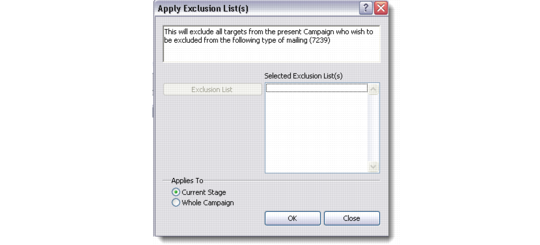
Apply Exclusion List
This option lets you exclude targets from the selected campaign from a particular type of mailing. You can apply the exclusion list to the current stage or the entire campaign.
Apply Exclusion List
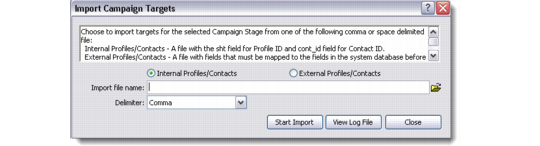
Import Targets
Use this option to import targets for a campaign from an external source or file. The Import Campaign Targets screen lets you select whether you want to import internal profiles and contacts or external ones.
Import Campaign Targets
To import internal profiles and contacts, select the appropriate radio button, attach the required file and click Start Import. This completes the process of importing campaign targets from a file, and the system displays a confirmation message on successful completion.
Import Campaign Targets - Confirmation Message
You can choose to view the log file for the import created by the system, or view it later by clicking View Log File from the Import Campaign Targets screen.
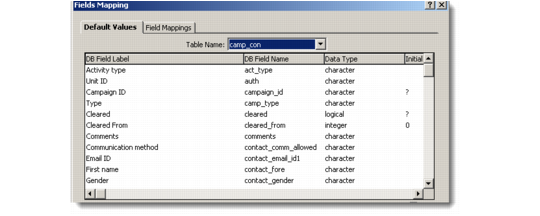
To import external profiles and contacts, select the appropriate radio button. The Import Campaign Targets screen refreshes to display the Fields Mapping button. Click this button to display the Fields Mapping window where you can map field names and labels to ensure that the information from the external file is captured accurately by the system. Click Start Import to complete the data transfer and target list creation.
Fields Mapping
The Import Targets option is available from both parts of the Campaign Processing screen.
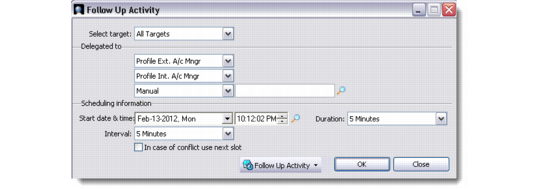
Follow-Up Activity
Choose this option to display the Follow-Up Activity screen where you can schedule follow-up activities for selected targets. You can also delegate targets to alternate account managers from here.
Follow-Up Activity