Master Instruction List
Use MILs to develop any number of work procedures to perform on pieces of equipment or a tool. These procedures are stored in the instruction list module. You can associate one master instruction list with a number of PM templates or copy it to corrective maintenance work orders.
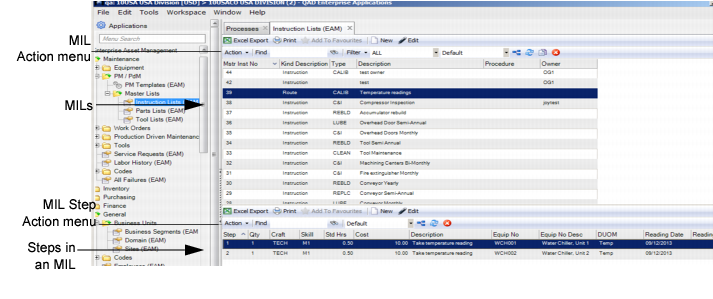
The MIL browse is located in Maintenance|PM/PdM|Master Lists|Instruction Lists.
MIL Browse
Creating an MIL
Follow these steps to create an MIL:
1 Open the MIL browse and click New in the upper browse.
A blank MIL record opens. The system automatically assigns an MIL number, which users cannot modify.
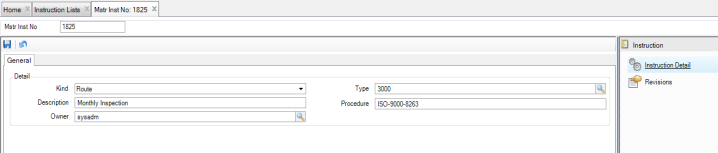
2 Enter the necessary information in the General tab.
MIL Record
Kind
Select the kind of MIL from the drop-down list:
• Instruction. Used to create steps detailing maintenance activities that need to be done for WO issued from PM or directly attached to WO.
• Route. Used to create steps for taking DUOM readings for one or many pieces of equipment for WO issued from PM or directly attached to WO.
• Safety. Safety Procedures used to create steps for internal and external safety requirements that need to be assessed with possible corrective actions for WO issued from PM or directly attached to WO.
Type
Use the lookup to select the type of MIL. This list is a user-defined grouping of MILs, by function, such as inspect and repair or lubrication.
Description
Use this field to explain the purpose of the MIL.
Procedure
Use this field as a cross-reference to another application, such as a quality system that may identify this MIL.
Owner
If necessary, select the owner for this MIL. This field adds security to the MIL by limiting the users who can modify the list. If an owner is selected in this field, only that person can modify this list.
3 Once all the information has been entered, click Save.
Adding Steps to an MIL
Follow this procedure to add steps to an MIL:
1 Select the MIL and click New in the lower browse.
A blank MIL step record opens. The system automatically assigns a step number. You can change the order of the steps using the Action menu in the lower browse of the instruction list. See
Move Steps Up or Down in an MIL.
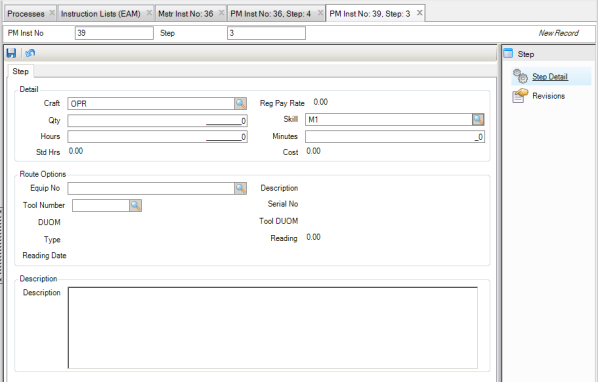
2 Enter the necessary information in the Step tab.
Instruction Step Tab
Detail
Craft
Select the specific craft required to complete this step from a validated table of user-defined codes.
Reg Pay Rate
Enter the craft’s hourly rates, used in the calculation of the estimated cost for a step on a master instruction list.
Qty
Enter the number of craft people required to complete that step. Calculate the cost per instruction step by multiplying the quantity by the time and its craft rate.
Skill
Select a skill level from a validated table of user-defined codes.
Hours
Enter the estimated amount of time in whole hours required to complete this individual step.
Minutes
Enter the estimated amount of time in whole minutes required to complete this individual step.
Std Hrs
EAM displays the calculated amount of time in whole and fractional hours required to complete this individual step.
Cost
EAM displays the calculated cost to complete this individual step.
Note: The cost for this step represents the estimated labor cost for the WO that uses the MIL.
Route Options
Note: The route fields are only enabled for Route MILs.
Equip No
Use the lookup to select the equipment.
Description
The equipment description. It defaults from the equipment record.
Note: You can select either Equipment No. or Tool Number. After you choose a piece of equipment or a tool and tab to the next field, the lookup you did not populate becomes inactive.
Tool Number
Enter the tool number or use the lookup to select a tool for this PM template.
Serial No
Enter the serial number or use the lookup to select a serial number for the tool you selected in Tool Number.
DUOM
The equipment’s DUOM. It defaults from equipment record. If necessary, use the lookup to enter another DUOM defined for equipment.
Tool DUOM
The DUOM defaults from the tool’s serial number record.
Reading
The current reading for the equipment or tool specified. It defaults from the Current Reading field in the Readings submenu.
Reading Date
The reading date for the equipment or tool specified. It defaults from the Date Read field in the Readings submenu.
The Equipment’s Attachments action can also be accessed from the PM if the Equip to PM? in Attach File Options is selected for the PM site. See General|Business Unit|Site|General. This option allows files or links associated with the equipment on the PM to be accessible for reference.
Description
Enter text to describe the specific steps or procedures associated with this individual step.
3 Once all the information has been entered, click Save.
4 Add additional steps to the MIL as necessary.
Move Steps Up or Down in an MIL
It is easy to change the sequence of steps in an MIL by moving steps up or down.
Moving a Step Up
To move a step up so that it is performed earlier in the sequence, highlight the step and select Move Up from the MIL Step Action menu.
Moving a Step Down
To move a step down so that it is performed later in the sequence, highlight the step and select Move Down from the MIL Step Action menu.
View Revision History for an MIL or MIL Step
Because many quality systems call for strict record keeping about the revisions made to MILs and MIL steps, the Revisions submenu provides an audit trail of all modifications made to these records. The revision records, which are stored in the Revisions submenu and in the Revisions module at General|Revisions, are automatically created when a modification is made to the MIL and MIL step.
Note: MIL and MIL step revision history is enabled by selecting the Mstr List Rev? check box in System Administration|System Control on the Detail tab. See
System Control: Detail Tab.
Revision History for an MIL
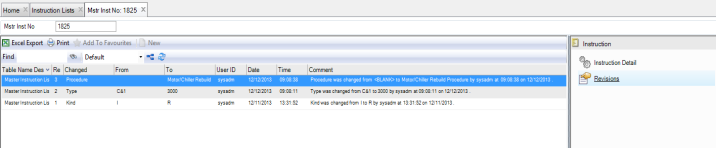
To view the revision history for an MIL, open the MIL and select the Revisions submenu.
Revision History for an MIL
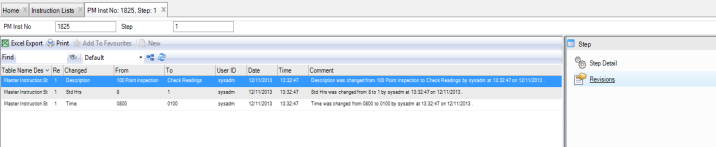
Revision History for an MIL Step
To view the revision history for an MIL step, open the MIL step and select the Revisions submenu.
Revision History for an MIL Step
Attaching and Linking Files to an MIL or MIL Step
EAM allows you to attach and link an unlimited number of files and to link an unlimited number of URLs to an MIL or MIL step. If you can run the file on your operating system, you can run it from EAM once it is attached or linked.
Note: If the Equip to MIL Step? check box is selected in the Site|General tab, files that are attached to an equipment record automatically copy to any MIL step associated with that piece of equipment.
Link Files to an MIL or MIL Step
Attach a File
To attach a file to a MIL or MIL step:
1 Select the MIL.
2 Select Attachments from the Action menu. If you are attaching a file to an MIL step, select the step and then select Attachments from the MIL Step Action menu
3 In the Attachments window, select Attach File.
4 Locate the file on your computer and click Open. The file is now attached to the MIL.
Link a File
Follow these steps to link a file to an MIL or MIL step:
1 Select the MIL.
2 Select Attachments from the MIL Action menu. If you are linking a file to an MIL step, select the step and then select Attachments from the MIL Step Action menu.
3 In the Attachments window, select Add File Link.
4 Locate the file and then click Open. The file is now linked to the MIL or the MIL step.
Link a URL
To link a URL:
1 Select the MIL.
2 Select Attachments from the MIL Action menu. If you are linking a URL to an MIL step, select the step and then select Attachments from the MIL Step Action menu.
3 In the Attachments window, select Add URL or other link.
4 Copy and paste the URL into the field and click OK. The URL is now linked to the MIL or the MIL step.