Creating a Service Request
Follow these steps to create a service request:
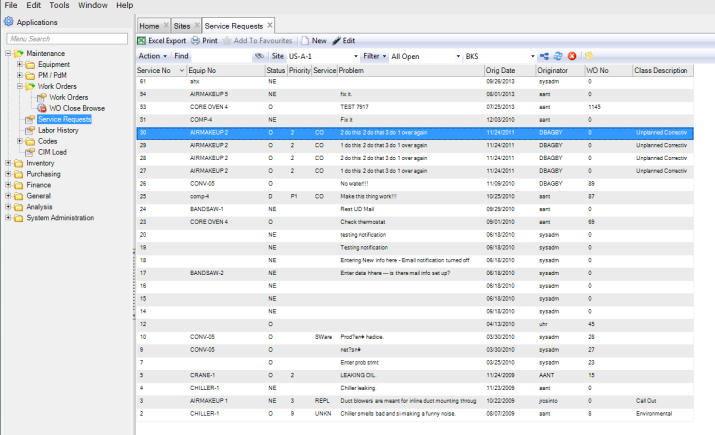
1 Open the Service Request browse in Maintenance|Work Orders|Service Requests.
Service Request Browse
2 Click New.
A blank service request record opens. The system automatically assigns a service request number, which cannot be modified.
4 Once you have entered all of the information, click Save.
Filling Out the Service Request
Use a service request to report an equipment problem that does not need a work order immediately. Often, the originator of the service request is the person who uses the piece of equipment. This employee is the most likely person to notice that a piece of equipment needs repair or service. Typically this person is not involved in creating maintenance work orders directly. Service requests provide an effective means of reporting equipment problems for which maintenance planners can subsequently create work orders.
When you create a work order for a piece of equipment with open service requests, the system prompts you to consider attaching those service requests. Attach any number of service requests, or none at all. Service requests ensure that all needed work happens at the same time. The service request originator receives notifications about status changes. Service requests improve the flow of information among employees.
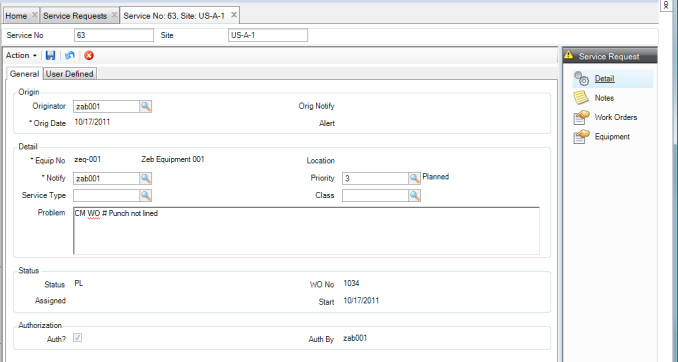
Service Request Tab: General
Use this tab to view or change information about the service request origin, equipment and problem details, status, and authorization.
Services Tab: General
Origin
Originator
By default, this field displays the user who created the service request. You can overwrite this field.
Orig Notify
Enter the user or mail group who receives automatic e-mail notification when the service request is created and saved.
Original Date
This field defaults to the date on which the service request was created, but you can overwrite the date.
Alert
This field is enabled when the Alert setting for
Priority is selected. Use the lookup to select a user or mail group to receive pager text messages for this service request.
Detail
Equip No
Enter the identification number for the piece of equipment. It displays the equipment description and defaults the user or group to notify from the equipment record. If the equipment is locked, the system displays a warning message.
Location
Displays the physical location for the equipment entered on the SR.
Notify
The location defaults from the equipment entered on the SR. This field displays the designated user or mail group who receives notification about the service request.
Priority
This field indicates the importance of the service request. The priority code defaults from the equipment record, but you can manually enter it. If the Alert setting for the Priority is selected, then you can update the
Alert field for the SR.
Service Type
Use the lookup to enter a code representing the category of service requested.
Class
Use to classify the type of work required. Select the class code for this service request from the lookup.
Problem
Enter a description of the problem.
Status
Status
Identifies where the service request is in its life cycle.
WO Number
Displays the identifying number of the work order assigned to this service request.
Assigned
Displays the employee assigned to the work order associated with the service request.
Start
Enter the date when the requestor or planner wants to start the work. This defaults into the WO created for the SR.
Authorization
If Auth SR? is selected for the SR site’s domain, an authorization is required before a work order can be created from the SR.
Auth?
The system updates this check box when the service request is authorized.
Authorized By
The system updates this field with the ID of the user who authorized the SR.
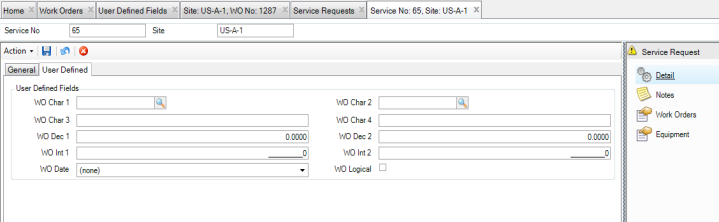
Service Request Tab: User Defined
Use the Service Request User Defined tab to track information against specific equipment in EAM. There are ten user-defined fields.
Services Tab: User Defined
User Defined Fields
WO Character 1/2
User-defined character fields, validated against tables that you add.
WO Character 3/4
Free-form user-defined character fields, not validated against tables.
WO Decimal 1/2
User-defined decimal fields for the work order.
WO Integer 1/2
User-defined integer fields for the work order.
WO Logical
A user-defined check box.
WO Date.
A user-defined date.
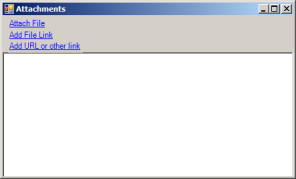
Attach or Link a File to a Service Request
EAM gives you the option of attaching an unlimited number of files and linking an unlimited number of files or URLs to a service request. If you can run the file on your operating system, you can run it from EAM once it is attached or linked.
Attaching or Linking a File to a Service Request
Attach a File to a Service Request
To attach a file to a service request:
1 Select a service request from the Service Request browse.
2 Select Attachments from the Action menu.
3 In the Attachments window, select Attach File.
4 Locate the file on your computer and click Open. The file is now attached to the service request.
Note: You cannot edit an attachment from the Attachment window.
Link a File to a Service Request
To link a file to a service request:
1 Select the service request from the Service Request browse.
2 Select Attachments from the Action menu.
3 In the Attachments window, select Add File Link.
4 Locate the file on your computer and click Open. The file is now linked to the service request.
Link a URL to a Service Request
To link a URL to a service request:
1 Select the service request from the Service Request browse.
2 Select Attachments from the Action menu.
3 In the Attachments window, select Add URL or other Link.
4 Copy and paste the link into the field and then click OK. The URL is now linked to the service request.
Print a Service Request
To print a service request, select Print Document from the Service Request Action menu.