QAD Enterprise Asset Management 2017.1
>
User Guide
>
Projects
>
Projects
>
Project Activities–Customer-Funded Projects
Project Activities–Customer-Funded Projects
You can perform the following activities for customer-funded projects:
Creating Scheduled Payments for Sales Orders on a Customer-Funded Project
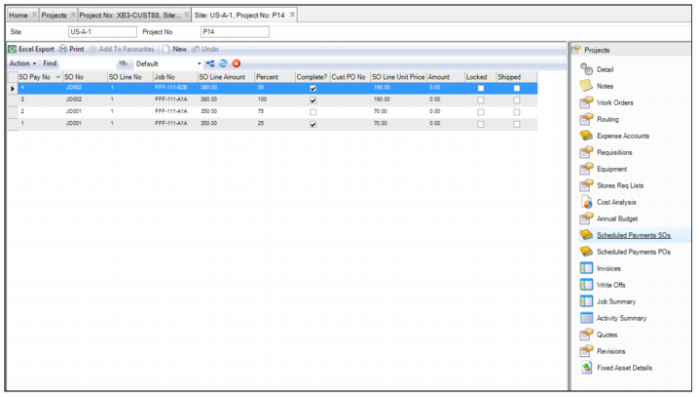
The Scheduled Payments SOs submenu allows you to create, manage, and view scheduled payments for sales orders for a customer-funded project. You also use this submenu to initiate the invoicing process in the ERP. The ERP generates invoices for the sales orders and invoice payments.
Project Submenu: Scheduled Payments SOs
Follow these steps to create a scheduled payment for sales orders on a customer-funded project:
1 Open the project, select the Scheduled Payment SOs, and click New.
2 Enter the payment details in the following fields:
SO Pay Number
A system-generated identifier associated with this scheduled payment.
SO Number
Use the lookup to select the sales order associated with this scheduled payment
Note: Sales orders must be created in the QAD ERP Sale Orders module for use with EAM projects. When the sales order is created in the ERP, the EAM project number must be specified in the SO header and in at least one of the sales order line accounts so that it can be imported and selected here in EAM.
SO Line Number
Use the lookup to select the sales order line number based on the sales order selected for the payment schedule line.
Job Number
Use the lookup to select the job number to associate with this scheduled payment.
SO Line Amount
Displays the amount associated from the selected sales order line.
Item
Displays the item associated from the selected sales order line.
Percent
Enter the percentage of the SO Line Amount to invoice. This amount is invoiced once the SO Ship action is selected. You can enter either percentages or amounts for the same SO line. You cannot enter an amount on an SO Pay line and a percentage for another SO Pay line for the same SO line.
Amount.
Enter the amount of the SO Line Amount to invoice. This amount is invoiced once the SO Ship action is selected.
Estimated PPAP Date
Select the estimated PPAP (Production Part Approval Process) date or enter the date in the field.
Actual PPAP Date
Select the actual PPAP date or enter the date in the field.
Due Date
Select the due date or enter the date in the field.
Estimated Invoice Date
Select the estimated invoice date or enter the date in the field.
Complete?
Select this check box to indicate that this pay line is ready to invoice.
Customer PO Number
Enter the customer purchase order number in this field.
SO Line Unit Price
Defaults from the sales order line into this field.
Locked
The system updates this check box once the SO Ship action is complete. If the check box is selected, the record cannot be modified.
Shipped
The system updates this check box once the SO Ship action is completed.
3 Once you have entered the necessary information, press Enter to save.
4 If necessary, repeat these steps to add additional pay lines.
Managing the Scheduled Payments for Sales Orders on a Customer-Funded Project
When a portion of the project work is complete, follow these steps to initiate the sales order invoicing process in ERP:
1 Open the project and select the Scheduled Payment SOs submenu.
2 Select the Complete? check box on the corresponding SO Pay Line. Press Enter to save.
3 Highlight the SO Pay Line and select SO Ship from the Action menu.
4 A date/time dialog box displays, showing default data and time. Make any necessary changes and then click OK.
A message box indicates that the update is complete.
5 Click OK to close the message box.
6 The system updates the Locked and Shipped status.
A pending invoice is created in the QAD ERP that can be selected for Post and Print so it is then available for the AR processing of customer payments.
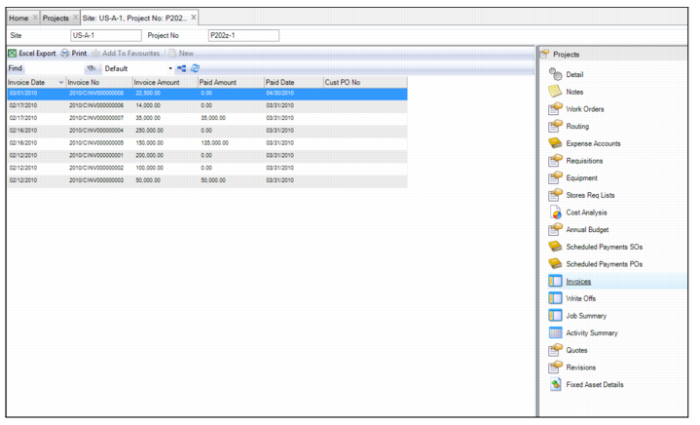
Reviewing Invoices and Reimbursements
The Invoices submenu displays the invoices created for customer-funded reimbursement for the project. These invoices are created in the ERP from sales order information on SO Scheduled Payments. Invoice No., Invoice Date, and Invoice Amount are updated in the Invoice submenu once the invoice is post and printed in ERP. Click the refresh button to see the most recent updates.
You can sort the list of invoices by selecting the Invoice Date, Invoice Number, Paid Date, or Customer PO Number column header and clicking the up or down arrow to sort by that value in ascending or descending order.
To review the invoices and reimbursement details for a customer-funded project, open the project and select the Invoices submenu.
Project Submenu: Invoices
Invoice Date
The date of the invoice.
Invoice Number
The number of the invoice.
Invoice Amount
The total amount of the invoice.
Paid Amount
The amount paid for the invoice. This value is updated when a payment is allocated to the invoice in QAD Financials.
Paid Date
The date the payment was made.
Cust PO No
The customer purchase order number associated with this invoice.
Job
The job number to associate with the scheduled payment invoiced.
Job Description
The job description.
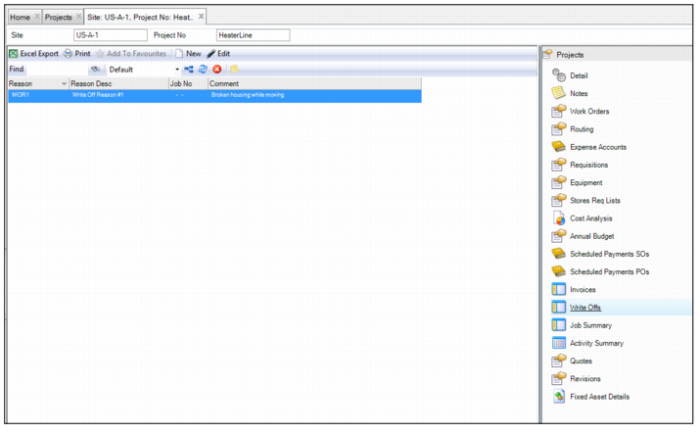
Entering Write-Offs for a Project
Write-offs are the amount of money the company pays out on a customer-funded project without reimbursement from the customer. Write-off amounts are manual data entries. Each write-off can have an associated reason code and job number. The total of write-off amounts is automatically updated on the Project’s Customer Funding tab, in the Write-off Amt field. See
Project: Customer Funding Tab.
Project Submenu: Write Offs
Follow these steps to enter write-offs for a project:
1 Open the project and select the Write Offs submenu.
2 Enter the write-off details in the following fields:
Reason
Use the lookup to select a reason for the write-off. Reason codes are set up in Finance|Codes|Write Off Reasons.
Job Number
Use the lookup to select the job to which the write-off is charged.
Amount
Enter the amount of the write-off.
Comment
Enter an optional comment.
3 Press Enter to save.
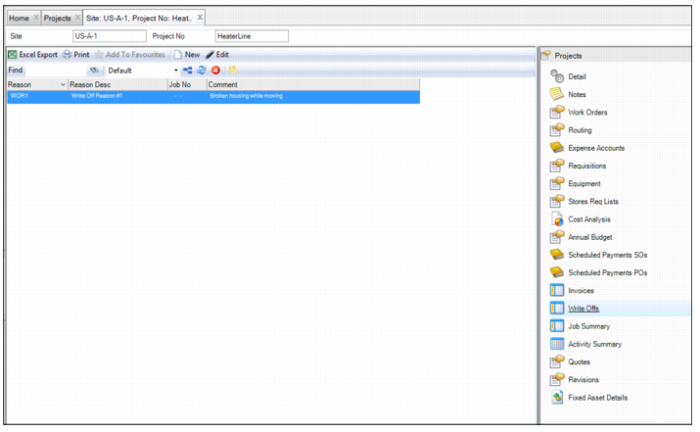
Viewing Write-Offs for a Project
To view the write-offs for a project, open the project and select the Write Offs submenu.
Project Submenu: Write Offs Submenu
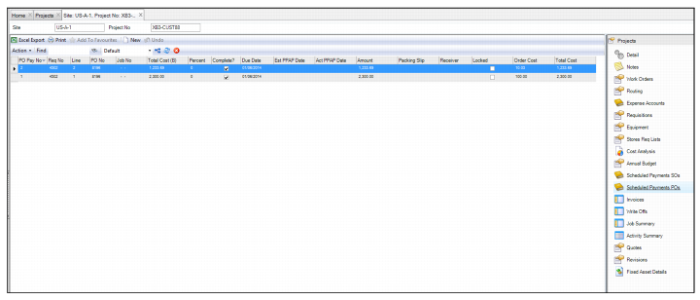
Creating Scheduled Payments to Vendors for a Project
The Scheduled Payments POs submenu allows you to create, edit, and view scheduled payments for POs associated with a customer-funded project.
Project Submenu: Scheduled Payments PO
Follow these steps to create a scheduled payment for a PO associated with a customer-funded project:
1 Open the project and select the Scheduled Payments POs submenu.
2 Enter the payment details in the following fields:
PO Pay Number
A system-generated identifier associated with this payment.
Req Number
Select the requisition number associated with this payment.
Line
Select the requisition line associated with the requisition on this PO Pay Line.
PO Number
Displays the purchase order number associated with this requisition selected for the PO Pay Line.
Job Number
Displays the job number associated with this payment.
Total Cost
Displays the total cost in requisition/PO currency for the requisition line associated with this PO Pay Line.
Total Cost (B)
Displays the total cost in base currency for the requisition line associated with this PO Pay Line.
Percent
Enter the percentage of the requisition line’s total cost to be paid for the supplier invoice.
Amount
Enter the amount of the requisition line’s total cost to be paid for the supplier invoice.
Packing Slip
Enter a Packing Slip. This field can be optional for use with PO Receiving or it can be required if Mandatory has been specified for the Project’s Site.
Complete?
Select this check box to indicate that this PO Pay Line is ready for payment.
Locked
Once the Receipt action is complete, the system updates this check box. If this check box is selected, the record cannot be modified.
Receiver
After the Complete Payment action is executed, the system automatically updates this field with the Receiver No.
Due Date
Select the due date or enter the date in the field.
Estimated PPAP Date
Select the estimated PPAP date or enter the date in the field.
Actual PPAP Date
Select the actual PPAP date or enter the date in the field.
3 Once you have entered the necessary information, press Enter to save.
4 If necessary, repeat these steps to add additional pay lines.
Managing the Scheduled Payments for POs on a Customer-Funded Project
Follow these steps to initiate the PO payment process in ERP:
1 Open the project and select the Scheduled Payments POs submenu.
2 Select the Complete? check box on the corresponding PO Pay Line. Press Enter to save.
3 Highlight the PO Pay Line.
4 Select Complete Payment from the Action menu. This action executes a PO Receipt based on the information from the PO Pay Line selected.
The system updates the Locked status on the PO Pay Line.
5 A Receipt is created in EAM and the Receiver No is updated on the Schedule PO Pay Line.
The EAM Receipt is sent to ERP Purchasing so that it can be used in AP processing for supplier invoice matching and payment.
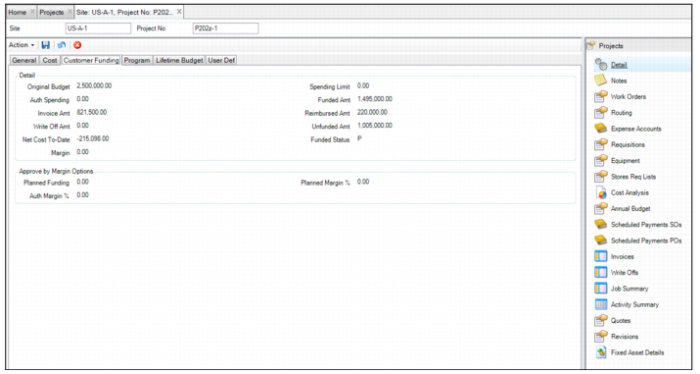
Reviewing Customer Funding Tab
The Customer Funding tab provides a summary of values for the customer-funded activities as the project progresses.
Customer Funding Tab