Scheduled Order Header Frame
Some of the header fields are similar in function to the equivalent fields in Sales Order Maintenance. Important fields are discussed in this section.
See User Guide: QAD Sales.
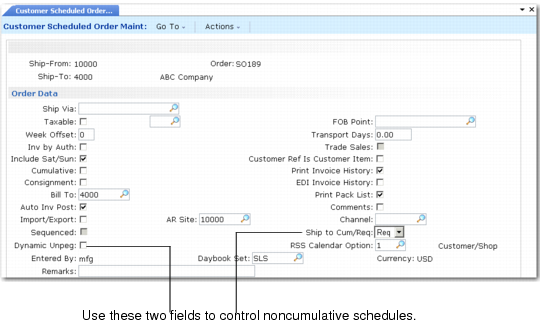
Customer Scheduled Order Maintenance (7.3.13)
Week Offset
This field sets the weekly starting day of the scheduled order to match the customer’s work week. The default is 0 (zero), which represents Monday. If this customer’s business week begins on Tuesday, set this to 1, and so on through 6, which sets Sunday as the starting day. All reports and inquiries with bucketed quantities display the period requirements on this weekday.
Inv by Auth
Indicate how invoice totals should be calculated and displayed for this scheduled order.
No: Invoice totals are calculated by line. This is the typical method for calculating totals unless the customer is using AR Self-Billing.
Yes: Invoice totals are calculated by authorization number. The printed invoice includes the price and amount for each authorization line as well as the total for all authorization lines. The extended price for each invoice line item is not displayed.
This field is important for customers using the optional Self-Billing Menu (27.6.12) and ensures that rounding errors do not occur between the accounts receivable (AR) amount calculated by Self-Bill Payment Application (27.6.12.7) and the invoice amount. Rounding errors can prevent invoices from being closed or create unapplied payments.
Enter Yes if the customer on this scheduled order pays invoices using authorization numbers. When the self-payment is applied by authorization number, the amounts match exactly.
See User Guide: QAD Financials for information on Self Billing.
Cumulative
Determines how requirements are entered on scheduled releases and displayed in reports and inquiries.
No: Net quantities are entered.
Yes: All quantities are entered as cumulative, meaning that the discrete quantity is added to the cumulative quantity of the previous requirement.
Consignment
Enter Yes if items on this scheduled order are consigned. This value defaults from Ship-To/Item Controls Maintenance (7.18.1), if used. If not used, the value defaults from Customer Consignment Control (7.18.24).
Enter No if the most items on this order are not consigned. You can designate individual items as consigned in the Consignment Order Line Item Data frame that displays later during order entry.
See User Guide: QAD Sales for information on Customer Consignment Inventory.
Auto Inv Post
This field sets the default value for the Post Invoice field in Pre-Shipper/Shipper Confirm (7.9.5).
• When Post Invoice is No, invoices are not posted during shipper confirmation. You must post them manually using Invoice Post and Print (7.13.4).
• When Post Invoice is Yes, invoices are automatically posted during shipper confirmation to the general ledger Accounts Receivable (AR) account specified for the customer. You can print accumulated invoices using Invoice Print or Reprint (7.13.12).
This value defaults from the Auto Invoice Post field in Customer Schedules/Shipper Acct Control (36.9.7).
Sequenced
This field is available only when using the optional Customer Sequence Schedules (7.5.4) module. It indicates whether the scheduled order is a sequenced scheduled order. If Yes, enter sequence information in the Sequence Delivery Data frame.
This value is used by EDI eCommerce, Required Ship Schedule Update (7.5.5), and Picklist/Pre-Shipper–Automatic (7.9.1) to verify whether scheduled orders are sequenced orders. It defaults from the Scheduled Order Default field in Sequence Schedule Control (7.5.4.24).
Note: Sequenced schedules are not supported when using a trade sales arrangement; therefore, if Trade Sales is Yes, this field is display only. See
Trade Sales.
Dynamic UnPeg
Set to Yes to initiate dynamic de-allocation. This affects the open quantity by letting pegged requirement quantities on unconfirmed shippers for the same order line number be included in the calculation. The pegged quantities are unpegged from unconfirmed shippers and pegged to ship lines on newly created shippers.
This activity is optional. It should only be used if unconfirmed shippers are left in the system for extended periods of time.
Transport Days
Enter the number of calendar days it takes for a shipment to arrive at the customer site. Specify a value only if your customer gives you a receipt schedule, specifying the date they want the product in-house. If your customer gives you a shipping schedule, they have already factored in the transportation time.
The schedule update functions uses this to set shipment dates.
Shipment Date = Requirement Date – Transport Days
Trade Sales
This field enables or disables trade sales functionality.
No (the default): This is a standard scheduled order.
Yes: The system:
• Automatically creates a supplier scheduled order—a type of purchase order—for each supplier of the line items
• Sets the ship type to blank on the trade sales order
• Displays an additional Trade Sales PO Data frame at the line item level
• Prohibits you from setting the Sequenced field
If line items already exist on the order, the system prompts you to confirm that you want trade sales purchase orders created for them. Once you confirm, the system creates the trade sales supplier scheduled orders for the suppliers associated with the items in Item Master Maintenance (1.4.1). If a valid supplier is not associated with the item on the order, an error displays and you cannot continue. If any existing lines have existing schedules or if you received items for a line, an error displays and you cannot continue.
If line items do not exist, the system creates a new supplier scheduled order line as you enter new line items.
If the trade sales order has more than one item supplied by the same supplier, the system creates one supplier scheduled order with multiple lines for the items; however, if the trade sales order has multiple order lines with the same item number and the same supplier, the system creates multiple supplier scheduled orders for one supplier.
Customer Ref is Customer Item
Indicate whether the value entered in Customer Ref should be a valid customer item, defined in Customer Item Maintenance (1.16).
The effect of setting this field to Yes varies depending on what you enter in the Item field in Customer Scheduled Order Maintenance:
• When you specify a customer item number defined in Customer Item Maintenance in the Item field, that customer item number defaults to the Customer Ref and Customer Item field (in the Order Line Item Data frame). The system replaces the value you enter in the Item field with the corresponding internal item number and displays a message to inform you of the change.
• When you enter an item defined in Item Master Maintenance in the Item field and that internal item corresponds to just one customer item, the corresponding customer item number defaults to Customer Ref and Customer Item.
• When you enter a valid internal item number in the Item field that does not have a corresponding customer item number an error displays. You must change the item or set up a customer item cross-reference in Customer Item Maintenance.
• When you enter a valid internal item number in the Item field that has more than one customer item number, no default displays in the Customer Ref field. You must specify a valid customer item in Customer Ref to continue.
• When you leave the Item field blank and enter a valid customer item in the Customer Ref field, the system enters the corresponding internal item number in the Item field and defaults the value in Customer Ref to the Customer Item field.
Setting this field to No has the following effects:
• When you enter a valid customer item in the Item field, that customer item number defaults to the Customer Item field. The system replaces the value you enter in the Item field with the corresponding internal item number and displays a message to inform you of the change. The customer item number displays next to the Customer Ref field, but the Customer Ref field is not updated.
• When you enter a valid internal item number that corresponds to just one customer item in the Item field, the corresponding customer item displays next to the Customer Ref field and defaults to the Customer Item field; Customer Ref is not updated.
• When you enter an item number that either does not have a corresponding customer item number or has more than one customer item number, then both Customer Item and Customer Ref are left blank. Values entered in Customer Ref are not validated.
This value defaults from Customer Schedules Control (7.3.24).
Print Invoice History
Specify whether an invoice history can be printed for this scheduled order using Invoice Print or Reprint (7.13.12). This lets you print a paper copy of an invoice after an EDI invoice is transmitted electronically or when the advance ship notice (ASN) is used by the customer as the invoice.
EDI Invoice History
Specify whether an invoice for this scheduled order can be selected for export to the customer in EDI format using Invoice Export (35.4.3). On new orders, this field defaults from the Send EDI Invoices parameter specified for the customer in Trading Partner Parameter Maintenance (35.13.10). If that parameter is not specified, the default is No.
Print Pack List
Indicate whether a packing list for this order should be printed.
No (the default): Do not print a packing list for this order.
Yes: Allow Sales Order Packing List to print the packing list.
Other factors such as confirmation, partial shipment, and allocation quantity can also prevent a packing list from printing. In addition, only sales orders with a blank action status are considered. Any other action status indicates that the order is on hold. To support multi-site shipment, the system does not automatically change this field after a packing list prints or after a shipment is processed. However, you cannot print a second packing list if one already exists at a specific site and the order has not shipped.
AR Site
Enter the site where the scheduled order was recorded. This can be the same as the ship-from site, but does not have to be. You can change this site for each line item.
In multisite transactions where the AR site is different from the ship-from site, you can make shipments and let a separate AR site collect the revenues. Also, the AR site can exist in a different entity or different database, or both.
Channel
Enter an optional code identifying the distribution channel through which this scheduled order originated.
Channel is used when the system searches for default accounts on this order. Alternate Sales and Sales Discount accounts can be set up in Sales Account Maintenance (1.2.17) based on product line, site, channel, and customer type.
Ship to Cum/Req
Specify Req (required) to indicate a noncumulative schedule. If Req, an additional frame displays. Specify Cum to indicate a cumulative schedule.
Enter Req to peg ship details out of sequence. Pegging occurs automatically during the creation of the shipper in:
• Picklist/Pre-Shipper–Automatic (7.9.1)
• Pre-Shipper/Shipper Workbench (7.9.2)
• Shipper Gateway (7.9.22)
For a cumulative order, you can disable automatic pegging by setting Automatic Cum Pegging to No in Container/Shipper Control (7.9.24) or Customer Schedules Control (7.3.24).
RSS Calendar Option
Enter one of the following to specify which calendar to use:
1 (the default): Use both the customer and shop (manufacturing) calendars to create the RSS.
2: Use only the customer calendar to create the RSS.
3: Use neither the customer calendar nor shop calendar. The system creates schedule dates without any calendar adjustments.
Changing this field causes the system to recalculate the customer’s receipt quantities and dates for all affected schedules when you run Required Ship Schedule Update (7.5.5) or Selective Required Ship Schedule Update (7.5.6).