Processing Shipments
Use Sales Order Shipper Maintenance (7.9.8) to specify what is going to be shipped. However, since some time may elapse between the actual shipment and the creation of the shipper, use Pre-Shipper/Shipper Confirm (7.9.5) to execute shipment.
A shipment consists of multiple items, which can be end items or containers holding other containers and/or end items. Each shipper has a unique ID, which can also be the ASN number.
Shipment maintenance relies on a structural relationship between items and containers. Containers are similar to parents and can include any number of items or other containers. A shipper is defined for the entire shipment, which contains all containers as well as any items that are not in containers.
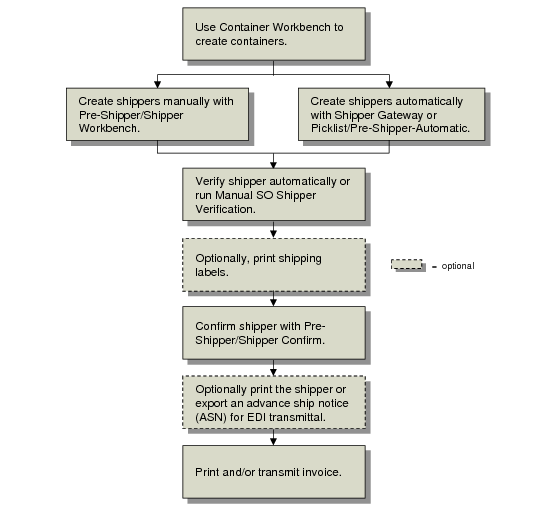
Scheduled Order Shipping Flow
Each shipment is processed in a similar manner using the following steps. Not all steps are required.
1 Containerize the shipment using Container Workbench (7.7.1), or use Pre-Shipper/Shipper Workbench (7.9.2) to add items and containers to shippers directly.
You can also define the shipper using Sales Order Shipper Maintenance (7.9.8).
This step can be done without defined containers by simply assigning end items to the shipper itself. However, if you use shipping labels, items must normally be in a container.
See User Guide: QAD Sales for details.
Note: Once a container is attached to a shipper or to a parent container, it cannot be deleted.
Assign containers and items, the quantities for each, then add any lot or serial detail information. You are also prompted for carrier details such as Ship Via and FOB Point. Volume and weight are not referenced.
All container and shipper data can be edited before shipper confirmation with the exception of the container ID. You can also modify shippers that have already been confirmed. However, modified shippers cannot be reconfirmed.
If you change the Ship Via or FOB Point fields on the shipper, the system does not automatically update the fields on the original scheduled order. To have the fields updated on the original scheduled order, the Post Invoice field in Pre-Shipper/Shipper Confirm (7.9.5) must be Yes.
For noncumulative schedules, requirement detail pegging takes place during this step.
If you are in multi-entry mode, you can also reedit line detail allocations for previously unconfirmed detail allocations when using multiple databases and allocating the line from a remote database.
2 Shipment verification is executed automatically at the completion of step 1. However, if you make additional modifications, you may want to execute Manual SO Shipper Verification (7.9.10) to reverify the structure of the shipper.
3 Print shipping labels using Shipping Label Print (7.7.7) or SO Shipping Label Print (7.9.14).
Print the labels by container. If you have referenced multiple containers under one container ID, multiple labels print. If no other containers are referenced, one label prints. Select the printer for which you have added barcode escape codes and developed template files.
4 Confirm the shipper using Pre-Shipper/Shipper Confirm (7.9.5).
This program confirms individual shipments by shipper ID. For noncumulative schedules, requirement detail consumption takes place during this step.
Confirmation decrements finished goods inventory, updates GL accounts, and increases the cumulative shipped quantity. Depending on how the Post Invoice field is set, it may also post an invoice.
The value of Post Invoice initially defaults from the Auto Inv Post field in the scheduled order header.
• When Post Invoice is No, the standard procedure for processing an invoice using Invoice Post and Print (7.13.4) applies.
• When Post Invoice is Yes, Pre-Shipper/Shipper Confirm automatically posts the invoice to the customer’s AR account. You can print the invoice during shipper confirmation or later using Invoice Print or Reprint (7.13.3).
You can print formal registered fiscal shipping documents, such as a Nota Fiscal, by specifying the appropriate form code.
The effective date in Pre-Shipper/Shipper Confirm can be used to record the shipment in a specific open GL accounting period. For example, this could be used after period end when shipments for that period have not all been fully processed.
See User Guide: QAD Sales for details.
5 Optionally, print the shipper using Pre-Shipper/Shipper Print (7.9.4) or Sales Order Shipper Print (7.9.9).
The shipper print program creates a shipper record or packing list. This function also updates the item quantity picked. At this point, the shipment is ready to leave your shipping dock.
Note: You can use Pre-Shipper/Shipper Print to include authorization numbers on the printed shipper.
6 Optionally, transmit the ASN using Shipment ASN Export (35.4.1).
In many scheduled order relationships, a customer does not process a shipment receipt until an ASN has been received. The ASN provides the customer with all the detail relevant to the shipment including:
• Purchase order and order line number
• Supplier and customer item numbers
• Authorization numbers, if available
• Item shipped
• Quantities
• Cumulative quantities
• Arrival time
In a trusted supplier relationship, the customer plans the shipment quantities directly into their production line, based on the electronically transmitted ASN with no receipt processing and no inspection. Often, the dock address where deliveries are made is the point on the production line where the items are going to be used, and their arrival time is coincident with the time the first item is needed for production.
Whether ASNs are sent for this particular customer is controlled by the Send EDI ASNs field in Trading Partner Parameter Maintenance (35.13.10).
7 Print/transmit the invoice using either Invoice Post and Print (7.13.4), Invoice Print and Reprint (7.13.12), or Invoice Export (35.4.3).
Note: Authorization numbers are included on the printed invoice.
The Print Invoice History field determines whether the invoice can be selected for printing. The EDI Invoice History field, which defaults from the customer’s record in Trading Partner Parameter Maintenance (35.13.10), determines whether invoices are transmitted using EDI. When invoices are neither printed nor transmitted, the customer makes payments against ASNs.
When printed invoices are permitted and the scheduled order is marked for auto-invoicing, confirming the shipper generates an invoice and then closes it. This is equivalent to the standard posting and printing steps. This enables you to make several daily or weekly shipments without requiring any specific invoicing tasks. You can print the closed invoices at the end of the day, week, or month using Invoice Print and Reprint (7.13.12).