Business Considerations
Does each item have a primary resource?
Do you need to define a resource group?
Understanding Item/Resource Relationships
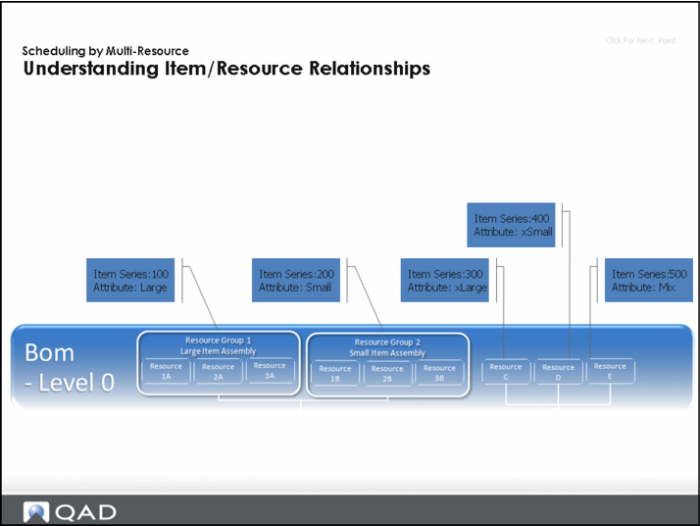
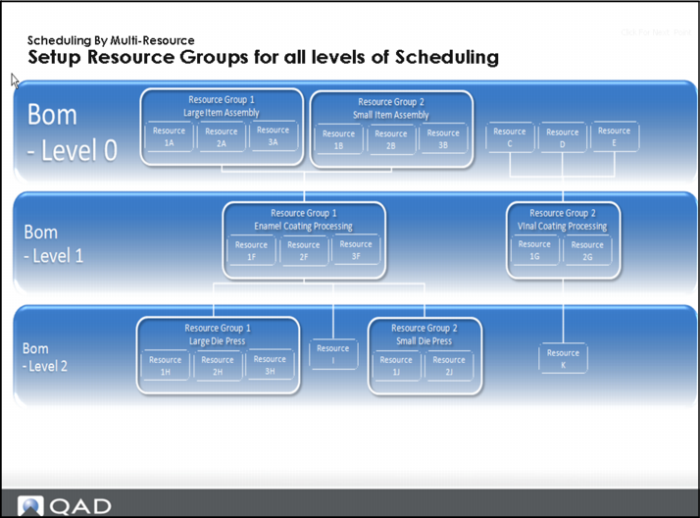
A Resource group represents a group of resources which process items with similar or identical attributes.
Associate each item produced to both a Resource Group and each resource (alternate resource) it can be produced on.
Question: What should the primary resource be assigned for each item?
Understanding Item/Resource Relationships (Continued)
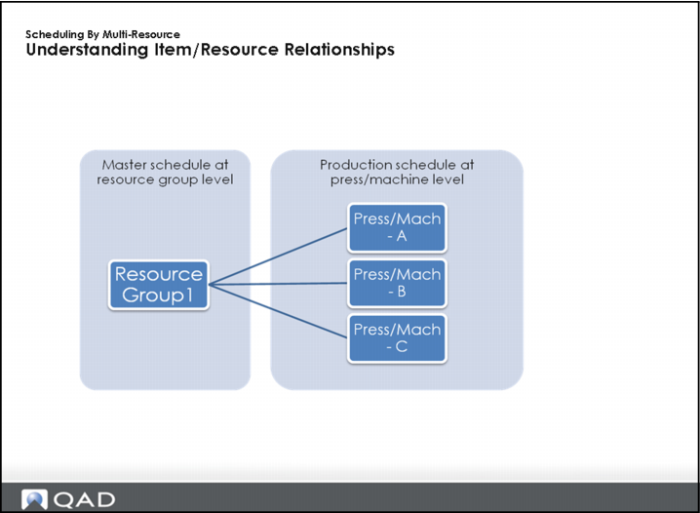
Business Scenario: You master schedule at the Resource Group level over the mid-term horizon, and assign production orders to the target resource in the short-term horizon.
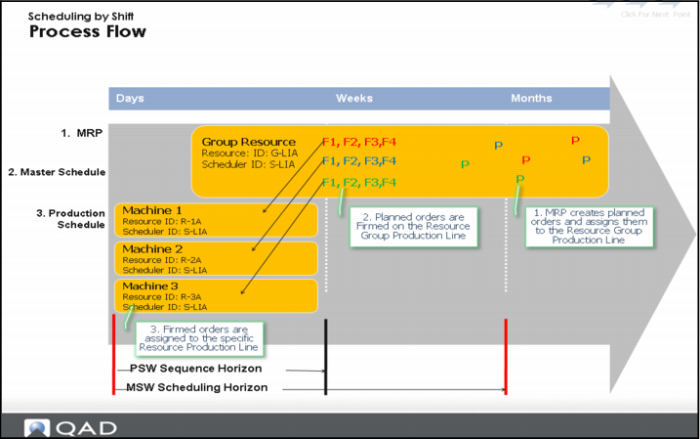
Process Flow
Solution Approach: You master schedule at the Resource Group level over the mid-term horizon, and assign production orders to the target resource in the short-term horizon.
Setup: Capacity
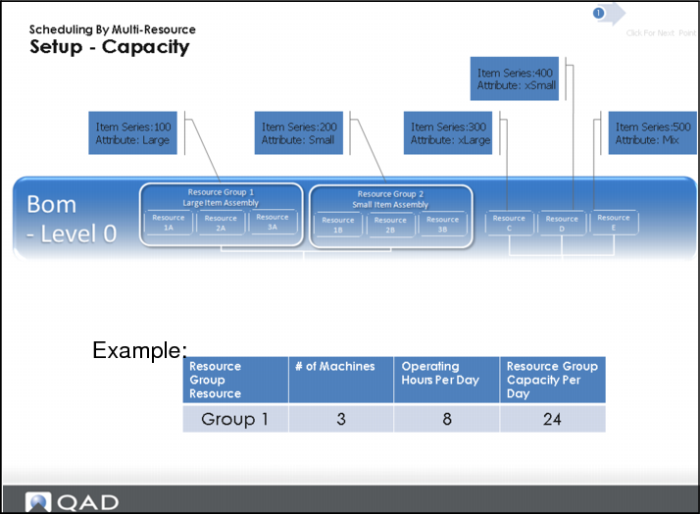
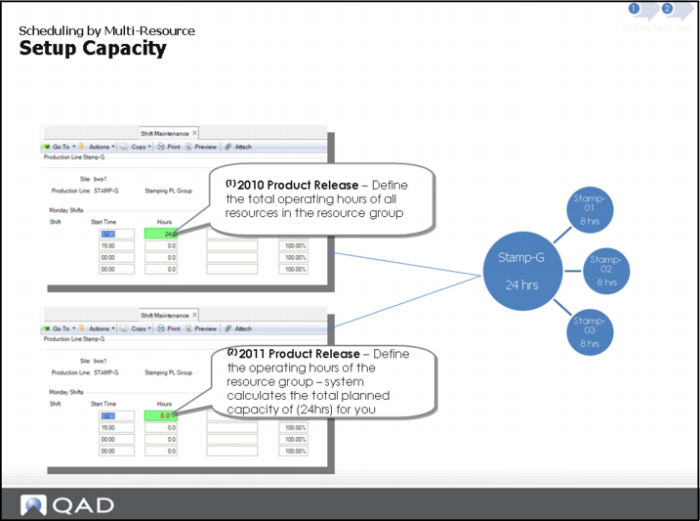
Question: What is the resource capacity for the resource group versus the individual resources belonging to the resource group?
Capacity for the Resource Group (resource) is equal to the number of “machines” within the resource group.
Setup Capacity (Continued)
The setup method is different between product releases.
Setup Resource Groups for All Scheduling Levels
Complete the setup for all levels of the BOM.
What is an example of a resource group in your environment?
Think about creating resource groups in situations where items are scheduled and there is no primary resource upon which the items are created.
PSW Example Basic
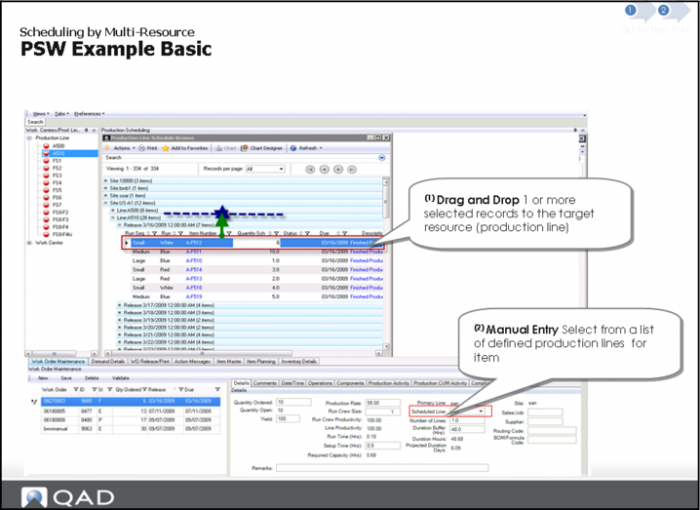
Modifying Resources by Dragging and Dropping
For a selected production order, you can drag and drop from the source resource to the target resource.
1 Select the production order in Production Order Maintenance Summary List within PSW.
2 Drag the order to the PSW Sequence Grid target resource.
A drop indicator displays, indicating the location at which you can drop the production order.
Note: The indicator does not display if the production line target is not defined as a primary or alternate production line.
PSW updates and recalculates data.
Manually Modifying a Resource
1 Move to the Production Order Maintenance tab in PSW, then select Details.
2 Manually enter a new production line in Scheduled Line field or select from the drop-down list.
PSW Example Advanced
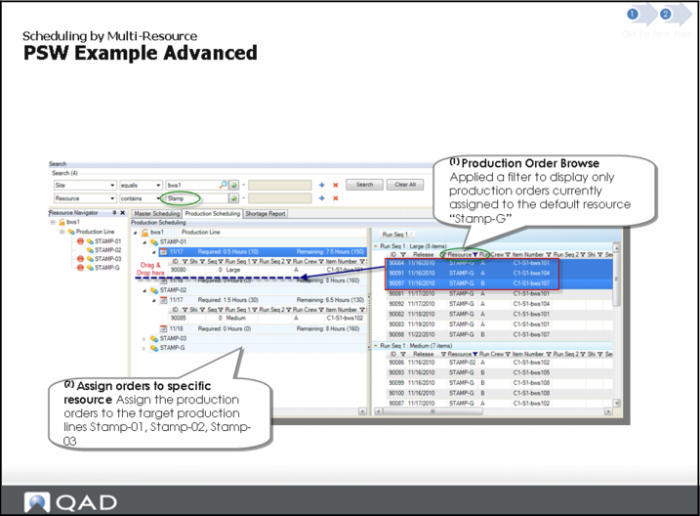
Solution Approach: Define your Search criteria and create a view to support multi-resource scheduling. In the graphic above:
(1) Using Production Order Browse: A filter is applied to display only production orders currently assigned to the default resource Stamp-G.
(2) Assign orders to specific resource. Assign the production orders to the target production lines Stamp-01, Stamp-02, Stamp-03.
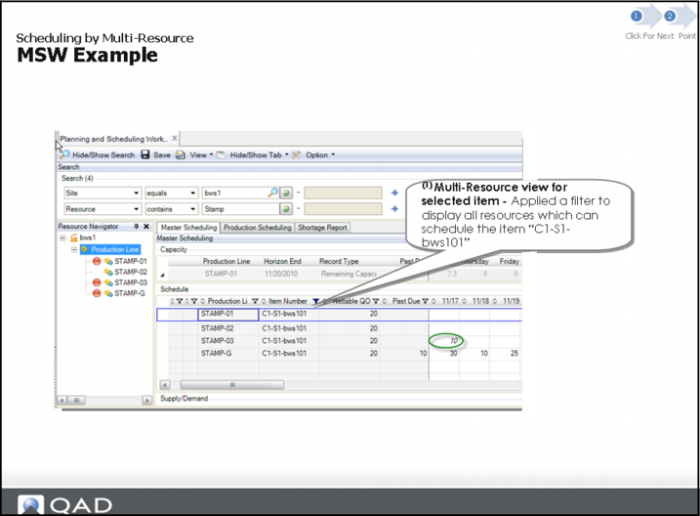
MSW Example
Solution Approach: Define your Search criteria and create a view to support multi-resource scheduling.
Hands-On Lesson Section
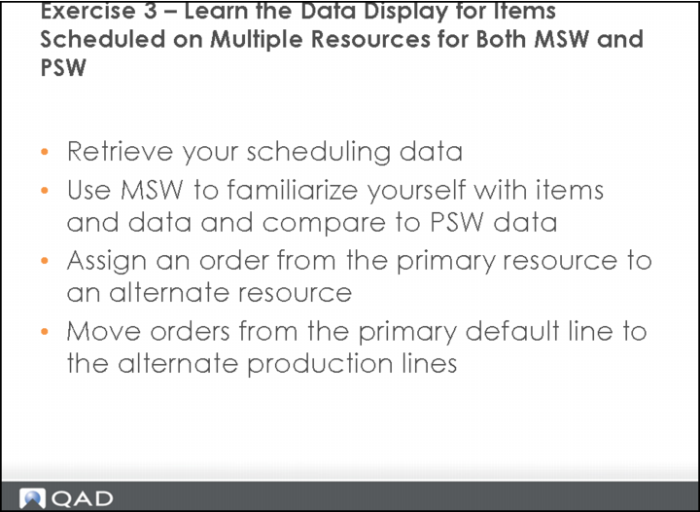
Exercise 3: Items Scheduled on Multiple Resources
The following exercises are aimed at familiarize yourself with how data is displayed for items scheduled on multiple resources on both the MSW and PSW. The exercises focus on the aspect of production scheduling across multiple resources.
Important: Do not save your scheduling changes from prior lessons. Ensure your training data was refreshed today. The exercises are not dependent on any prior lesson.
Retrieve your Scheduling Data
1 Select Toolbar Options, Preferences, then Display.
2 Under Production Scheduling, de-Select (disable) Display Shift.
3 Set the Sequencing Days field to 2.
4 In the Search Panel, enter selection criteria Site equals 10-202.
5 Enter Resource Contains Stamp.
6 Click Search.
You may be prompted to save.
7 Important: Do NOT save.
8 Hide the Search Panel and Capacity Panel.
9 In the Navigator Panel, click on Production Line Stamp-G.
Use MSW to Familiarize Yourself with Items/Data and Compare to PSW Data
Stamp-G is the department level production line where planned orders from MRP default. It is also the production line for which you firmed planned orders. You added them to the master schedule over the next several days and weeks into the future. Now, you are ready to review the items on the current master scheduled on the primary production line Resource Stamp-G.
1 In the MSW Schedule Grid, review the items and scheduled quantities on the production line you selected for <today>.
• Ensure you have selected Production Line Stamp-G in the Navigator Panel.
• All quantities, displayed in the firm scheduling horizon are firmed orders that you need to assign to specific production lines (Stamp-01, Stamp-02, Stamp-03).
2 In the PSW Sequence Grid, review the items and scheduled quantities on this production line for STAMP-G for <today>.
• Question: Are the items and orders displayed on the MSW Schedule Grid the same as the items and orders displayed on the Sequence Grid for today?
• Suggestion: If you have two monitors available, it may be helpful to move the right-click on the production scheduling tab, select Float and move the Production Scheduling tab to the second monitor. This should make it easier to compare the data on both MSW and PSW views.
Note: Shifts should not be displaying if you disabled them.
3 In the Navigator Panel, Select production line STAMP-03.
The system displays the same item numbers, but different scheduled quantities for each item.
• Not all items have scheduled quantities on STAMP-03. Other items without quantities appear on STAMP-03 because this resource is defined as an alternate resource per QAD EE Production Line/Item Maintenance programs.
4 In the MSW Schedule Grid, select item 53103 and select the Schedule Grid cell of tomorrow.
In the Production Order Maintenance Detail Panel, you can see that this item depicts that you have assigned production orders from the STAMP-G default production line to the specific STAMP-03 production line.
5 Select the PSW Sequence Grid.
The system displays the same item records for 53103.
• This illustrates that the MSW and PSW data are the same—PSW is just a more detailed view.
Assign an Order from the Primary Resource to an Alternate Resource
Continuing from the prior scenario, you want to view all primary and alternate resources for a selected item and then assign an order from the primary resource to an alternate resource. You use the MSW to do this, filtering on the selected item and moving it to an order to an alternate line with the Production Order Detail panel.
Note: You have to define the alternate on the production line in Production Line Maintenance (18.1.1), and you must make your search criteria generic enough to pick up the alternate resources. For example, enter resource contains STAMP in the search to pick up production line STAMP-1 and STAMP-2 and the alternate STAMP-G.
1 In the MSW Schedule Grid, Item Number column, filter on item 53103.
The Schedule Grid displays 1 or more records for item 53103.
• If you only see one record for item 53103, then you are not seeing all the records, continue on next step to correct.
2 In the Navigator Panel, select production line STAMP-03.
The Schedule Grid displays only item 53103.
3 In the Navigator Panel, select Production Line.
The Schedule Grid displays four records for item 53103.
• Question: What do these four records indicate to you?
4 In the Navigator Panel, select production line on the MSW Schedule Grid; then select the record for production line STAMP-G or item number 53103.
The Schedule Grid displays a scheduled quantity of 5 for tomorrow.
• The work order ID selected by default should be 90090 for a quantity of 5.
5 Review Production Order Maintenance Details tab for order 90090.
The Details tab displays the primary line STAMP-G and the scheduled line Stamp-G.
6 Modify the scheduled line; select STAMP-01.
The system updates the Schedule Grid, moving the order to production line STAMP-01.
• You can Tab out of field to apply selected value.
Note: This approach is one method of moving orders between production lines—moving them from the default/primary production line to the alternate production lines. The next exercise shows you another method using the PSW.
Move Orders from the Primary Default line to the Alternate Production Lines
Continuing from the prior scenario, you create a production schedule for each production line, STAMP-01, STAMP-02, STAMP-03. You use the PSW to move the orders from the primary default line, STAMP-G, to the alternate production lines, STAMP-01, STAMP-02, STAMP-03. You then use Production Order Browse to drag and drop to move the orders to the targeted lines.
1 In the Navigator Panel, select Production Line.
The PSW Sequence Grid displays all four production lines.
Note: To drag and drop orders to alternate lines, you must ensure on the Navigator Panel that your selection is at the production line/site level.
2 In the PSW Sequence Grid, expand STAMP-G for <today>.
The system displays several orders that are scheduled on STAMP-G.
3 Select order 90080 and drag and drop it to the target production line STAMP-01 for <today>.
The PSW Sequence Grid shows the order 90080 moved to the new production line.
Note: This is the basic method for using drag and drop on the PSW to move orders between lines, but this method may not be effective if you have an abundance of data on the UI, so go on to learn another way.
4 Open the PSW Production Order Browse panel and apply a filter to the Resource column for production line STAMP-G.
Production Order Browse only displays orders assigned to STAMP-G.
• This is a good approach to use the Production Order Browse to display all orders on a source resource so that you can move orders to one or more alternate resources on the PSW Sequence Grid.
5 In Production Order Browse, group records by the Release Date column, and then group by the Run Seq 1 column.
• You group to organize data in an effective way, making the data easier to comprehend and more efficient to move orders between resources. By grouping the data by release date, you can focus on the orders first with the nearest release dates.
Note: You group by dragging the column to shaded area with the text, Drag a column header here to group by that column.
6 In Production Order Browse, select all three orders shown for the Large attribute for release date of <today> and drag them to the PSW Sequence Grid for STAMP-01 <today>.
The system assigns the orders to the target production line.
7 Using the same method for orders with a Release Date of <today>, assign the Medium attribute orders to production line STAMP-02.
One small order should display on the Production Order Browse for Release Date of <today>.
8 Using the same method for orders with a Release Date of <today>, assign the Small attribute orders to production line STAMP-03 for <today>.
No orders should display on the Production Order Browse for Release Date of <today>.
• Question: Was there enough capacity on all three production lines?
• The answer should be yes.
9 Fill up remaining capacity for <today> on each production line Stamp-01, Stamp-02, Stamp-03 by using the methods above. Use Production Order browse to identify orders with future release dates.
Remaining capacity for each production line, <today> should be less than or equal to 0.
• Question: Any comments/thoughts on this approach?
Important: Do NOT save your changes.
Questions
1 What is the motivation for multi-resource scheduling?
2 A resource group represents a group of resources that processes what?
3 True or False. You master schedule at the resource group level over the mid-term horizon, and assign production orders to the target resource in the short-term horizon
4 How do planned orders get assigned to the resource group?
5 What is the resource capacity for the resource group versus the individual resources belonging to the resource group?
Answers
1 Direct shop floor execution at the resource level or measure shop floor performance by specific machine.
2 A Resource group represents a group of resources that processes items with similar or identical attributes.
3 True.
4 MRP creates planned orders and assigns them to the resource group.
5 Capacity for the resource group (resource) is equal to the number of machines within the resource group.
Split Production Order Section
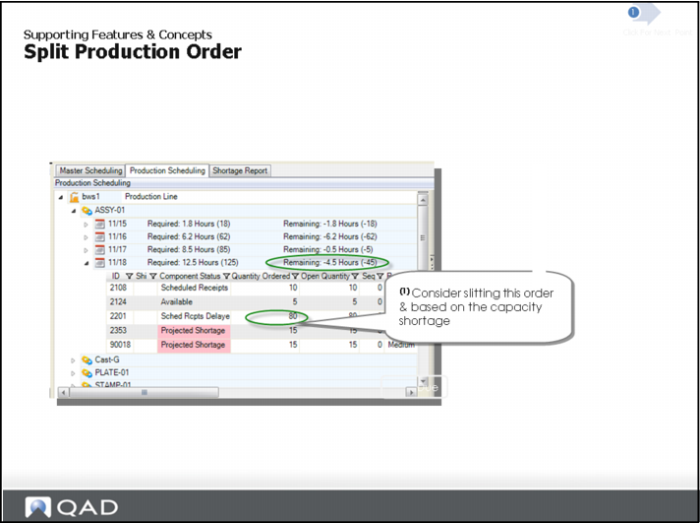
Split Production Order
Business Scenario: You desire to split a production order to:
• Accommodate a capacity constraint within a day or shift
• Produce in small batch versus the standard MRP/forecast quantity
• Produce based on material availability
• Split and track by work order number
Split Production Order: Solution Approach
Solution Approach: Split production order with the split function. The split creates a new order ID. The new order keeps the same work order number, but a new ID.
System processing consists of the following:
1. Creates a new (copy) production order with split quantity.
2. Reduces the original production order by the Quantity To Split field.
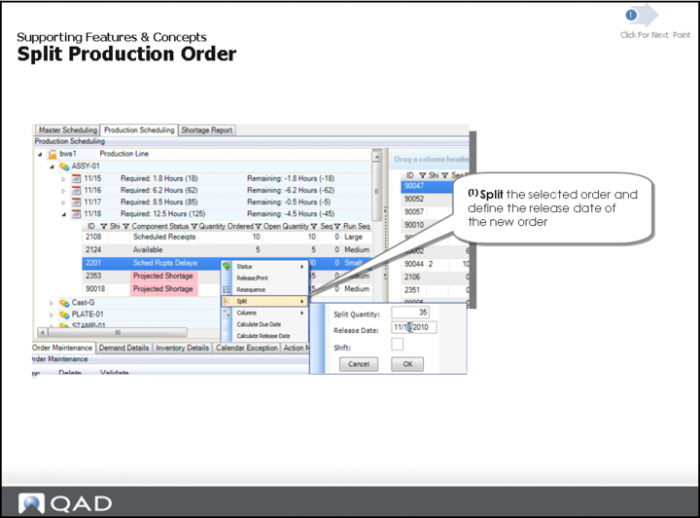
PSW lets you split a production order into smaller production orders while tracking costs to a cumulative order. To split a new discrete production order into several production orders:
1 Select the production order to split.
2 Split the order by selecting the line, then right-clicking to display the pull-down menu.
3 Select Split.
A window displays additional options.
4 Enter the split quantity, release date, and the shift.
5 Press OK.
Standard Split Function
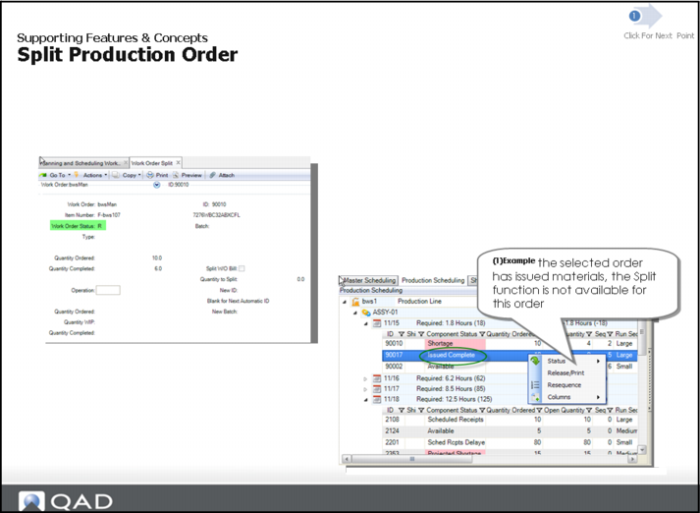
Solution Approach: Use the legacy Work Order Split (16.9) for orders:
• Order status is allocated/released.
• Materials issued/picked for order.
• Production reported against order.
• Order Type is discrete.
Anchor Order Due Date Section
Anchor Order Due Date
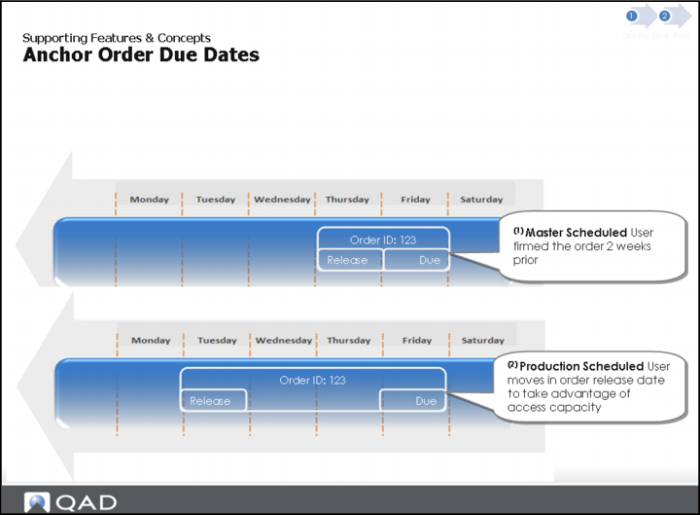
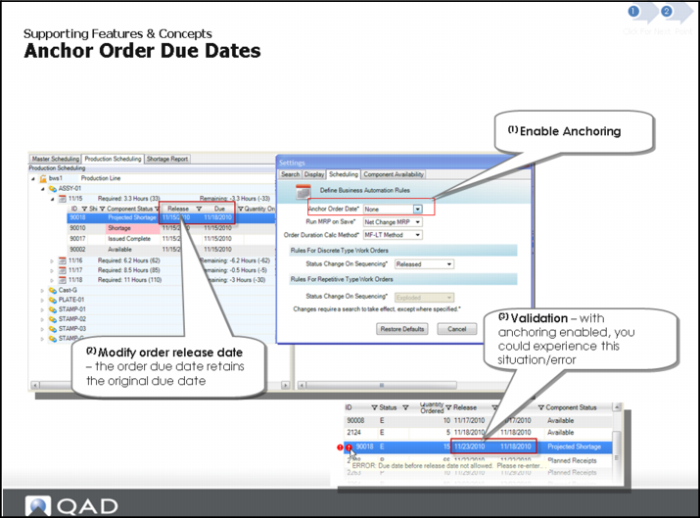
Business Scenario: You desire to change the order release date with changing the order due date.
Master schedulers typically define production order due dates. Occasionally, you may need to start a production order earlier than planned; however, you want production order due dates to stay intact. Anchoring a due date lets you lock in the production order due date so that it does not change during the production schedule process.
The master schedule provides the shop floor with a schedule that shows works orders due by Friday. You must determine upon which date the production orders run, but only the Master Scheduler can change the Friday due date; therefore, you anchor the Friday due date.
Note: If you change the order to after the due date, the system displays an error message.
Solution Approach
Solution Approach: Enable anchoring
• Enables monitoring performance to plan.
• Provides authorization control.
• Provides baseline reference.
The Anchor Order Date field is in the Scheduling tab of the Settings User Preferences window.
Anchor Order Date
Enter a production order due date that the system locks and prohibits changing during the production schedule process.
Hands-On Lesson Section
Exercise 4: Split an Order and Anchor the Order Due Date
1 Start the workbenches, then in the Search Panel, enter selection criteria Site equals 10-202.
2 Enter Resource equals ASSY-01.
3 Click search.
4 In the PSW, select an order to split.
5 Split the order by selecting the line, then right-clicking to display the pull-down menu.
6 Specify the split quantity, release date, and shift.
7 Press OK.
PSW splits the production order as specified.
8 Anchor the order due date by selecting Options in the toolbar, then the Scheduling tab.
9 Enter Due Date in the Anchor Due Date column, then review data.
Other Related Topics Section