Report Tree Maintenance
This section describes how to create and maintain report trees using Report Tree Maintenance.
Report Tree Maintenance
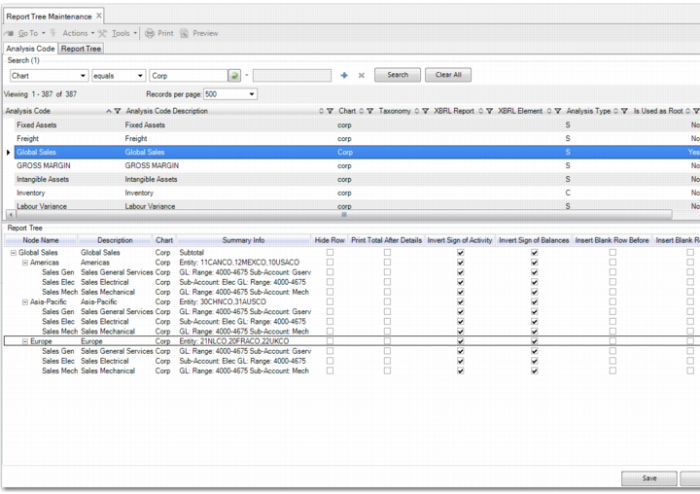
A report tree is a hierarchy built with report analysis codes. Usually, the higher levels in the tree are totals. You can use report analysis codes of type Sub-Total for this purpose.
Usually, the lowest levels in the tree, also referred to as leaves, are balances from accounting. You can use report analysis codes of type Analysis for these levels. However, Analysis type nodes can also be used higher in the tree. In this case, the whole branch in the tree under that code fulfills the selection linked to that Analysis code. In addition, Calculate and Text type codes can be anywhere in the hierarchy. See
Report Analysis Codes. You can add up to 99 levels of analysis codes to a report tree.
Building a Tree
Report Tree Maintenance contains two browses in the header of the screen. The first browse contains the list of report analysis codes. The second browse contains the list of existing trees, identified by their top root-level node. You can drag and drop from both lists.
Create a New Tree
When you open the screen, the work area at the bottom is empty. If you drag and drop a single report analysis code into the empty work area, this report analysis code is at the top of the new report tree. The report analysis code at the top becomes the code that identifies the whole tree. You can continue building the tree by dragging and dropping more report analysis codes into the tree. Alternatively, you can create new report analysis codes to add to the tree. Right-click in the lower pane and select Report Analysis Code Create. You can then create a report analysis code to form a part of your tree. A newly created analysis code is automatically added as a child node under the node that you right-clicked on. You can create a complete new tree using this method.
Note: You must have the appropriate permissions to create report analysis codes.
You can move nodes up and down in the tree, but only under the same parent node. If you want to move a node to another parent, right-click and delete the node. Next, drag the node from the browse at the top and drop it in the new location.
When you drop an existing tree on a branch of another tree that you are building, the whole tree that you dropped is copied into the target tree. Each tree hierarchy retains its own independent structure. However, the trees do share analysis codes. Therefore, when you change the details of a shared analysis code, this affects both trees.
The Row Style field, which enables you to specify the appearance of a row in the report, is also available in the lower pane of Report Tree Maintenance. You can enter keywords in this field to format text in a report row as bold, underlined, and highlighted. Simply include the keywords you want to include, separated by a comma. For example, to format a report as bold and highlighted, enter bold,high in this column. The three keywords are:
• bold
• line
• high
In the Row Style field, you can also indicate that for transactions related to a particular leaf node, a report must display credit balances only or debit balances only. To show accounts with debit balances only, enter “dronly” in the Row Style field. To show accounts with credit balances only, enter “cronly” in the Row Style field. The option to display debit amounts only or credit amounts only is useful in Balance Sheet reports, where you can show, for example, bank accounts with a debit balance under Assets and bank accounts with a credit balance under Liabilities.
To insert a page break between different levels of detail, enter “page” in the Row Style field in Report Tree Maintenance at the level after which you want the page break. For example, if the highest level of information in the report tree is GL, and the next level is Entity, enter “page” in the Row Style field for the GL node. On the report, the entity details start on a new page after the GL details.
Select the Show Details field for any leaf node for which you want to print GL transactions in detail on the report. For this option to take effect, you must choose the Selected value in the Print GL Transactions field in Report Master Create. When running the report in Financial Report Run, you must also set the Print Details report selection criteria to Yes.
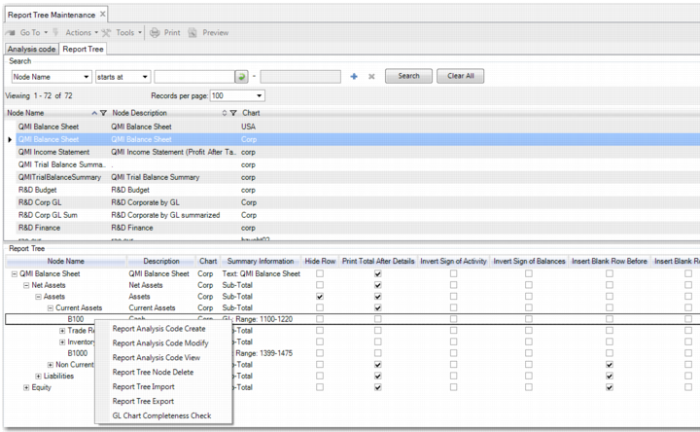
Modify an Existing Tree
If you select an existing report tree from the Report Tree browse and drag and drop it in the empty work area, you can also add and modify report analysis codes in this existing tree, as displayed in
Maintain Report Tree Analysis Codes. When you right-click a report analysis code and select Report Analysis Code Modify, you can modify the details of the report analysis code, except for the analysis code and report chart names. When you save your changes, the report tree is updated.
When you right-click a report analysis code and select Report Analysis Code Create, you can create a new report analysis code. However, because the new report analysis code is associated with the current tree, you cannot edit the Report Chart field. When you save the new report analysis code, it is added to the report tree as a child node of the node that you right-clicked.
When you create or modify a report analysis code with more than one dimension, the Summary Information field in the report tree grid displays information on each dimension.
Note: You must have the appropriate permissions to create and modify report analysis codes.
Maintain Report Tree Analysis Codes
GL Chart Completeness Check
The GL Completeness Check verifies that there is at least one occurrence of each GL account required for a complete report tree. For example, when you are making a complete income statement, you may forget to add an income statement from one entity to the report tree.
You can sort the GL Chart Completeness Check by GL account or by number of occurrences. The completeness check only considers the GL dimension.