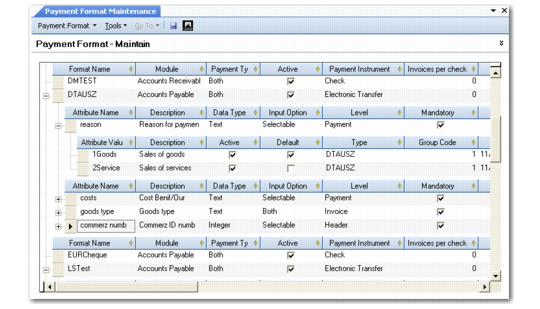
Payment Format Maintenance
Use Payment Format Maintenance (25.11.1) to view and modify payment formats, their attributes, and attribute values. You can also create a new format by adding a new row in the grid and specifying its attributes. You must ensure that these attributes match the requirements of the banking system to which you send the payment.
For electronic payment formats, most users use Bank File Format Import to import predefined formats so that manually creating payment formats is not needed. This function imports formats as bank-specific XML files, and automatically creates payment formats that are customized for the bank’s individual requirements. The imported formats are displayed in the list of available payment formats and can then be linked to the bank accounts used for the payments. See
Bank File Format Import.
Once you have used a payment format in a payment, you cannot subsequently modify the format code, but can modify the description and currency. The exception to this rule is the use of bank accounts and formats within a supplier payment selection, which you can change when the status of the selection is initial. See
Changing Bank Accounts on a Payment Selection.
Payment Format Maintenance
Field Descriptions
Format Name
Enter a name for the payment format.
Module
Specify Accounts Payable or Accounts Receivable depending on whether the format is used for supplier payments or customer payments.
Payment Type
Specify Domestic, Foreign, or Both as the payment type. A payment is defined as foreign if the country code of the supplier is different than that of your own entity.
The system verifies that the payment type of the format is correct based on the bank validations:
• If the validation format associated with your GL bank account (in the Banking tab of Account Create) is the same as the validation specified for the customer or supplier bank (in the Banking tab of Customer Create or Supplier Create), only formats marked as domestic or both can be used.
• If the validation format associated with your GL bank account is different than the one specified for the customer or supplier bank, only formats marked as foreign or both can be used.
Active
Indicate if this is an active record.
Currency
Specify a currency for the payment format.
Payment Instrument
Select Check, Draft, Direct Debit, Electronic Transfer, Promissory Note, Summary Statement, Transfer, or Credit Card as the payment instrument for this format.
You use checks, drafts, direct debits, promissory notes, summary statements, and credit cards in AR payments. Transfers and electronic transfers are used in AP payments only. See
Customer Payments and
Supplier Payment Instruments for descriptions of these instruments.
Invoices per Check
If you are creating a check format, enter the number of invoice lines that can be printed on the check. This limit ensures that you do not have more invoice lines on a single check than can be printed on a single page, and prevents an error in the numbering sequence of a check print run.
Type Description
Enter a brief description (maximum 40 characters) of the payment format.
TP Site, TP Address, Subsystem
These fields display information used in the EDI eCommerce load program.
SEPA
Select this field to indicate that the format is of type SEPA. By default, this field is not displayed but you can add it to the grid using the Columns right-click option.
Payment Attributes
Payment attributes provide additional information about the payment, and can be mandatory or optional depending on the requirements of the banking system that is to receive the payment. Attributes are typically used for electronic payments, since you are unlikely to need attributes and values for a paper payment format.
You create a new attribute by selecting the format row in the grid and adding a child row to the format. You can add values to attributes, in cases where you want to apply an attribute to a number of different payments and identify each payment by a different value.
When you change the bank account and payment format on a supplier payment selection, you must ensure that attributes linked to the new format are consistent with the original attributes you defined for the invoices and supplier referred to in the selection. This is described in
Changing Payment Attributes on a Selection.
Example: The sales commission codes for payments to a particular customer are 400, 500, and 600. You create an AR payment attribute called Commission Code which has the values 400, 500, and 600. When creating customer payments, you can select the correct commission code for each payment.
When you load predefined payment formats, all required attributes are already defined and loaded.
Three types of payment attributes correspond to three sections of an electronic payment file:
Header-level attributes.
These attributes can be used for addressing details in the payment header of the file. When a format containing header attributes is used in a customer or supplier payment selection, you can modify the header-level attributes of the format in the Payment Selection Create screen. See
Supplier Payment Selections and
Creating Customer Payment Selections.
Payment-level attributes.
These attributes are used to provide payment information for customer or supplier orders. These attributes can be modified during the creation of the invoice.
Invoice-level attributes
These attributes are used to provide invoice information in the payment file. These attributes can be modified during the creation of the invoice.
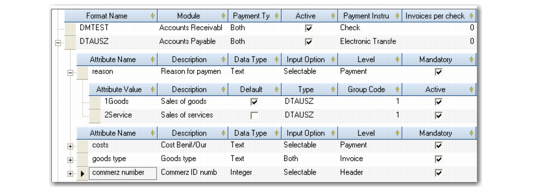
Payment Attributes
Field Descriptions
Attribute Name
Enter an appropriate attribute name.
Description
Enter a brief description (maximum 40 characters) of the attribute.
Data Type
Select the payment format data type:
Date. When you select a date type, you must enter a valid date as the attribute value. For example, enter the expiration date for the payment as a date attribute.
Text: When you select a text type, enter an attribute name as a generic description of the attribute values. For example, use a text type to record the Cost Commission code for the payment.
Amount: An amount attribute must be a positive or negative decimal number. Use the amount attribute to indicate a set quantity; for example, the quantity of goods sold for which this payment is being made.
Logical: A logical attribute is either true or false and must have the values Yes or No. You must select one of these attribute values as a default value.
Example: Define an attribute for domestic sales and assign the values Yes or No. For payments for domestic sales, you select the Yes value when creating the payment. For non-domestic sales, you select the No value.
Integer. This type must consist of a negative or positive whole number. For example, you can create an attribute to indicate the central bank reporting ID of your bank.
Input Option
Select an input option for the attribute:
Selectable: Users must select one of the attribute values when creating the payment.
Editable: Users can edit the value on the payment screen.
Both: Users can select from the values defined, or edit the value on screen.
Level
This field indicates the level of the payment file to which the attribute applies: Header, Invoice, or Payment.
Mandatory
This field indicates if the attribute is mandatory in a payment using this format. When an attribute is mandatory, you must supply a value for the attribute in order to complete the payment.
Active
This field indicates that the attribute is active.
Group Code
This field is an internal reference ID for a set of attributes.
Last Modified User/Date/Time
These read-only fields are maintained by the system and display the ID of the user who last updated this record and the date and time of update.
Payment Attribute Values
Assign values to an attribute by selecting the attribute row in the grid and adding a child row to the attribute.
Field Descriptions
Attribute Value
Enter a text or numerical value for the attribute, depending on the attribute data type. When you enter multiple values, you must select one when creating the payment.
Description
Enter a brief description (maximum 40 characters).
Active
Indicate if this is an active record.
Default
Select this value as the default value to be displayed in the payment create screen.
Last Modified User/Date/Time
These read-only fields display the ID of the user who last updated this record and the date and time of update.
Grouping Payment Attribute
You can use the Grouping attribute to group payments.
If your bank charges a fee for each payment transaction, you can use the Grouping attribute to group multiple invoice payments for the same supplier in order to reduce bank charges. In this case, Grouping is set to True.
If your bank does not charge a fee for each transaction line, it is better to have a single payment for each invoice because this helps the supplier to match the payments to open invoices. In this case, Grouping is set to False.
Set the default Grouping value to False in the Banking tab of any suppliers where you want to use a single payment for each invoice. If you do not specify this attribute, the default behavior is that Grouping is set to True.
When the attribute is set for a supplier, all newly created invoices for that supplier inherit the setting. However, you can modify the attribute on a case by case basis using Supplier Invoice Create or Supplier Invoice Modify. In Payment Selection Confirm, if all the selected invoices for a supplier have Grouping set to False, the system separates the payment selection into single payments for each invoice.
The Grouping attribute is pre-added for some payment formats. However, you can add the attribute for any payment formats using Payment Format Maintenance.
The Grouping attribute must have a type of Logical. If you specify Selectable as the Input Type, you can create two possible values for the Grouping attribute: True and False. To create the two values, insert two child rows and select the Value field for one of the rows. The selected row indicates the True value.
Grouping Attribute