Advanced Excel Integration
This activity has multiple steps:
• Choose the Excel Integration activity from the menu.
• Load data into the grid using the Load option (right-click the empty grid and choose Load). The Load option lets you retrieve all database records for a supported business component.
Alternatively, load data into the grid using the Load by Filter option, which is available for a select number of Excel integration business components. This option lets you filter data to select only the records you want. Right-click the empty grid and choose Load <business component> by Filter, for example, Load Suppliers by Filter. See
Loading Data Using Filters.
• Export the data to a spreadsheet, open the data in Excel, and modify it (right-click the grid again to select Export to Excel).
• After saving your changes, you return to the QAD application and import the modified data (right-click the empty grid to select Import from Excel, and click Save to create or update the data in the system database).
To export data for maintenance:
1 Choose the Excel Integration activity for one of the supported record types, such as supplier.
The system displays a blank grid containing the data fields for this business component as column headings.
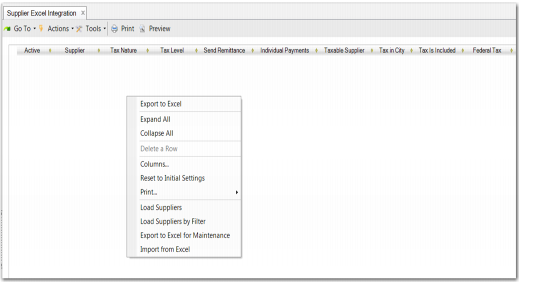
2 Right-click on the blank grid and choose Load Suppliers.
Alternatively, you can choose Load Suppliers by Filter. See
Loading Data Using Filters.
Supplier Excel Integration
The system retrieves all supplier records from the database and loads them into the grid. The order of columns in the grid is determined by the sequence of the fields in the original data model, and this is the order in which they appear in the spreadsheet.
You can also make modifications directly on screen before exporting to Excel, once the business component data is loaded. Your modifications are validated when you click Save.
Important: You should not customize the display by hiding columns before export. When you hide a column, the corresponding field is not exported to the spreadsheet. If the field is mandatory for this business component, the system attempts to validate it before saving to the database, and will generate validation errors. You can, however, move and resize columns.
Loading Data Using Filters
When loading data from the database for certain Excel Integration components, you can filter the data to select only the records you want, which increases loading performance.
Loading by filtering is available in the following commonly used Excel Integration components:
• Business Relation Excel Integration
• Customer Excel Integration
• Supplier Excel Integration
• Supplier Bank Number Excel Integration
• End User Excel Integration
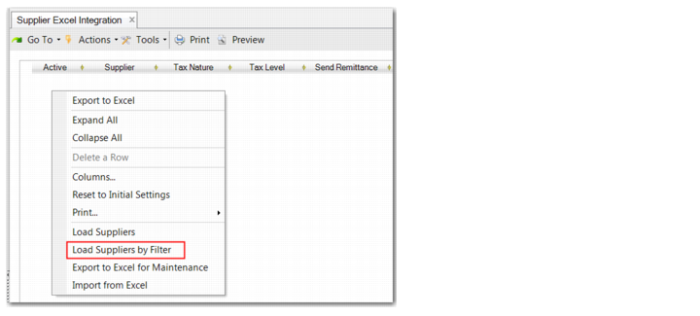
Load Suppliers by Filter, Right-Click Menu Option
When you right-click in the Excel integration grid and choose Load <business component> by Filter, the application opens a Search browse. The Load by Filter option is available regardless of whether the grid is populated.
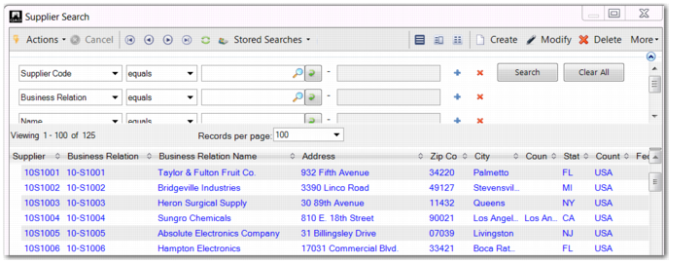
Supplier Search Browse
The filtering options available in the Search browse match those available in other browses for the same business components. You can use combinations of the Shift, Ctrl, and End keys to select individual records, a range of records, or all records displayed in the grid. See
Selecting Records,
Grid Filtering, and
Search Criteria.
When you finish filtering records using the Search browse, only the records you selected are loaded and displayed in the Excel integration grid, along with their associated sub-fields.
You can modify the records in your refined selection or export the records to Excel for maintenance, as in the regular Excel integration process. See
Export Data to Excel for Modification.
You can also repeat the process of loading additional records using filters.
Export Data to Excel for Modification
To export the data:
1 Right-click in the grid and choose Export to Excel for Maintenance.
2 At the prompt, enter the name of the spreadsheet in which to save the data.
3 Open the spreadsheet in Excel and make your modifications.
Note: You do not have to exit the QAD application before working in Excel. For minor maintenance, it is more convenient to run the applications simultaneously, and to switch back to your QAD application to import the saved data.
If you want to modify only a subset of the records that were loaded from the database into the grid, you can delete the redundant rows from the grid before exporting to Excel. Only the records that remain are then updated in the following steps. Excel integration does not delete records from the database.
The spreadsheet has the following features:
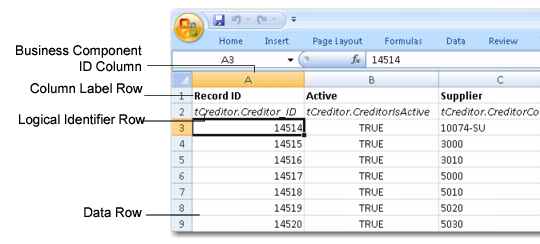
• The first row of every spreadsheet contains the column header labels for the business component fields. You can edit these headers for maintenance purposes within Excel. When you import your saved data into the system, your edits are discarded.
• The second row contains technical field names for the business component fields, as illustrated in
Exported Excel Spreadsheet. The names correspond directly to the database fields, and must not be edited. Any change you make to a logical identifier generates an error during validation.
• The other rows contain your business component data.
• The spreadsheet contains business component ID columns, which identify the business component instances in the databases. You cannot edit these IDs, and you should leave these columns blank for any new rows you create. Each spreadsheet can contain a number of ID columns. For example, when you export Business Relation data to a spreadsheet, there are ID columns for business relation, address, default SAF, contact, and tax number.
Important: All rows are imported into the system, which allows you to hide unnecessary rows while working with large spreadsheets. You should avoid hiding columns, however, as hidden columns are not imported. You can create extra columns for maintenance purposes, which are also not imported. You can, however, move and resize columns in the Excel sheet.
Exported Excel Spreadsheet
• Avoid using the Sort option in Excel.
Most business components contain sublevel information. For example, the business relation can contain separate address rows for head office, delivery, invoice, reminder and remittance, and can also contain contact details.
When you export to Excel, the main business component data and its sublevel data are grouped together in a hierarchy, with each main business component row followed by sublevel rows. If you sort the data in Excel, the sublevel rows are rearranged throughout the spreadsheet, and the hierarchical relationship is lost. This creates a conflict and prevents you from importing the saved data.
• Ensure that your column widths are set to Autofit before saving. If the column width is too narrow and the data is not readable, the data does not import correctly.
• The spreadsheet you create has the Shared attribute, which allows other network users to modify the data.
Be aware of mandatory fields while you are modifying data. For example, you must specify a bank number, currency, and banking profile when you create a GL bank account. If you do not enter valid information for these fields while creating a new GL bank account in the spreadsheet, an error occurs after import when you try to save the data.
Import Modified Data from Excel
When you have completed the modifications:
1 Save the changes to your Excel spreadsheet.
2 Switch back to your QAD application.
3 Right-click in the business component data grid and choose Import from Excel.
Important: When you export records to Excel, edit them, and load them back into the system for the same business component, the existing records in the database are overwritten. It is especially important to bear this detail in mind when working with customer and supplier data in Customer Excel Integration and Supplier Excel Integration.
4 When prompted, select your spreadsheet and click OK.
5 Click Save to validate the data and save to the database.
If the system returns validation errors, you can resolve them on screen at this stage, and save again to validate. The system only saves multiple records to the database if there are no errors. The system treats the entire Excel spreadsheet as a single transaction, and does not make partial updates for rows without errors.