Setting Up Obsolete Inventory Analysis
You must complete setup tasks before you analyze inventory.
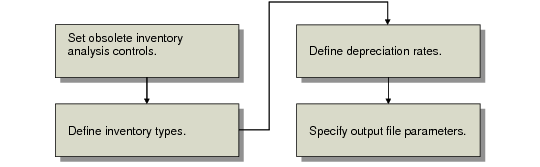
Setup Flow depicts the setup flow.
Note: Although defining depreciation rates is discussed as a setup task, you can define rates at any time.
Setup Flow
Setting Obsolete Inventory Controls
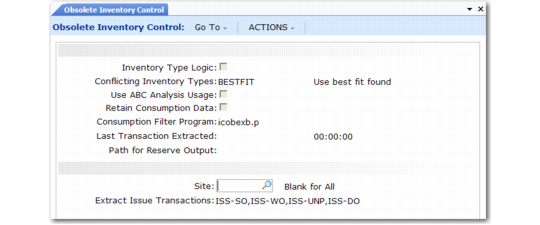
Fields in Obsolete Inventory Control (3.5.1.24) set system defaults for obsolete inventory analysis and reporting functions.
Obsolete Inventory Control (3.5.1.24)
Inventory Type Logic
Indicate how you want the system to display fields associated with an inventory type in Inventory Type Maintenance (3.5.1.1), Inventory Type Item Report (3.5.1.13; 3.5.1.37 for enhanced .NET UI version) and Item Inventory Type Report (3.5.1.14; 3.5.1.38 for enhanced .NET UI version).
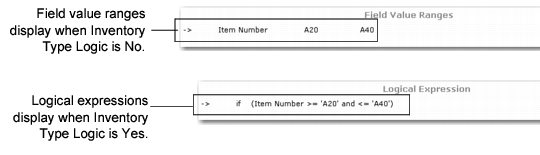
The system can display the fields as a logical expression in a Logical Expression frame or it can display the field label and any values or value ranges for the fields in a Field Value Ranges frame; see Inventory Type Maintenance (3.5.1.1), Field Display.
No (the default): Do not display logical expressions for definitions. Display the field label and values for the field in From and To fields.
Yes: Display logical expressions for definitions.
Example: In Inventory Type Maintenance, you specify an inventory type that includes items A20 to A40. You set Field Number to 3 for item type, Value Number to 1 for the first set of values for item type, From to A20 and To to A40.
Conflicting Inventory Types
Specify the action to takes when items that overlapping inventory types are found when calculating obsolete inventory values.
BESTFIT (default): Choose the first inventory type with the highest number of fields.
BYPASS: Do not analyze if conflicting. No analysis data is reported where conflicts exist. The system reports conflicts if Report Conflicts is Yes in Obsolete Inventory Analysis.
FIRST: Choose the first inventory type in alphabetical order.
You specify inventory types in Inventory Type Maintenance. The system uses the course of action you specify when it encounters items in overlapping inventory types within a site when it performs coverage and reserve calculations in Obsolete Inventory Analysis.
You can run Item Inventory Type Report to show conflicts before you analyze obsolete inventory. In the report, set Conflicts Only to Yes to display items in conflicting inventory types only. Also, you can set Report Conflicts to Yes in Obsolete Inventory Analysis to show inventory type conflicts when you run obsolete inventory analysis calculations.
Use ABC Analysis Usage
Specify whether to have the system use the average daily usage extracted from existing ABC analysis for obsolete inventory analysis.
No: The system does not use extracted ABC analysis data when it performs obsolete inventory calculations. The system uses the issue transactions you previously extracted in Extract Consumption (3.5.1.7) or it extracts issue transactions as needed when you run Obsolete Inventory Analysis.
Yes: The system uses extracted ABC analysis data when it performs obsolete inventory calculations. Consumption data is not needed for analysis when the system uses ABC analysis data.
ABC analysis extracts past issue transactions for particular transaction types and stores an average daily issues quantity. ABC classification is based on annual dollar usage of inventory where:
• Class A inventory items have the highest annual usage and receive the most attention.
• Class B items have lower annual usage and are controlled using reorder point.
• Class C items have the lowest annual usage. For class C, inventory value is determined by annual usage, unit cost, lead time, space available for storage, and quality.
Retain Consumption Data
Indicate whether to retain item consumption data the system uses during obsolete inventory analysis.
No (the default): The system does not retain consumption data and you cannot run Extract Consumption or Consumption Report (3.5.1.19; 3.5.1.43 for enhanced .NET UI version). The system stores values temporarily during obsolete inventory analysis.
Yes: The system retains a table of consumption data by item, site, and period; displays the table in Consumption Report; and lets you build extractions in Extract Consumption. The system also retains the quantity on hand (QOH) balance by item, period, year, and site if you set Extract Quantity on Hand to Yes in Extract Consumption (3.5.7).
You must specify Yes if you want to:
• Extract consumption data using Extract Consumption.
• Retain item consumption data in the system and display it later in Consumption Report.
The system retains consumption data for each item/site by GL year and GL period.
The system also stores consumption data by GL quarter; however, since GL calendars do not identify quarters, the system calculates quarters by dividing the number of periods in the fiscal year of the transaction’s effective date by four, truncating to a whole number for the first three quarters, and placing the remainder in the last quarter. Hence, a 13-period year consists of 3, 3, 3 and 4 periods.
Note: You can filter consumption data by specifying a filtering program in the Consumption Filter Program field.
Consumption Filter Program
Enter the name of the program the system uses to filter consumption data it extracts for obsolete inventory analysis. The default filter program is icobexb.p. If you leave this field blank, the system extracts all data.
The input to icobexb.p is the record ID of the transaction history record. You can customize icobexb.p so that it filters specific record IDs. Commented sections are included in icobexb.p that provide instructions to customize it. You can also create your own filter program and enter it here.
Last Transaction Extracted
This field is display only and lists the system date and time of the last inventory transaction the system extracted in Extract Consumption (3.5.1.7). This field also displays in Extract Consumption.
Path for Reserve Output
Specify the path that the system uses when you write obsolete inventory analysis data into an output file that you can optionally define in Output File Type Maintenance (3.5.1.5). A blank indicates the system creates the output file in the working directory. Use your system’s conventions to specify path and directory.
Site
Specify a site to use when gathering past transactions for obsolete inventory analysis. Leave blank for all sites.
The system analyzes obsolete inventory by calculating how many periods the current quantity on hand will last based on the consumption quantity over a past period. When you specify a site here, the system gathers transactions from this site only.
Extract Issue Transactions
Specify the types of transactions you want the system to extract when analyzing obsolete inventory. Separate multiple transaction types with commas. By default, the following four types are used:
ISS-SO: Issue sales order item.
ISS-WO: Issue work order item.
ISS-UNP: Inventory unplanned issue.
ISS-DO: Distribution order shipment.
The system analyzes obsolete inventory by calculating how many periods the current quantity on hand will last based on the consumption quantity over a past period. When you specify a transaction type here, the system extracts only issue transactions of that type from inventory transaction history and uses the data to analyze items at a specified site or all sites. You can add other transaction types. The system does not verify that transaction types exist.
Note: You specify the site in the Site field.
Defining Inventory Types
Use Inventory Type Maintenance (3.5.1.1) to select and group similar items into a unique inventory type. Use Depreciation Rate Maintenance (3.5.1.3) to apply a set of depreciation rates to the inventory type.
In Inventory Type Maintenance, you define the inventory type. The system stores the inventory type and a specific logical structure for the inventory type. You define the logical structure by specifying:
• A number that identifies a set of related fields. Each type can have multiple sets of associated fields.
• A number for each item-related field that you want to display in obsolete inventory reports and output data that shows inventory types.
Note: The number is associated with a field in Language Detail Maintenance (36.4.2).
• A value number that identifies one value or value ranges for the fields.
• A single value or a range of values for the fields.
Use the following procedure to create an inventory type. Examples follow the procedure.
1 Enter a new name in Inventory Type.
2 Optionally, enter a short description of the inventory type in Description.
3 Optionally, define a field set to group one set of fields. The field set must be an integer greater than zero.
4 Enter the number in Field Number that corresponds to the field you want to display in obsolete inventory reports and output data. Select from the following item fields or use the lookup browse to select the number.
Field Number Values
Field Number | Field Label |
1 | Item number |
2 | Product line |
3 | Item type |
4 | Group |
5 | Commodity code |
6 | ABC class |
7 | Purchase/Manufacturing Code |
8 | Site |
5 If the item field has only one value or range of values, enter 1 in Value Number. If you define a second value or range of values for the same item field, enter 2 in Value Number, and so on.
6 Choose one of the following:
a Define a single value for an item field by entering the same value in From and To.
b Define a range of values for an item field by entering the first value in the range in the From field and the last value in the range in the To field.
The item fields you select and the From and To values for the fields display in the Field Value Ranges frame. An arrow points to the current field set, field number, and values you defined in the top portion of the screen. Optionally, you can display your selected item fields and values for the fields in a logical expression by setting Inventory Type Logic to Yes in Obsolete Inventory Control (3.5.1.24). When Yes, a Logical Expression frame displays instead of a Field Value Ranges frame.
Inventory Type Examples
The following paragraphs provide examples of the various ways you can define the structure of an inventory type.
Example: Define a single-value inventory type based only on one field. Create an inventory type based only on site 1000 by using the following values:
Field Set: | 1 |
Field Number: | 8 (site) |
Field Value: | 1 (the first value for site) |
From: | 1000 |
To: | 1000 |
Example: Define multiple values for a single field. Create an inventory type that contains item type AAA and item types BBA through BBC by using the following values:
Field Number: | 3 (item type) |
Value Number: | 1 (the first value for item type) |
From: | AAA |
To: | AAA |
Value Number: | 2 (the second value for item type) |
From: | BBA |
To: | BBC |
Example: Define multiple fields for a field set. Create a field set that contains field type AAA and all purchased items for site 2002 by using the following values:
Field Set: | 5 |
Field Number: | 3 (item type) |
Value Number: | 1 (the first value for item type) |
From: | AAA |
To: | AAA |
Field Number: | 7 (Pur/Mfg) |
Value Number: | 1 (the first value for Pur/Mfg) |
From: | P |
To: | P |
Field Number: | 8 (site) |
Value Number: | 1 (the first value for site) |
From: | 2002 |
To: | 2002 |
Item Inventory Type Overlapping
Because of the way that you group items, it is possible to assign items to more than one inventory type. When the system encounters items in overlapping inventory types during obsolete inventory analysis, it uses the course of action you specify in the Conflicting Inventory Types field in Obsolete Inventory Control (3.5.1.24) when calculating coverage and reserve in Obsolete Inventory Analysis.
If you specify that the system not analyze obsolete inventory data when a conflict is found, the system does not include the item in the analysis. If you want an obsolete inventory analysis for the items in overlapping inventory types, you must correct the way items are grouped in this program.
To avoid this rework, run Item Inventory Type Report (3.5.1.14; 3.5.1.38 for enhanced .NET UI version) before you run Obsolete Inventory Analysis. Item Inventory Type Report displays items in multiple classifications and specifically marks items with conflicting inventory types. Optionally, you can set the report to display only items with conflicting inventory types. You can also report conflicting inventory types when you run or execute the analysis in Obsolete Inventory Analysis.
Inventory Type Maintenance
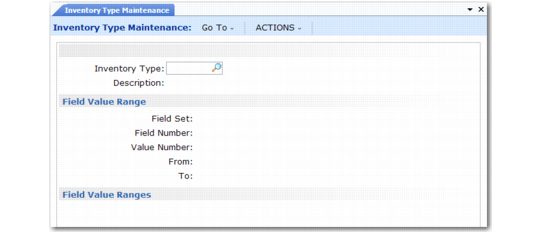
Use Inventory Type Maintenance (3.5.1.1) to create inventory types. Enter the inventory type name and description in the header. Define multiple sets of fields in the Field Value Range frame.
Inventory Type Maintenance (3.5.1.1)
Item Inventory Type
Enter a unique name no longer than eight characters for the inventory type.
Description
Enter a brief description of the inventory type.
Field Set
Enter a number that identifies a set of fields. Each inventory type can have multiple sets of fields associated with it.
Field Number
Enter a number from one to eight that identifies a field from the item/site records. You can select the field from a list of fields in the lookup browse. You cannot leave this field blank.
You can enter a range of values for the field by specifying them in the From and To fields.
Value Number
Enter a sequence number that identifies a value or range of values for the field you enter in Field Number. See page
here for an example.
From
Enter the first value in a range of values for the associated item/site record field you specified in Field Number. Each field can have multiple values and ranges of values associated with it.
To
Enter the last value in a range of values for the associated item/site record field you specified in Field Number.
Defining Depreciation Rates
Use Depreciation Rate Maintenance (3.5.1.3) to create and assign depreciation rates for each inventory type. A rate cannot exceed 100%.
You assign deprecation rates for each inventory type; then specify a range for the number of periods the depreciation rate covers. The system applies the depreciation rate you specify up to the period you specify when calculating reserve.
Example: Specify an inventory type that groups your purchased items; then set the depreciation rate so that the rate slowly increases for the next two years in periods of six months until you no longer need the purchased item. To do this, set Up to Number of Periods to 6 and Depreciation Rate at 10 percent, and click Next. Then set Up to Number of Periods to 12 and Depreciation Rate at 20 percent, and click Next, and so on. The purchased items depreciate up to 6 months by 10 percent, then up to 12 months by 12 percent.
If you do not want an inventory item type to depreciate until after nine months, specify the rate as 0 (zero) and specify Up to Number of Periods as 9. The system applies a different depreciation rate, depending upon your specification, for the next period when the nine months is over.
Note: The system does not book GL transactions for reserve that it calculates using actual depreciation rates.
You can assign a separate deprecation rate for the system to use when consumption, demand, or both are zero. To do this, specify Consump(tion), Demand, or Both in the Zero Consumption/Demand field; then specify a different depreciation rate.
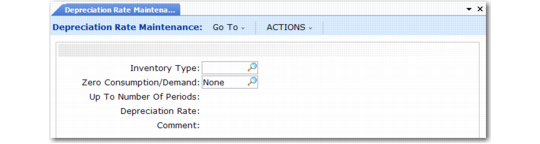
Depreciation Rate Maintenance (3.5.1.3)
Inventory Type
Specify the inventory type to which the system applies the depreciation rate. All items associated with the inventory type are depreciated at this rate when calculating reserve.
Zero Consumption/Demand
Indicate when the system should use a different depreciation rate:
None (the default): Use the depreciation rate specified when consumption, demand, or both have a non-zero value. You can specify the number of periods in Up to Number of Periods. If you enter None but specify 0 (zero) periods, the system uses the depreciation rate you specify.
Consump(tion): Use the depreciation rate specified when there is zero consumption of inventory. The system sets Up to Number of Periods to zero and you cannot edit the field.
Demand: Use the depreciation rate when there is zero demand of inventory. The system sets Up to Number of Periods to zero and you cannot edit the field.
Both: Use the depreciation rate when there is both zero consumption and demand of inventory. The system sets Up to Number of Periods to zero and you cannot edit the field.
Up to Number of Periods
Enter the number of periods this rate covers. Each value you specify indicates the high end or ending period of a range. The system increments this value by 1 to determine the starting point of the next range.
Example: Enter 3 in the Up to Number of Periods field. The system stores 0 to 3 as the period range to cover. Then, enter 20 in the Up to Number of Periods field. The system sets the next period range as 4 to 20.
Specify 0 (zero) to indicate no usage. The maximum is 9999 periods.
Note: Specify the maximum of 9999 to prevent coverage periods from falling out of ranges.
If you specify a value other than None for Zero Consumption/ Demand, the system sets this field to 0 (zero) and you cannot edit it.
The system stores the periods and rates in a depreciation rate detail table. When you run Obsolete Inventory Analysis, the system looks up the period you specify to analyze in the depreciation rate detail table to determine in which range of periods your specified period falls.
Depreciation Rate
Enter the depreciation rate percentage for the specified inventory type. Depreciation rates do not have to sum to 100% for any range or inventory type of items; however, a rate cannot exceed 100%.
Comment
Enter a comment no longer than eight characters to mark data in obsolete inventory reports. For example, enter Excess to mark rates you assign to excess inventory items that depreciate.
The comments print with reserve data when you specify Yes to Reserve Report in Obsolete Inventory Analysis.
Setting Up Output File Types
You can optionally create an output file for obsolete inventory analysis data. Use Output File Type Maintenance (3.5.1.5) to specify how the output file converter sorts and formats the data before you run the analysis.
The system converts and formats obsolete analysis data using the output file of your choice when you run Obsolete Inventory Analysis (3.5.1.9). You specify the name of the output file in Obsolete Inventory Analysis.
The output data can include the following:
• Additional fields of item data
• All system-calculated obsolete inventory analysis fields, including the reserve amount
The additional fields and the system-calculated obsolete inventory analysis fields include the following:
9 | Inventory Type | 18 | Avg Issues Per Period |
10 | Item Description 1 | 19 | Coverage Periods |
11 | Item Description 2 | 20 | Standard Cost (Unit) |
12 | Inventory Account | 21 | QOH Standard Cost |
13 | Inventory Sub Account | 22 | Depreciation Periods |
14 | Inventory Cost Center | 23 | Depreciation Rate |
15 | Quantity On Hand | 24 | Reserve Amount |
16 | Total Issue Quantity | 25 | Depreciation Comment |
17 | Issue Periods | | |
Use Output File Type Browse (3.5.1.17) to find output files by file type, such as CSV.
Specifying Fields in the Output File
In Output File Type Maintenance, you enter a number that is associated with a field if you want that field included in the output file. You enter the sequence of the field in Extract Sequence.
Example: To include item number as the first field and item type as the second field that display in the output file, use the following procedure:
1 Enter 1 for item number in Field Number or select item number from the lookup browse; then click Next.
2 Enter 1 in Extract Sequence; then click Next.
3 Enter 3 for item type in Field Number; then click Next.
4 Enter 2 in Extract Sequence; then click Next.
Output File Types
The icobrpd.p default converter program creates flat files in CSV (comma-separated values) format. CSV files contain values as a series of ASCII text lines with column values that are separated by commas. A CSV file is a way to collect data from a table so that you can input it to another table-oriented application, such as a relational database application or spreadsheet.
If you specify Separator Character as blank instead of a comma (,) and Quote Character as a quote (“), the default converter program can convert files as Progress export files.
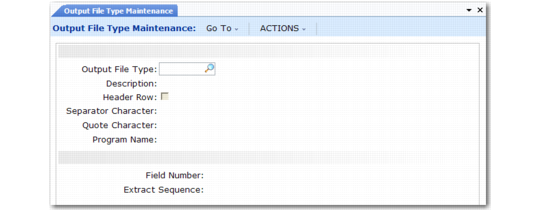
Output File Type Maintenance (3.5.1.5)
Output File Type
Specify the output file type for the obsolete analysis data. For example, if you use a converter program that produces data in a comma-separated values (CSV) format, enter CSV. You cannot leave this field blank. The system includes the default icobrpd.p converter program that converts data to CSV format.
Description
Enter a description of the output file.
Header Row
Indicate if you want to include a header row of field labels in the output file. You specify the fields in Field Number.
No: The system does not add a header row to the output file.
Yes: The system adds a header row to the output file.
Separator Character
Enter the character the converter program recognizes as a separator character. For example, comma-separated value (CSV) programs recognize the comma (,) as a separator character.
Quote Character
Enter the character the output file processing program recognizes as a quote. For example, comma-separated value (CSV) programs recognize quotation marks (“) to mark actual data.
Program Name
Specify the name of the converter program that processes the output file. The system includes two converter programs:
• icobrpd.p (the default): This program converts reserve data to comma-separated value (CSV) format.
• icobrpe.p: This program lets you capture the main reserve data but does not convert data into a format as complex as CSV format.
You can create your own program to convert reserve data by copying either converter program; then follow commented sections in the programs to make changes.
Field Number
Enter a number that represents a field the converter program includes in the output file. Use the lookup browse to select the field number. See
Specifying Fields in the Output File.
Extract Sequence
Enter a number to indicate the sequence of the associated field as displayed in the output file. For example, if you enter 1 in Field Number for the item number, enter 1 here to display the item number as the first field in the output file.
To display a field at the end of the display, enter a large number. For example, if you have seven fields that display, enter 25. The system displays this field last but automatically renumbers the field so that it is in consecutive order. The system also renumbers fields in consecutive order when you delete a field.