Creating a Purchase Order
Build PO from Requisitions (5.2.18) consists of a series of frames that lead you through the build process:
1 Set the criteria you want to use for selecting appropriate requisition lines.
2 Select the lines you want to copy to the purchase order.
3 Open a purchase order; either create a new PO or open an existing one where you want to append the requisition lines.
4 Generate a report on the copy process. This report displays the lines that you copied, as well as any warning messages GRS has generated.
Establishing Selection Criteria
The first screen lets you specify a number of selection criteria for the system to use in displaying approved requisition line items. You do not have to use all the criteria; use only the fields appropriate to the selection you want to make. You also specify on this screen whether you want the default setting for copying line items to the new PO to be Yes or No.
Build PO from Requisitions (5.2.18)
Requisition Number
Enter the first of the range of requisition numbers you want to include in the selection. Enter the same number in the To field to limit the selection to one requisition.
Supplier
Enter the first of the range of supplier numbers you want to include in the selection. Enter the same number in the To field to limit the selection to requisitions including only that supplier. To include only requisitions that do not have a supplier specified, set Blank Suppliers Only to Yes.
Item Number
Enter the first of the range of item numbers you want to include in the selection. Enter the same number in the To field to limit the selection to requisitions including only that item.
Need Date
Enter the first in the range of need dates you want to include in the selection. Enter the same date in the To field to limit the selection to requisitions including only that need date.
Buyer
Enter the user ID of the buyer. This defaults to the user who logged on. You can also enter another buyer’s user ID.
Note: Clear this field to display the selection list for all buyers. Otherwise, if you are not a buyer yourself, the program does not find any requisitions.
Site
Enter a specific site code to be included in the selection criteria.
Requested By
Enter the user ID of a specific requestor to be included in the selection criteria.
Job Name
Enter a specific job code to be included in the selection criteria.
Ship-To
Enter a specific ship-to address to be included in the selection criteria.
Currency
Enter a specific requisition currency to be included in the selection criteria.
Blank Suppliers Only
Indicate whether you want to view only those requisitions that do not have a supplier specified; the default is No.
Note: If you have also made an entry in the Supplier field, changing Blank Suppliers Only to Yes takes precedence—only requisitions without a supplier are selected.
Include MRP Items
Indicate whether you want to include direct materials items in the selection criteria; defaults to Yes. If you do not want to include requisitions for direct materials in the selection criteria, change this field to No. If you set this to No and leave Include MRO Items set to Yes, the selection screen includes only MRO items.
Note: MRP items are received into inventory and considered by MRP as a source of supply.
Include MRO Items
Indicate whether you want to include MRO items in the selection criteria; defaults to Yes. MRO items include maintenance, repair, and operating supplies. If you do not want to include requisitions for MRO items in the selection criteria, change this field to No. If you set this to No and leave Include MRP Items set to Yes, the selection screen includes only direct-materials items.
Copy Header Comments
Indicate whether to copy header comments onto a new PO; defaults to Yes. If set to Yes and you are creating a new purchase order, the header comments from the first requisition you selected for copying become the header comments on the PO. This only applies the first time you copy lines to a new purchase order. If you are appending lines to an existing PO, the field is ignored. Once you have copied the header comments, you can modify them in Purchase Order Maintenance (5.7).
Copy Line Comments
Indicate whether to copy requisition line comments into PO line comments; defaults to Yes.
Default Copy
Indicate the default value for the Copy field on the line items listed on the next screen as a result of the criteria selection; defaults to Yes.
Selecting Purchase Requisition Line Items
After you have completed the first screen, GRS shows a list of approved, open requisition line items that meet your selection criteria. Set the Copy field to Yes for lines you want to copy. The Copy field is the only field on this screen that can be changed.
Build PO from Requisitions, Selection Screen
When you have selected the lines you want to copy to the PO, you are prompted to confirm that all the information is correct. Select Yes to advance to the next screen; No returns the cursor to the selection screen.
Adding Requisition Lines to the Purchase Order
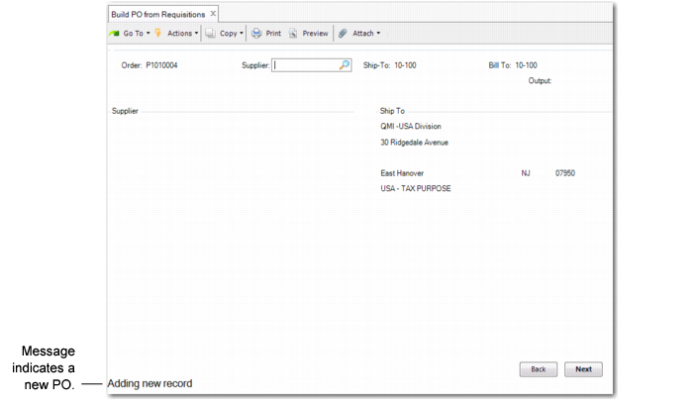
After you select the approved requisition lines you want to copy, a purchase order header frame appears. If you want to copy the requisition items to a new purchase order, press Enter and the system assigns a new PO number. To append the copied requisition lines to an existing purchase order, enter the PO number.
Build PO from Requisitions, First Header Frame
A message at the bottom of the screen indicates whether this PO is new or existing. If it is a new purchase order, the Supplier and Ship-To fields default from the first requisition line you selected on the previous screen; the Bill-To value defaults from Purchasing Accounting Control (36.9.5). You can change them. If you are adding lines to an existing PO, these fields are displayed from the header of that PO. You can update the ship-to and bill-to address codes, but not the supplier.
Use the Output field to select the way you want to display the PO report.
Note: Sending this report to a printer is not the same as printing the PO for the supplier. When you are ready to issue the PO, print it with Purchase Order Maintenance (5.7) or Purchase Order Print (5.10).
For the new purchase order:
• Header order revision levels and order revision dates default to blank.
• The system uses the Fixed Price setting from the supplier on the requisition to populate the header and line Fixed Price fields.
• The system copies the requisition line discount table to the order line discount table when no discount table was specified on the requisition header.
Using the PO Report
The PO report shows a line-by-line summary of all the requisition items you copied to the purchase order. Warnings, if any, are displayed after each line item. Review the report and make changes as needed in Purchase Order Maintenance (5.7).
Among other things, the report indicates conflicts between the header supplier and line-item supplier.