Creating Pre-Shippers Automatically
Picklist/Pre-Shipper–Automatic creates pre-shippers for orders generated in Sales Order Maintenance (7.1.1) and Customer Scheduled Order Maintenance (7.3.13). Once you create a set of pre-shippers, you can merge them with other pre-shippers and shippers using Pre-Shipper/Shipper Workbench (7.9.2).
When it creates the pre-shippers, Picklist/Pre-Shipper–Automatic can create detail allocations and assign containers.
Before the system finishes creating a batch of pre-shippers, it prompts you to confirm each pre-shipper. You can verify that each pre-shipper printed correctly before recording detail allocation transactions.
Total shipping requirements can be broken down into multiple pre‑shippers based on shipping weight, address list types, or other criteria set up in Picklist/Pre-Shipper–Automatic.
Allocating Inventory
When you create pre-shippers using Picklist/Pre-Shipper–Automatic (7.9.1), the system can detail allocate inventory depending on how you set it up.
In general, the system performs two types of allocations:
• General allocations reserve some quantity of an item number at a specific site to fill a specific confirmed order. This can be done in Sales Order Maintenance (7.1.1).
• Detail allocations reserve unexpired, on-hand inventory uniquely identified by site, location, lot/serial number, and reference number.
A detail allocation is often referred to as an item being picked, either for a manufacturing operation or a shipping order. Inventory can be allocated at several stages in the life cycle of a sales order:
• Sales Order Maintenance automatically creates general allocations for all orders due within a certain number of days, as specified in Sales Order Control. Detail allocations can be entered if the customer specifies particular lots or characteristics (Expire Date, Grade, Assay %).
• You can run Sales Order Auto Allocations (7.1.7) regularly to create general allocations for any orders due within a certain number of days. These orders are typically not allocated at order entry. Run this function by customer class to allocate scarce inventory to high priority customers first.
• Use Sales Order Manual Allocations (7.1.6) to override general or detail allocations.
• Sales Order Packing List (7.9.13) and Picklist/Pre-Shipper–Automatic (7.9.1) normally print allocated quantities only (set Print Only Lines to Pick to Yes). The pre-shipper details each item by quantity per location, lot, and reference number. The system converts general allocations to detail allocations at this time.
When you create a pre-shipper with Picklist/Pre-Shipper–Automatic, the allocations made to the original sales order are deleted and new allocations created for the pre-shipper. This is not true when you create a pre-shipper manually or add another sales order line to a pre-shipper with Pre-Shipper/Shipper Workbench. In this case, the pre-shipper allocations are in addition to the sales order allocations.
Important: To prevent double allocations, delete the sales order allocations manually using Sales Order Manual Allocation.
When you run Picklist/Pre-Shipper–Automatic with Auto Allocation set to Yes and Stage Open Quantities set to No, the system detail allocates confirmed sales order lines. With Auto Allocation set to No, the system detail allocates the lesser of the general allocated quantity or the quantity to ship.
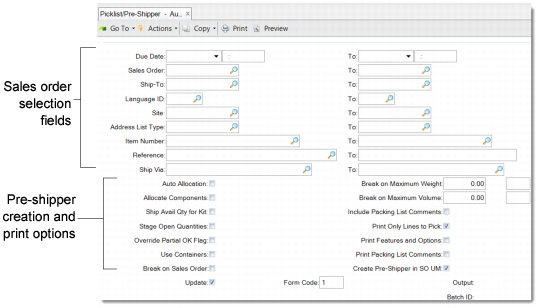
You can select orders by range of due date, sales order number, ship-to, language, site, address type, item number, and reference. These selection criteria determine which orders are processed. They have no effect on the sequence in which sales orders are picked and printed. The system always picks items for sales orders in sequence by customer code and then sales order number.
To ensure that orders with the most recent item due dates are picked, use Sales Order Auto Allocations to allocate the items by due date before using this function. Then when generating the pre-shippers, set Print Only Lines to Pick to Yes.
Running Picklist/Pre-Shipper–Automatic can produce different results based on the setting of Stage Open Quantities and Print Only Lines to Pick.
• Stage Open Quantities. If Yes, pre-shippers are created based on open sales order quantities, not allocated quantities. This lets you create pre-shippers for sales order lines even when sufficient inventory is not available. This option is useful when you are sure that inventory will become available soon.
• Print Only Lines to Pick. If Yes, only lines with an allocated quantity print. If No, all sales order line items with a non-zero open quantity are printed, regardless of the quantity allocated.
When Print Only Lines to Pick is No and an allocated quantity does not exist, a document still prints, but the pre-shipper number is blank. The document lists sales order line items with a quantity open greater than zero.
Using Containers with Automatic Pre-Shippers
Use Containers must be Yes to assign containers using this method. You can automatically assign containers created in Container Workbench (7.7.1) to pre-shippers using Picklist/Pre-Shipper–Automatic if they meet the following criteria:
• The container has not been assigned to another container, pre-shipper, or shipper.
• The container contains only the sales order line item number. Automatic container assignment does not work when containers include more than one item number.
• For customer scheduled orders only, the container item number is either the primary container for the scheduled order line or one of the alternate containers for the scheduled order line.
• The container is designed to hold a quantity of the sales order line item number that is equal to or less than the quantity of the sales order line.
Specifying Other Picklist Defaults
If Require Inventory Movement Codes is Yes in Cust Sched/Shipper Acct Control, the system looks for a default inventory movement code to assign to each picklist. An error is generated when:
• The system cannot find a default inventory movement code based on the shipping group.
• You are denied access to the code at the Ship-From site of the picklist/pre-shipper.
If movement codes are not required, picklists are created without them.
The system assigns a picklist/pre-shipper ID based on the NRM sequence ID for the inventory movement code and shipping group, or from Container/Shipper Control. In order for the system to dispense the number, the NRM sequence must be an internal sequence (system-generated). If the assigned NRM sequence is an external sequence, the system displays an error message.
The document format and carriers used are also based on defaults defined for the inventory movement code and shipping group, or Container/Shipper Control.
Consolidation Requirements
Consolidation requirements are based on the shipping group used for the shipment.
• If either the ship-to or ship-from address of the shipment prohibits consolidation, the system generates a new picklist for each sales order.
• If either the ship-to or ship-from address requires consolidation, and other consolidation criteria are met (such as weight and volume limitations), the system consolidates line items on a single picklist.
The Max Lines on a Pre-Shipper field in Container/Shipper Control limits the number of printed lines allowed on each picklist, which can limit the number of line items. This takes precedence over consolidation requirements.
Note: The Break on Sales Order option also affects consolidation.
Selecting Sales Orders for Pre-Shipper Creation
The range of values you enter in the sales order selection fields of Picklist/Pre-Shipper–Automatic (7.9.1) determines the sales orders for which the system creates pre-shippers. Each of these fields includes a From and a To value. Leaving any of these fields blank results in the system considering all sales orders, regardless of the value of this field (see
Picklist/Pre-Shipper– Automatic (7.9.1)).
Picklist/Pre-Shipper– Automatic (7.9.1)
You can select sales orders by range of due dates, order number, ship-to address, language, site, address list type, item number, ship via, or schedule reference. Reference applies to scheduled orders only.
Selecting Pre-Shipper Creation Options
The following fields define the system’s level of automation when creating pre-shippers, based on the sales order line items selected:
Auto Allocation
Enter Yes to detail allocate matching, confirmed sales order lines, or No to ignore allocations. See
Allocating Inventory.
Allocate Components
This field enables you to create detail inventory allocations for the components of configured kits.
No. The system bases the allocation on the site and location specified on the sales order line. The quantity to ship for a component is determined by the quantity open for the configured kit item rather than the quantity available to allocate for the component.
Yes: The system creates detail allocations for confirmed sales order lines. For detail allocations, set this field to Yes even when Available Kit Quantity to Ship (7.1.8) has been used to update detailed allocations.
Note: The system only supports kits in discrete sales orders—not customer scheduled orders.
Ship Avail Qty for Kit
This field determines the quantity picked for kit items. A kit is a type of configured item that represents a set of items that are picked and shipped together; no real assembly takes place.
No: The quantity to ship for the kit item is set to the corresponding quantity open on the order line.
Yes: The system determines the component of the kit with the least quantity available to allocate. The quantity to ship for the kit item is set to this quantity. This ensures that complete kits are shipped.
Note: Setting Stage Open Quantities to Yes overrides a Yes value in Ship Avail Qty for Kit.
Use Available Kit Quantity to Ship (7.1.8) to create or display allocations based on the kit component with the least quantity available to allocate.
Stage Open Quantities
Enter Yes to create pre-shippers for sales order lines that cannot be detail allocated because inventory is not available. Picklists are created based on open sales order line quantities. Enter No to ignore sales order lines for items without available inventory.
Note: Because memo items cannot be detail allocated, this field has no effect on how such items are selected for printing on a picklist. Use Print Only Lines to Pick to control printing for memo items. See
here.
A Yes for Stage Open Quantities overrides the effects of the Auto Allocation setting and overrides a Yes setting for Ship Avail Qty for Kit.
Use Containers cannot be Yes when this field is Yes. You cannot stage open quantities and also use containers. When this option is selected, only sales order information prints on the picklist.
Override Partial OK
Indicate if the system should consider the Partial OK setting in the trailer of each sales order when creating pre‑shippers. This field defaults from Customer Data Maintenance (2.1.1) and specifies whether the customer accepts partial shipments.
No: The system checks the value of Partial OK on each order and creates pre-shippers based on this setting. If the setting is No for the order, the system verifies that all line items for each site represented on the order are available (allocated) and can be completely shipped. If this is not true, the pre-shipper does not include any of the line items from that site.
Example: Lines 1 and 2 for site 100 and line 3 for site 200 all have the complete order quantity available. However, line 4 for site 200 has only a partial quantity available. When both Partial OK on the sales order and Override Partial OK are No, the pre-shipper includes only the site 100 lines.
Yes: Pre-shippers include all lines regardless of availability and the Partial OK setting on the order.
Use Containers
Enter Yes to assign containers meeting certain criteria, or No if you do not containerize shipments. See
Using Containers with Automatic Pre-Shippers.
Break on Sales Order
Enter Yes to have the system create separate pre-shippers for each sales order in the selection with the same ship‑to address code or No to have the system create a combined pre‑shipper for all sales orders in the selection with the same ship‑to address code.
Break on Maximum Weight
Enter the maximum gross weight for a pre-shipper.
• If zero, the system creates pre-shippers without regard to maximum gross weight.
• If nonzero, the system checks the pre-shipper gross weight before adding a sales order line item to it to make sure the line item does not exceed the maximum gross weight value. If a sales order line item exceeds the maximum gross weight value, the system creates a new pre-shipper.
UM (Weight)
Enter the unit of measure of the Break on Maximum Weight value.
Break on Maximum Volume
Enter the maximum volume for a pre-shipper.
• If zero, the system creates pre-shippers without regard to maximum volume.
• If nonzero, the system checks the pre-shipper volume before adding a sales order line item to it to make sure the line item does not exceed the maximum volume value. If a sales order line item exceeds the maximum volume value, the system creates a new pre-shipper.
UM (Volume)
Enter the unit of measure of the Break on Maximum Volume value.
Selecting Printer Options
Include Packing List Comments
Enter Yes to leave room on each pre-shipper page to print packing list comments or No to ignore the size of packing list comments in consideration of the number of lines on the pre-shipper. This setting works in relation to the Max Lines on a Pre-Shipper setting in Container/Shipper Control (7.9.24). If zero, the Include Packing List Comments setting has no effect. See
Picklist/Pre-Shipper– Automatic (7.9.1).
Print Only Lines to Pick
Enter Yes to only print sales order line item numbers that have been detail allocated on packing lists or No to print all sales order line item numbers regardless of allocations.
This field defaults from the setting of Pick Only Allocated Lines in Sales Order Control.
If Receive F/A in SO is Yes in Configured Products Control (8.24), configured items always print on the picklist, regardless of how Print Only Lines to Pick is set. See
here.
Stage Open Quantities also affects how inventory items are selected for printing in this program, based on whether they are detail allocated. However, memo items cannot be detail allocated. Print Only Lines to Pick is the only field that controls selection of memo items for printing on a picklist, regardless of the Stage Open Quantities setting. If Print Only Lines to Pick is No, the memo item open quantity prints on the picklist. If the field is Yes, only the allocated quantity of the memo item prints. If no quantity is allocated, the printed picklist does not include the memo item.
Print Features and Options
Enter Yes to print configured sales order line item numbers followed by a list of features and options selected for the item or No to only print the configured item number.
Print Packing List Comments
Enter Yes to print packing list comments or No to not print packing list comments.
Create Pre-Shipper in SO UM
When an alternate unit of measure is specified on a sales order, indicate which unit of measure the system should use when creating the picklist/pre-shipper:
No: The picklist/pre-shipper is created and printed using the stocking unit of measure for the item on the sales order, as specified in Item Master Maintenance.
Yes: The picklist/pre-shipper is created and printed using the unit of measure specified on the sales order in Sales Order Maintenance.
To print the pre-shipper/shipper later, use Pre-Shipper/Shipper Print, which lets you select either the sales order unit of measure or the shipper unit of measure.
Form Code
Specify the form code of the document format on which you want these documents to print. You can customize forms to suit your business needs. See
Creating Custom Shippers for details.
Running Picklist/Pre-Shipper–Automatic
The following instructions give a generalized view of how to use Picklist/Pre-Shipper–Automatic. The settings you use depend on the processes and methods employed in your operation. Review the previous sections carefully to make sure you understand how this program works and what settings to make in this and other programs in order to get the results you want.
1 Choose Picklist/Pre-Shipper–Automatic (7.9.1) and enter a range of values matching the numbers of the sales orders for which you want to create pre-shippers. See
here.
3 Choose a device in Output and, optionally, enter a Batch ID. The system displays a message while the report is running.
When the report is complete, you are prompted to update the quantity picked.
4 Review the report to confirm that the correct sales orders have been selected and that the Pre-Shipper List is satisfactory.
5 Choose Yes at the Update Quantity Picked? message to accept the update and continue processing the transactions or No to modify your sales order selections or the update parameters.
6 If you chose No in step 5, repeat Steps 2 through 5 until you are satisfied with the Pre-Shipper List.
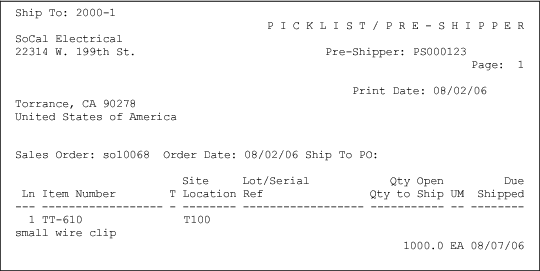
Sample Picklist shows a sample picklist.
Sample Picklist