Creating Retrobills Manually
Use the following steps to manually create a retrobill for a scheduled order line item:
1 Set preferences and specify a numbering sequence ID for retrobills in Retrobill Control.
2 As needed, use Retrobill Include/Exclude Invoices to exclude specific invoices from retrobill processing.
3 Create retrobills in Retrobill Maintenance. Set up the retrobill identifier and specify the scheduled order affected and the terms of the retrobill.
4 View retrobill information in Retrobill Inquiry (7.13.13.2).
5 Create a debit/credit memo with Retrobill Report.
6 Use Invoice Post and Print to post and optionally print the invoice.
7 Use Customer Invoice View (27.1.1.3) to view the invoice.
8 Communicate the invoice to your customer.
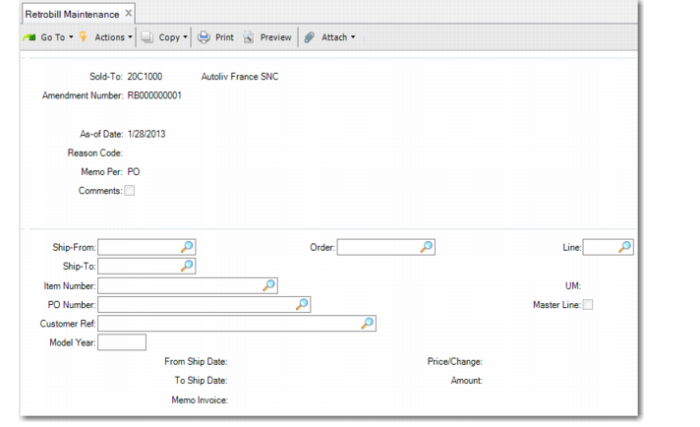
Retrobill Maintenance
Use Retrobill Maintenance (7.13.13.1) to create or modify retrobill records that are processed later in Retrobill Report.
Note: For retrobills generated in Retrobill Auto Create, you can only perform limited functions in Retrobill Maintenance:
• Modify the values in Reason Code, Memo Per, and Comments.
• Delete the retrobill order or an amendment to a scheduled order line.
In the first frame, enter a sold-to code and amendment number; leave Amendment Number blank for a system-generated number. Those fields form the unique retrobill ID used by the system. The amendment number authorizes the retrobill and is sometimes provided by the customer.
Memo Per, which defaults from Retrobill Control (see
here), determines how many debit/credit invoices are created.
The Reason Code and Comments fields are optional.
Click Next to move to the second frame.
The second frame consists of two sections. In the first section, identify the scheduled order and line item being changed. In the second, define the terms of the retrobill.
The ship-from, ship-to, item, PO number, scheduled order number, line item number, customer reference, and model year are used to select the scheduled order and line item being changed by the retrobill.
Click Next to advance to the lower section of the frame.
Retrobill Maintenance (7.13.13.1)
In this section, you define the terms of the retrobill by specifying:
From Ship Date/To Ship Date
These set the date range used for selecting invoices during retrobill processing in Retrobill Report. Invoices falling outside this date range are not included.
Price/Change
Indicates whether the Amount field contains a new price (Price) or a price change (Change).
Price: The value entered in the Amount field replaces the current price.
Change: The amount is applied to the current price. To reduce an existing price, enter a negative amount.
Amount
Specify the currency amount to be applied based on the Price/Change field.
Memo Invoice
Displays the debit/credit invoice number set by the Retrobill Report (7.13.13.3) when Create Memo is Yes. You can also use this field to manually enter a debit/credit invoice number.
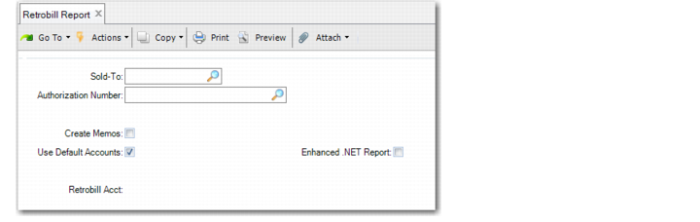
Retrobill Report
Use Retrobill Report (7.13.13.3) to run the retrobill process. The retrobill is identified by the sold-to and amendment number (called Authorization Number here).
Use this program to process:
• Retrobills created manually in Retrobill Maintenance.
• Retrobills created automatically in Retrobill Auto Create with Create Memos set to No. In this case, the system creates pending invoices for selected existing retrobill records.
If you want to create a debit/credit invoice, set Create Memos to Yes.
Note: If Maintain Operation Type in Tax Usage is Yes in Legal Document Control, Create Memos does not display. Instead, the system displays Create Complementary SO and Create Credit SO.
Note: During processing, Retrobill Report uses the value of the Memo Per field specified in Retrobill Maintenance or Retrobill Auto Create to determine how debit/credit memos are created for the specific retrobill. The Create Memos field in Retrobill Report determines if a debit/credit invoice is created at all. If this field is set to No, a debit/credit invoice is not created regardless of how Memo Per is set. The program runs in simulation mode, producing a report for you to review before actually creating the memos.
When you use the QAD .NET UI, the Enhanced .NET Report field determines the report output format—either the same format as the character UI or the enhanced format provided by Reporting Framework.
Note: If you are using the character UI, the Enhanced .NET Report field does not display.
Retrobill Report