QAD 2017 Enterprise Edition
>
User Guides
>
System Administration
>
System Control
>
System Maintenance
System Maintenance
You can use the following activities to manage system settings:
• Use Maintain to configure the main system setup definitions.
• Use Synchronize during initial system installation and to enable new features after a software update.
• Use View System Codes to display the list of values for fields that display valid values in drop-down lists.
Maintain
The System Maintain activity lets you configure the system setup, and describes the system-level values that are applied to all domains and entities.
Note: The system settings must be defined before you create domains and entities.
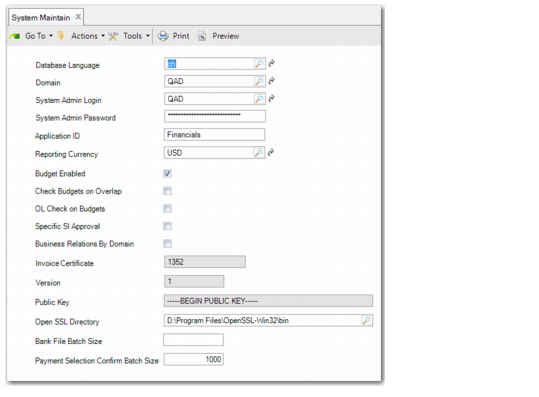
System Maintain (36.24.3.1)
Field Descriptions
Database Language
Choose the system language from the drop-down list. The system language is used to determine the language of UI elements if a user logs in and no UI strings are found in the language associated with their user record.
Domain
Enter the code that identifies the system domain. By default this is set to QAD. The system domain includes default data that is copied to new domains that are created, including control program settings, default accounts, and generalized codes. The system domain is used as a template for new domains.
Since the system domain is used as a template, you can add data to it or tailor defaults before creating new domains based on it. For more information on the system domain, see
QAD Financials User Guide.
System Admin Login
Specify a user ID to be used for system startup activities that can be run from a shortcut or as a scheduled task in Windows. These activities include system integrity checking, synchronize, starting the application, and starting the daemons. A valid user ID is required to ensure that a session can be created. By default this is set to the initial user, mfg.
System Admin Password
Specify the password for the system administration user ID.
Application ID
Specify an ID for this instance of the application (maximum 24 characters).
Reporting Currency
Specify the reporting currency to use for this database.
Important: Make sure you specify a reporting currency before you initiate any transactions in the database; it cannot be modified once GL transactions exist.
Budget Enabled
Select the field to enable budgeting. If you clear the field, the Budgeting function is disabled, and you cannot create new budgets or modify existing ones.
If your organization does not use budgeting, you should deactivate it to improve system performance.
Important: If you disable the Budgeting module, you also disable to ability to create allocation transactions based on WBS topics.
Check Budgets on Overlap
Select this field to verify that the same combination of budget elements (GL accounts, sub-accounts, cost centers, projects, and SAFs) is not being used in different budget topics or in different budgets. This setting is only applicable for budgets that also overlap in time; for example, overlapping budget periods. When the field is selected, the system generates an error message when a conflict occurs.
This verification process adds considerably to the length of time taken to save and run a budget.
OL Check for Budgets
Select the field to enable the online budget check.
Each time a linked budget account is specified in banking entry, journal entry, customer and supplier invoices, open item adjustment, or petty cash activities, the system determines if the new transaction causes the budget amounts to be overrun.
Specific SI Approval
Select the field if the task of approving supplier invoices is assigned to a specific user role.
After you select the Specific SI Approval field, create a role that corresponds to the approver’s user name; for example, SIA–xxxxxx, where xxxxxx is the user name of the approver. Link the new role to the approver’s user name.
Choose the SIA–xxxxxx role as approver when you create supplier invoices. When you save the supplier invoices, the system sends them to the Workflow Inbox of user xxxxxx for approval. See
Configuring Workflow for information on setting up the Workflow Inbox.
Note: The Role field displays in supplier invoice activities only if you customize the screen to add it. See
UI Customization.
Business Relations By Domain
Select this field to enable the restriction of business relations to domains. When you select this field, the Domain Restricted field is selected by default on each new business relation you create. When a business relation is restricted to a domain, it can only be viewed and accessed within the domain in which it was created. You can over-ride this setting by clearing the Domain Restricted field in Business Relation Create. For more information on business relations, see
QAD Financials User Guide.
Invoice Certificate
This field displays QAD’s shipment and invoice certification number, assigned by the local government, where applicable. This field is updated using System Synchronize.
For more information on invoice certification, see
QAD Financials User Guide. For more information on shipment certification, see
QAD Sales User Guide.Version
This field displays the version number of the public and private keys. This field is updated using System Synchronize.
Public Key
This field displays the invoice certification public key created by QAD. This field is updated using System Synchronize.
Open SSL Directory
Specify the OpenSSL bin directory. OpenSSL is used to generate the private and public keys.
This field is mandatory. You cannot enable invoice certification if you have not specified the OpenSSL bin directory.
Bank File Batch Size
Specify a value between 0 and 200 for the number of lines that you can include in a batch imported using Process Incoming Bank Files (31.1.6). The default value is 100.
Payment Selection Confirm Batch Size
Specify the maximum number of invoices that you can include in a batch processed using Supplier Payment Selection Confirm (28.9.4.5) or Supplier Payment Selection Unconfirm (28.9.4.8). The default is 1000.
See
Determining the Optimal Payment Selection Confirm Batch Size for guidelines on setting the most appropriate batch size for your system.
Note: Some batches can be less than the batch size specified in System Maintain. This situation occurs because the system avoids splitting payments for the same supplier into separate batches.
For more information on electronic banking and on supplier payment selections, see
QAD Financials User Guide.
Determining the Optimal Payment Selection Confirm Batch Size
The optimal batch size for Supplier Payment Selection Confirm depends on your system configuration and hardware. The recommended approach is to determine the best batch size for your system using trial and error. However, you must consider the guidelines in this section.
If you set a batch size that is too high, you incur the risk that one batch cannot be completed successfully due to system constraints and concurring load conditions.
QAD tests have shown that a batch size of 1000 easily fits within the constraints for most systems. Therefore, 1000 is the default payment selection batch size. Starting from 1000, you can experiment and increase the batch size, for example, by 200 at a time and measure the time taken to process the batch. You can determine the time taken by monitoring the progress bar in Supplier Payment Selection Confirm.
If a batch of 1200 is processed successfully, try to process a batch of 1400, and repeat this process until you find the optimal batch size for your system.
Important: Tests have shown that a batch size of 1500 is close to the maximum limit on some systems.