1. Mapping Simple Screens
The QGen tool is installed during the installation of QAD QXtend, but the script to access QGen is not automatically created. The QGen script runs QAD Enterprise Applications in standalone character mode and must be launched from a standard telnet session. QGen cannot be run from within the QAD .Net UI.
To access QGen from the training environment:
1 Open PUTTY use the icon on the training Windows machine Desktop.
2 Double-click the qaddemo saved session.
3 Log in as user demo-admin, password qad.
4 Run the QGen script by entering:
/dr01/qadapps/qea/qxtend/scripts/client.qgen
5 Log in using the user ID demo and password qad.
1.1 Map the Generalized Code Maintenance Screen
Mapping a screen in QAD Enterprise Applications requires you to walk through each of the fields/frames in a function and record the actions taken by the user to enter data. The first part of this exercise describes mapping a simple application screen: Generalized Code Maintenance.
In your telnet session, do the following:
1 Launch the Generalized Codes Maintenance function (36.2.13).
2 Press Ctrl+W to enable the QGen auto pop-up functionality that automatically prompts you for details about each field.
3 Press Ctrl+O to access the QGen menu.
4 Select the New Run Through mode by pressing the spacebar. (Move down the options by using the down arrow key.)
5 Press F1.
6 When the system asks if you want to reset, acknowledge the reset action by pressing the spacebar. Then press F1.
7 Walk through the Generalized Codes Maintenance screen, while updating an existing entry:
a UI Field = Field Name.
Enter abd_conv and press Enter.
In the Field Info screen, set Primary Key to Yes, and Delete Field to No.
Leave all other fields as their default values.
Press F1 to continue.
b UI Field = Value.
Press Enter.
In the Field Info screen, set Primary Key to Yes, and Delete Field to No.
Leave all other fields as their default values.
Press F1 to continue.
c UI Field = Comments.
Press Enter.
In the Field Info screen set Primary Key to No, and Delete Field to Yes.
Leave all other fields as their default values.
Press F1 to continue.
d UI Field = Group.
Press Enter.
In the Field Info screen set Primary Key to No, and Delete Field to Yes.
Leave all other fields as their default values.
Press F1 to continue.
e You are returned to the Field Name field. For QGen to recognize an iteration, it has to identify that it has encountered a field twice.
Enter abd_conv and press Enter.
In the Iteration Info frame, enter the name to use for the iteration.
Iteration Name = generalizedCode
Action to Exit = F4.
Press F1 to continue.
Choose not to continue with the iteration
8 Save the information recorded while mapping the Generalized Code Maintenance screen:
a Press Ctrl+W to disable the QGen automatic pop-up.
b Press Ctrl+O to access the QGen menu.
c Select Save and press F1.
d When prompted for the name of the QDoc, enter:
maintainGeneralizedCode
9 Load the information record while mapping the Generalized Code Maintenance screen:
a Press Ctrl+O to access the QGen menu.
b Select Load and press F1.
c When prompted for the name of the QDoc, enter:
maintainGeneralizedCode
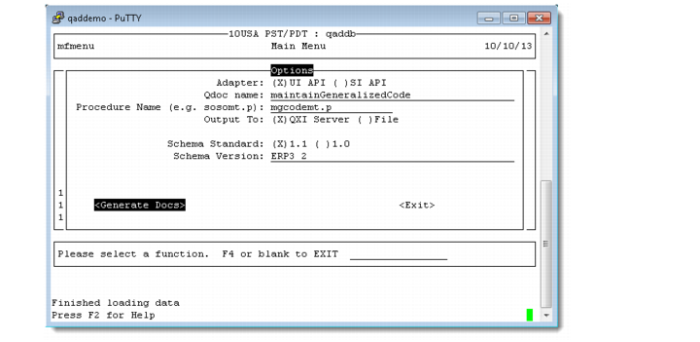
10 Generate the API files that are required by QXI:
a Press Ctrl+O to access the QGen menu.
b Select Generate Docs and press F1.
c Set the following values:
| Adapter | UI API |
| QDoc name | maintainGeneralizedCode |
| Procedure Name | mgcodemt.p |
| Output To | QXI Server |
| Schema Standard | 1.1 (Press Tab to tab to the Schema Version field.) |
| Schema Version | ERP3_2 |
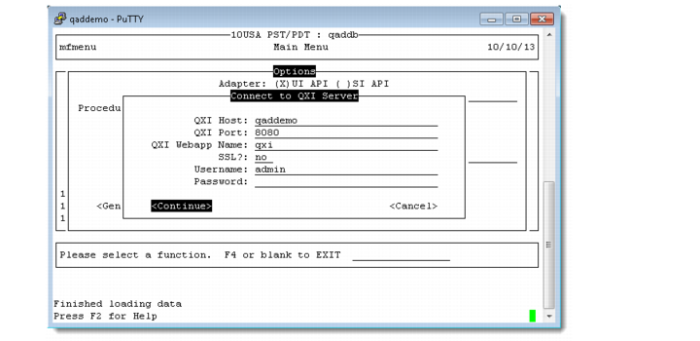
d Select the Generate Docs option and press Enter.
e Set the following values in Connect to QXI Server screen
| QXI Host | qaddemo |
| QXI Port | 8080 |
| QXI Webapp Name | qxi |
| SSL | no |
| Username | admin |
| Password | mfgpro |
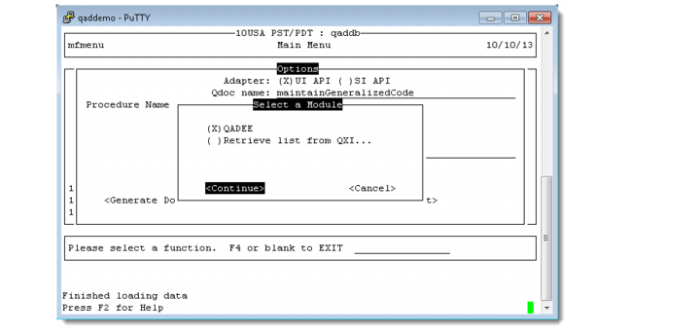
f Press Continue
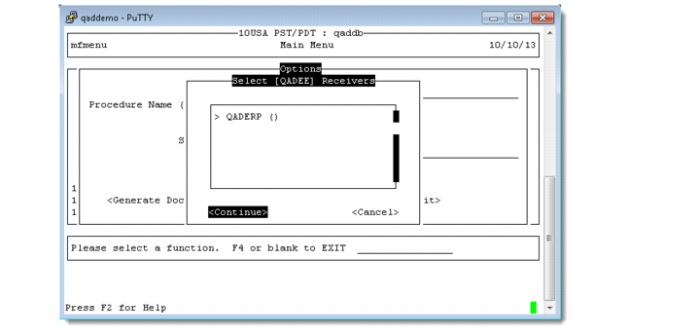
g Select QADEE and press Continue
h Choose QADERP and press Continue
i Press OK if QDoc successfully uploaded to QXI
j Press F4 to exit the Generate Docs screen.
1.2 Verify the Generalized Code API has been added
To verify that the maintainGeneralizedCode API was successfully added to QXI, you need to check two places. First check that the API is available as a custom API for the QADEE application type; second, check it is a supported API on the QADERP receiver.
1 Open the QXI Web application in Internet Explorer:
http://qaddemo:8080/qxi
2 Select the Configuration tab.
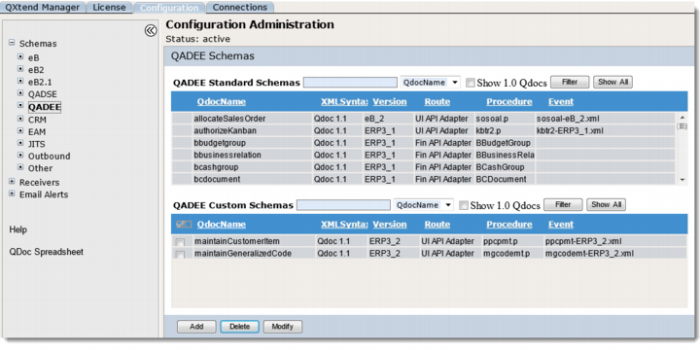
3 Select the Schemas node on the menu tree.
4 Select QADEE.
The maintainGeneralizedCode version ERP3_2 should display as the custom API that is available for the QADEE application type as shown here:
5 Select the Configuration tab.
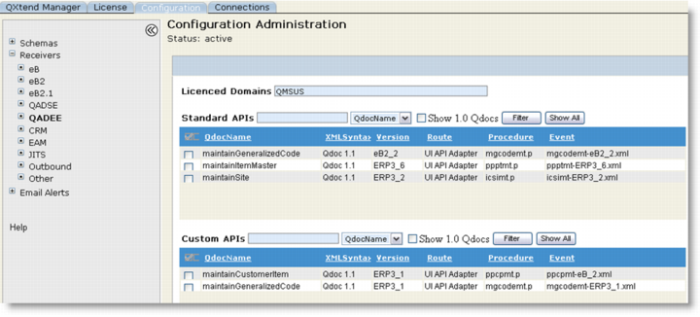
6 Select the Receivers node on the menu tree.
7 Select QADEE.
8 Select the check box next to the QADERP receiver and click the View button.
The maintainGeneralizedCode API version ERP3_2 should display as a supported QDoc for the receiver as shown here:
1.3 Test the New API
The new version of the Generalized Code Maintenance API has now been successfully deployed to QXI. However, we will have to use the new version to process a few transactions before we can be sure everything has been uploaded correctly.
The best way to test a QAD QXtend API is by using soapUI to build a WSDL project, create some requests, and process those requests using soapUI.
Locate the WSDL page first.
1 Open the QXI Web application wsdl page in Internet Explorer:
http://qaddemo:8080/qxi/wsdl
2 Select QADEE from the list of modules.
3 Select receiver QADERP.
4 Click on Yes link at the right of maintainGeneralizedCode (ERP3_2).
5 Copy the URL of the WSDL page.
Create a soapUI project using the WSDL
1 Open soapUI on the Windows image. Use the shortcut on the Desktop.
2 Create a new workspace.
a File - New Workspace.
b Set the workspace name to Lab 05 - QGen.
c Save the workspace file in <LabHomeDirectory>.
3 Create a new WSDL project.
a Right-click on the workspace name.
a Select the New soapUI Project option.
a Paste the URL of WSDL page to Initial WSDL.
a Set the project name to QGen 05 - Generalized Code.
a Click OK to create the project.
4 Drill down to the Request 1 message created under the QGen 05 - Generalized Code project.
5 Right-click Request 1 and select the Clone Request option. Enter a name for the new request.
6 Edit the new request so that it can be processed by QXI. Change the SOAP header:
a Set the receiver to QADERP.
b Set suppressResponseDetail to true.
7 Create the necessary session context entries. Create two ttContext iterations:
a Qualifier = QAD, Name = version, Value = ERP3_2
b Qualifier = QAD, Name = domain, Value = 10USA
Note: If you copy and paste the empty ttContext node and blank lines are created, right-click the request and select the Format XML option. soapUI will remove any blank lines and correct the indentation of the XML.
8 Edit the application data section of the message:
a The dsGeneralizedCode node by default will contain all of the fields available when processing a Generalized Code update. However, there are only a few fields that are absolutely required for an transaction to process successfully, the best way to identify the mandatory fields is to run through the UI and see which fields you have to enter data for.
b Edit the XML and create a new Generalized Code QDoc that will be processed successfully by QAD QXtend Inbound, use the following values:
| codeFldname | qxtest01 |
| codeValue | test |
| codeCmmt | Qxtend Training Test |
| codeGroup | APP |
9 Process the QDoc message that you have created in the new soapUI project and verify that the Generalized Code is created successfully.
10 Create and process a new message that will delete the Generalized Code created in the previous step.
11 Verify the changes in QAD EE.