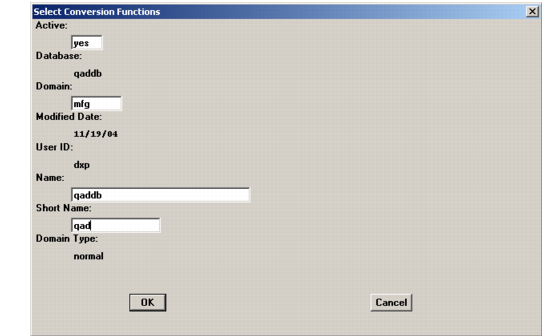
Select Conversion Functions
This step displays all required and optional conversions depending on the source database version. You can select the optional conversions you want to run. Following this selection, data screens appear for each of the conversions as needed for your specific environment.
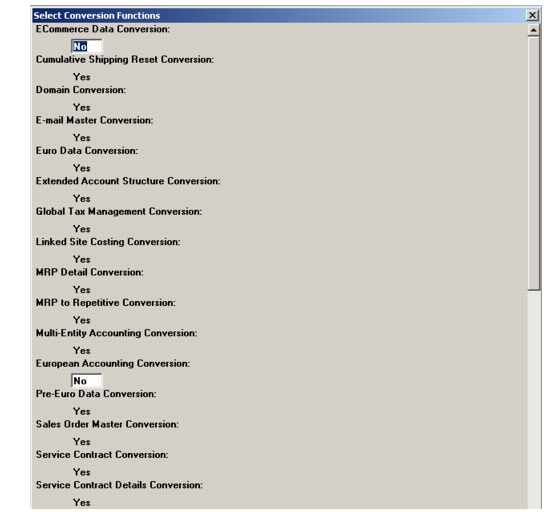
1 Complete the Select Conversion Functions screen.
Top Portion of Conversion Functions Screen
2 Scroll down to view all options. Set optional conversions you want to run against your database to Yes.
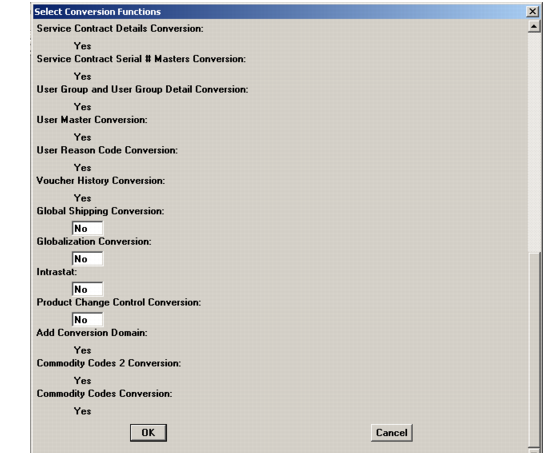
Bottom Portion of Conversion Functions Screen
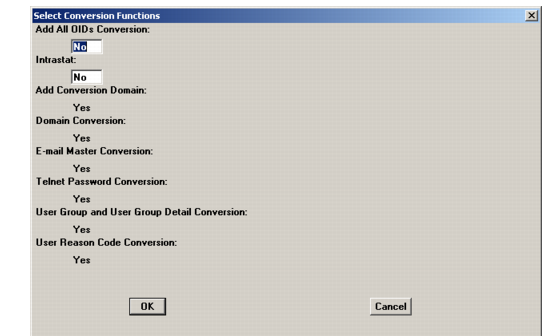
eB2 Source Database Conversions
3 Choose OK.
Add All OIDs Conversion (8.5 - eB2)
This conversion generates a correct OID value for all existing database records. This is only necessary if you are implementing Enhanced Controls and can also be run as a separate operation at the time that Enhanced Controls is implemented.
Global Shipping Conversion (8.5)
The next conversion screen prompts you for Global Shipping conversion-specific information.
Note: This selection screen does not appear if you have not selected the Global Shipping Conversion in the Select Conversion Functions screen.
Global Shipping Conversion
1 Enter record prefixes and the carrier list type information as shown, using the field descriptions that follow:
Prefix for new pre-shipper NRM sequence IDs
Specify the Number Range Management (NRM) sequence the system creates and assigns to all new pre-shippers if a default is not defined in Container/Shipper Control (7.9.24).
Prefix for new shipper NRM sequence IDs
Specify the NRM sequence the system creates and assigns to all new shippers if a default is not defined in Container/Shipper Control.
Prefix for new master bill of lading NRM sequence IDs
Specify the NRM sequence the system creates and assigns to all new master bills of lading if a default is not defined in Container/Shipper Control.
Prefix for new shipper document format codes
Specify the document format the system creates for standard and custom shipper print procedures.
New list type for existing “carrier” addresses
Global Shipping creates a reserved carrier list type. If you created a user-defined list type called carrier prior to installing the target version, the conversion utility lets you redefine the existing carrier list type.
• To preserve the existing carrier list type, leave this blank or enter carrier. The addresses are designated as carrier addresses.
• To redefine the existing carrier list type, enter a new list type name at the prompt.
• To merge the existing carrier list type with another existing list type, enter the non-carrier list type.
2 Press OK to continue.
Domain Conversions (8.5 – eB2)
All QAD Standard Edition databases require a minimum of two domains. One—the system domain—is created when you install the QAD Standard Edition target version. For converted databases, a production or primary domain is created during the conversion process.
In this process, the conversion routines make assumptions based on information in the source database. If there are no connection records (dc_mstr) entries for other databases in the source database, a new connection master is created and the production domain assigned to this database.
If dc_mstr entries for other databases exist, you are first asked to choose the current database from the list. You then assign a primary domain for this database. After the primary domain has been assigned, you must assign a domain to each of the other databases that have dc_mstr records. These domains are then required to support future connections to these other databases.
Important: When you convert the other databases, all the domain names must be identical. For example, if you assign domain names of sales, production, and distribution to databases named db1, db2, and db3 respectively in the first database you convert, the same domains for the same databases must be used in converting subsequent databases.
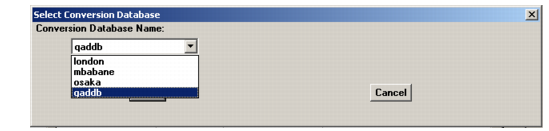
Multiple Databases – More than One dc_mstr
1 If the source database contains more than one database connection master, the first screen to display is the Select Conversion Database screen. Select the database you are converting and press OK.
Select Conversion Name Screen
2 You are then prompted to create a domain for each database with a connection record in alphanumeric order.
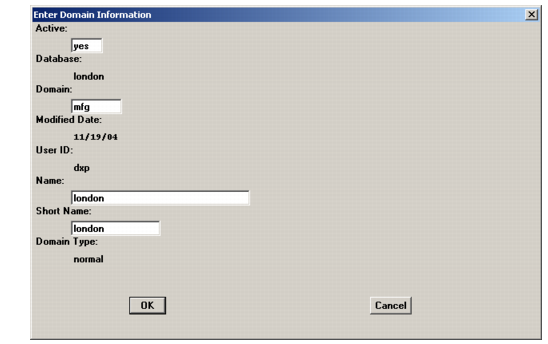
Master Domain Entry
3 The master domain screen shown in
Master Domain Entry displays for each database identified with a
dc_mstr in the conversion database. Enter values based on the following field descriptions.
Active
Indicate whether this domain is currently active.
Yes (the default): This domain can be associated with users in User Maintenance (36.3.1) and specified at log-in.
No: This domain is not active in the current database.
Database
The logical name of the database displays but cannot be modified.
Domain (Code)
Enter a unique code for each database identifying a specific domain.
(Domain) Name
Enter a descriptive name to associate with this domain (up to 28 characters). This name must be unique within a database and across connected databases.
This name displays in the lookup associated with domain fields and on various reports and inquiries, as space permits.
(Domain) Short Name
Enter a brief name (up to 14 characters) to associate with this domain. This name must be unique within a database and across connected databases.
The domain short name displays in the program title bar in character and Windows interfaces based on the setting of Header Display Mode in Security Control (36.3.24). It always displays in the program title in Desktop screens.
Domain Type
This displays the default value.
4 Choose OK when you finish.
Single Database – No dc_mstr
1 If this database has no dc_mstr records, the Select Conversion Functions screen displays with the logical database name displayed. Use the domain entry screen to create the required dc_mstr for the conversion (target) database.
Database Connection Master for a New Domain
2 Accept the defaults, or enter additional information (if you know it). The critical fields are:
Active
Indicate whether this domain is currently active.
Yes (the default): This domain can be associated with users in User Maintenance (36.3.1) and specified at log-in.
No: This domain is not active in the current database.
Database
The logical name of the database displays but cannot be modified.
Domain (Code)
Enter a unique code for each database identifying a specific domain.
(Domain) Name
Enter a descriptive name to associate with this domain (up to 28 characters). This name must be unique within a database and across connected databases.
This name displays in the lookup associated with domain fields and on various reports and inquiries, as space permits.
(Domain) Short Name
Enter a brief name (up to 14 characters) to associate with this domain. This name must be unique within a database and across connected databases.
The domain short name displays in the program title bar in character and Windows interfaces based on the setting of Header Display Mode in Security Control (36.3.24). It always displays in the program title in Desktop screens.
Domain Type
This displays the default value.
3 Choose OK when you finish.
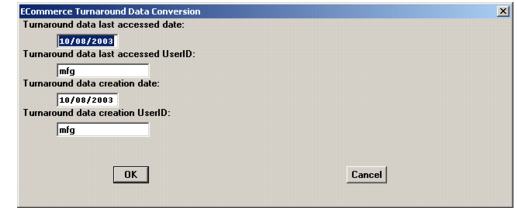
EDI ECommerce Conversions (8.6E – eB2)
The conversion prompts for ECommerce turnaround data if this is a conversion required for your source version (8.6E – eB2). Use the screen and field descriptions to complete this dialog.
Note: This selection screen does not appear if you have not selected the ECommerce Data Conversion in the Conversion Functions screen.
ECommerce Turnaround Values
ECommerce turnaround data is any data in an ECommerce document imported to QAD Standard Edition that is not used by the system. The data is, instead, stored in a side table and placed in the related export document when it is sent.
If you are using earlier versions of the ECommerce functionality and you have turnaround data in the side tables, you need to enter a date and user ID for when the data was created and when it was last accessed. Four new fields were added that require default starting values. The values are probably unimportant for past data and should simply be a valid user ID such as mfg and valid dates.
1 Enter turnaround information as shown, using the field descriptions that follow:
Turnaround data last accessed date
Enter the last date on which turnaround data was accessed.
Turnaround data last accessed user ID
Enter ID of the last user who accessed the turnaround data.
Turnaround data creation date
Enter the date on which turnaround data was created.
Turnaround data creation user ID
Enter ID of the user who created the turnaround data.
2 Press OK to continue.
Euro Data Conversion (8.5 – 8.6D)
Note: This selection screen always appears since the Euro Data Conversion is required.
1 Enter accounts, sub-accounts, and cost centers as shown, using the following field descriptions:
Unrealized Gain Account, Sub-account, Cost Center
These prompts create a default account, sub-account, and cost center for posting unrealized gains in currency exchanges. If you leave the account blank, the Unrealized Exch Rate Gain/Loss account defined in General Ledger Control (25.1) is used as a default. No default cost center is used.
Unrealized Loss Account, Sub-account, Cost Center
Specify the default account, sub-account, and cost center for posting unrealized losses in currency exchanges. (See notes from previous entry.)
Realized Gain Account, Sub-account, Cost Center
Specify the default account, sub-account, and cost center for posting realized gains in currency exchanges. If you leave this prompt blank, the Exchange Gain account, sub-account, and cost center defined in the first bank master record matching the currency in question are used.
Realized Loss Account, Sub-account, Cost Center
Specify the default account, sub-account, and cost center for posting realized losses in currency exchanges. (See notes from previous entry.)
Rounding Account, Sub-account, Cost Center
Specify the default account, sub-account, and cost center for posting rounding amounts in currency exchanges. If you leave this prompt blank, no default values are assumed.
Currency Exchange Accounts Conversion Screen
2 Press OK to continue. The Log Window displays your connection status.
3 The Connect Database dialog displays for Logical easource. The European Accounting database is called qadepm or largo by default. Locate your European Accounting database, and choose OK to continue.
4 The Log Window displays progress. Choose Close on completion.