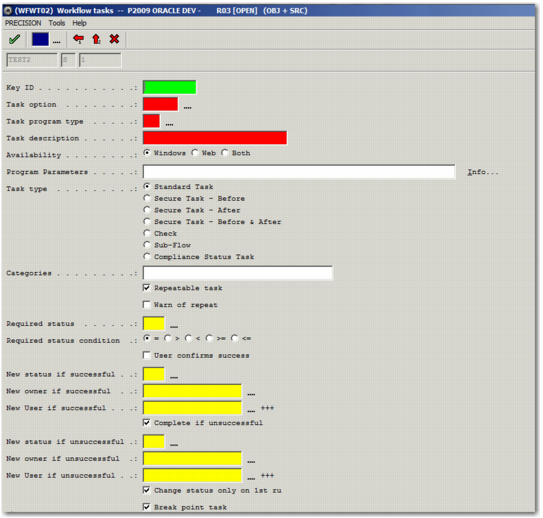
Field | Description |
Key ID | Choose a unique and meaningful character code for the task. This code is used to identify the task and link it to pre- and postrequisite tasks and compliance checks. The key ID ensures that even if a task’s sequence number changes, these links remain unbroken. Also, the key ID is used by other programs within workflow to identify and update the task. |
Task option | The shortcut code for the option that you want to run for this task. For a full list of options you can configure as workflow tasks, see the List of Workflow Tasks tab in Appendix A on the QAD Document Library. |
Task program type | The default task program type for the Web UI is 50. |
Task description | A brief description of the task. When you run the task, this text is displayed in the task pop-up titlebar. |
Availability | This field indicates if the task is available from the Windows UI, the Web UI, or both. |
Program Parameters | To view information on acceptable parameters, click Info. You can use this field for document printing, pop-up notes, compliance checking, or to open folders and execute external programs. |
Task Type | Indicates the type of task you are creating. For example, it may be a standard task or a check. A sub-flow task is a workflow within the main workflow, with a number of tasks that run consecutively. A compliance status task updates with compliance information when compliance runs either outside or within a workflow task, or in the background. |
Categories | List the categories that the workflow task falls under. The categories determine the tabs in which the tasks appear in the Tasks area. |
User confirms success | If you want the Unsuccessful button to appear at the bottom of the workflow task in the Web UI, then select this field. |
New status if successful | If you want the status of the workflow to change on successful completion of the task, specify the new status here. |
New owner if successful | If you want the owner of the workflow to change on successful completion of the task, then specify the new owner here. |
New User if successful | If you want the user assigned to the workflow to change on successful completion of the task, then specify the new user here. |
Complete if unsuccessful | Select this option if you want the task to show as complete, regardless of whether the task was successful. |
New status if unsuccessful | If you want the status of the workflow to change when the task is unsuccessful, then specify the new status here. |
New owner if unsuccessful | If you want the owner of the workflow to change when the task is unsuccessful, then specify the new status here. |
New User if unsuccessful | If you want the user assigned to the workflow to change when the task is unsuccessful, then specify the new status here. |
Break point task | Select this option if the task is a breakpoint task. Breakpoint tasks result in a pause in the workflow before the next task is run. |
Lock transaction | If the transaction is to be locked, then select this field. |