Domain
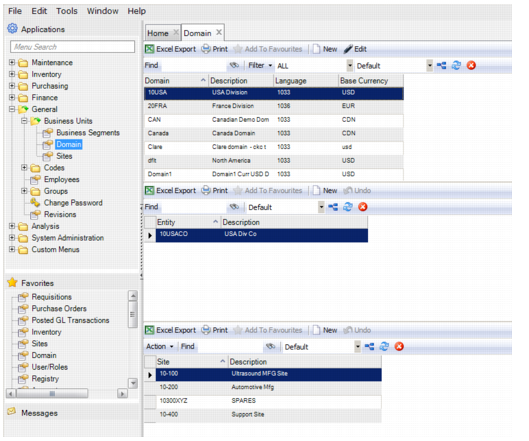
The Domain browse, which is in General|Business Units|Domain, is used to organize and display domain records. This data is important when EAM integrates with the QAD ERP system. In this browse, you can create and edit domain records as well as access supporting functions.
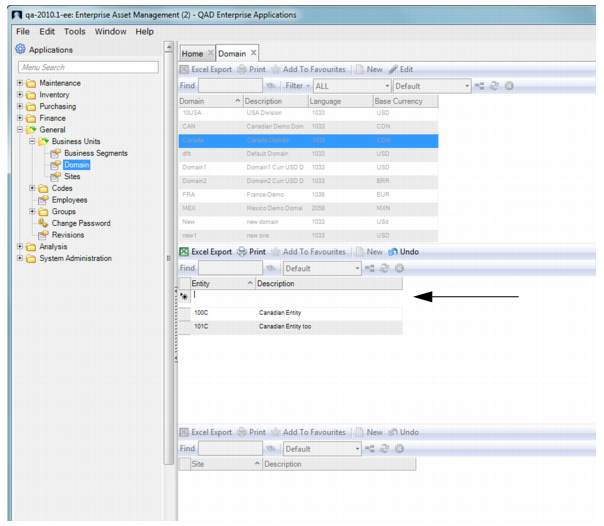
When you select a domain in the upper browse, the middle browse displays the entities associated with the domain, while the lower browse displays the sites associated with the entity.
Domain Browse
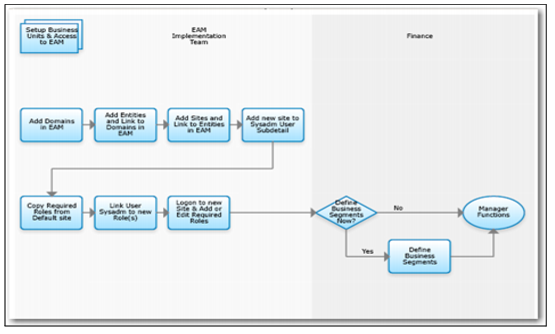
Process Flow to Set Up Business Units and Access to EAM
Set Up Business Units and Access to EAM Process Flow
1 Set up one or more domain codes.
2 Set up one or more entity codes.
3 Set up one or more site codes.
4 Add new site to the sysadm user-subdetail.
5 Copy an existing role to the new site.
6 Log on to new site and edit or set up required roles.
7 Link user sysadm to new security group.
8 Log on to new site and set up required roles.
9 Link user sysadm to new required roles.
10 Set up business segment codes.
Creating a Domain Record
Follow these steps to create a domain record:
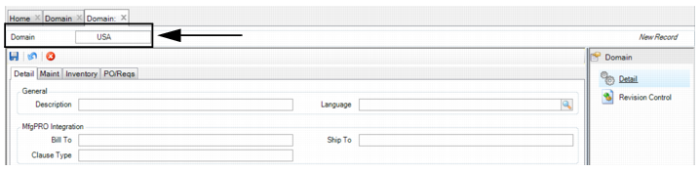
1 Open the Domain browse and click New. A blank domain record opens.
2 Enter a domain code that matches a code in QAD ERP.
Domain Code Field
4 Once all the information has been entered, click Save.
5 Add an Entity record and associate it with the Domain record that was created. Select the Domain, and in the middle browse click New.
Important: The entity codes must match the codes set up in QAD ERP.
7 Add a Site record and associate it with the Entity record that was created. Select the Entity, and in the lower browse click New.
Important: The site codes must match the codes set up in QAD ERP. When you save the Site, the new Site appears in the General|Business Units|Sites.
Filling out the Domain Record
Enter information about the domain on the Detail, Maint, Inventory, and PO/Reqs tabs.
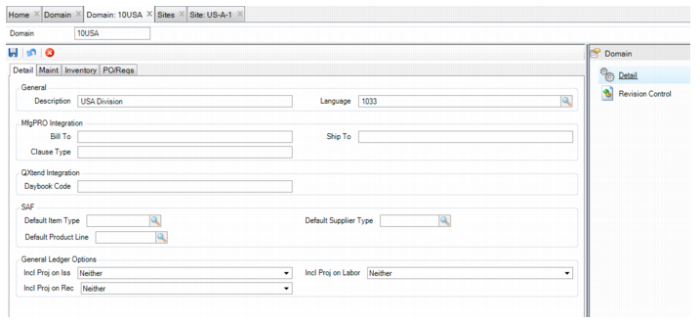
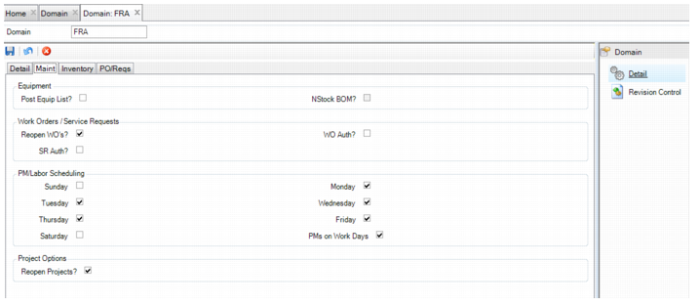
Domain: Detail Tab
On the Detail tab, enter domain information.
Domain: Detail Tab
General
Domain
Enter a code (maximum eight characters) identifying a specific domain. Codes are restricted to upper and lowercase letters and numbers. A primary domain code must be unique within a database and across connected databases. EAM domains must match QAD ERP domains.
Description
Enter a brief name (maximum 14 characters) to associate with this domain. This name must be unique within a database and across connected databases.
Language
Enter the default language for this domain. The EAM domain language must match the QAD ERP domain language.
MfgPRO Integration
Bill To
The default bill-to address that is used on all POs for this specific domain.
Ship To
The address type stored in Addresses in the ERP system to designate ship-to addresses.
Clause Type
Refers to the Type field in QAD Enterprise Edition (EE) master comments. In EE, master comments can be used in various places. To help organize these comments, a user-defined Type field is used to group them. The ERP Interface|Download routine only displays the EE master comments based on the Clause Type entered in this field.
Financial Integration
Daybook Code
Enter the daybook code associated with this domain. The daybook code must be defined in QAD EE Financials. For more information regarding daybooks, see the QAD Financials User Guide.
SAF
Default (SAF) Item Type
Enter a default item type code associated with a part transaction. When EE tells EAM that the item type concept is required, EAM finds the parts record associated with the GL Transaction and provides the parts.type_code value. If parts.type_code is blank or no parts record can be found, EAM uses the default found here.
Default (SAF) Supplier Type
Enter a default supplier type code associated with a purchasing transaction. When the supplier type concept is required, EAM uses the mglt_det.po_no to find the po_header. It then finds the vendor for that po_header and supplies vendor.type_code. If the record cannot be found or the value is blank, EAM uses the default found here.
Default (SAF) Product Line
Enter a default product line code associated with a part purchasing transaction. When the product line concept is required, EAM uses mglt_det to find the relevant parts and po_line and pulls the product_line_no from those records. If the record cannot be found or the value is blank, EAM uses the default found here.
Note: EAM only supports SAF when integrated with EE. EAM does not store SAF details related to transactions. EAM draws the SAF concepts it needs from EE based on a transaction line’s cost center, account code, and project number. EE then compares those three values to its SAF Structures and returns the concepts that EAM must fulfill.
General Ledger Options
Inc Proj on Iss
When an issue transaction is tied to a project, select on which side in the GL you want the project ID included: Debit side, Credit side, Both, or Neither.
Inc Proj on Labor
When a labor transaction is tied to a project, select on which side in the GL that you want the project ID included: Debit side, Credit side, Both, or Neither.
Inc Proj on Rec
When a receipt transaction is tied to a project, select on which side in the GL that you want the project ID included: Debit side, Credit side, Both, or Neither.
Domain: Maintenance Tab
On the Maintenance tab, enter system control information to set up domain-wide parameters.
Domain: Maintenance Tab
Equipment
Post Equip List?
If this option is selected, the system posts all stock parts with their Add to BOM? option selected (on the Codes tab of the Inventory screen) to the equipment bill of material (BOM) structure when issued from stores.
NStock BOM?
This option controls whether non-stock parts are added to the BOM for any piece of equipment referenced on a requisition. The NStock BOM? option is disabled and cleared when the Post Equip List? option is cleared.
Work Orders/Service Requests
Reopen WOs?
If this option is selected, users with the required role setting can reopen a work order. You can issue parts, distribute labor, and receive and charge POs against the work order. If a work order is closed or canceled and this option is selected, change the status of the work order to Open before you make changes. If the option is cleared, you cannot reopen the work order.
WO Auth?
If this option is selected, a user with the required role setting must authorize the work order before any associated parts, labor, or receipts against a PO can be initiated.
SR Auth?
If this option is selected, a user with the required role setting must authorize a service request. The service request must be authorized before it can become a work order.
PM/Labor Scheduling
PM/Labor Scheduling.
Select this option to automatically schedule PMs meeting calendar criteria, such as specifying holiday closures.
The selected days of the week are used in scheduling preventive maintenance work orders. For example, if Saturday is selected, and a PM comes due on a Saturday, the system generates the PM work order for that Saturday. If Saturday is cleared, the system does not generate the PM work order. It sets the schedule start date to the next available work day. The system finds the next available day to schedule that work order.
PMs on Work Days
When a PM is due, the system compares the original scheduled date for the PM to the Sunday-through-Saturday settings (for PM/Labor Scheduling) to determine the actual date.
For example, if the PM is due on a Saturday and Saturday is cleared, the system validates the PM work schedules. If it is selected, the PM scheduled start date is the next available workday. If the PMs on Work Days option is cleared, the system schedules it for Saturday even though the Saturday is cleared. It schedules the work order for a day that is not scheduled for PM work.
Project Options
Reopen Projects?
Indicate whether users with the required role setting can reopen closed projects.
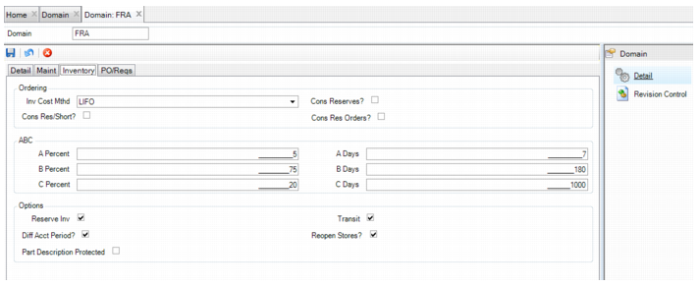
Domain: Inventory Tab
Enter system control information to set up domain-wide parameters on the Inventory tab.
Domain: Inventory Tab
Ordering
Inv Cost Method
Set the inventory cost method for all sites associated with a domain. EAM supports the following inventory evaluation methods: FIFO (first in, first out), LIFO (last in, first out), and Weighted Avg (weighted average). Select one of these options to control how EAM determines the value of the inventory for all items.
Cons Reserves?
EAM uses this option when calculating the number of parts required to replenish inventory based on the reorder point and the management maximum quantities. The purpose of Consider Reserves is to add (selected) or ignore parts that are reserved for specific jobs from the stock replenishment run.
Cons Res/Short?
The system uses this option if there are currently more parts reserved than available in inventory. When calculating the reorder quantity on the stock replenishment run, EAM adds the number of parts reserved and short.
Cons Res Orders?
Use this option to add (selected) or ignore the requisitions on-order for parts that are reserved for specific jobs from the stock replenishment calculation.
ABC
ABC Percent
Specify the relative percentage of inventory value for A-, B-, or C-type parts.
ABC Days
Specify the number of days used to calculate the next physical inventory due date.
Options
Reserve Inv?
If this option is selected, EAM automatically reserves all parts on a stores requisition (work order parts list). When a stores requisition is created, EAM automatically reserves all parts on the list. If this option is cleared, you can still selectively reserve parts on specific critical stores requisitions.
Transit?
This option determines whether the system uses transit accounts when relocating parts between sites. If Transit? is cleared, when a part transfer is done from one site, inventory is automatically relieved from the original site, and it appears in the destination site. If Transit? is selected, when the part is issued from the original site, it goes into a transit account (similar to an intercompany charge account). The part remains in the From Site’s transit charge account until the inventory clerk receives the part into the destination site. At receipt, the corresponding debit and credit are made against the Transit account and the part moves into the destination site. After the part is in the To Site’s inventory, you can issue it.
Diff Acct Period
This option determines whether sites currently in different accounting periods can process intercompany transactions. If selected, you can process intercompany transactions between sites in different accounting periods. If cleared, you can process intercompany transactions only between sites in the same accounting period.
Reopen Stores?
Use this option to determine whether users with the required role access can select the reopen action on closed stores requisitions. Select this option if you return an item to the store room that was issued but not used for a stores requisitions.
Part Description Protected
To ensure that part descriptions are protected and consistent across all sites, EAM allows you to prevent the part descriptions from being edited when the Copy Parts Across Sites action is performed. Select this check box to prevent the part description from being edited when a part is copied to another site. If this check box is not selected, when a part is copied to another site, a user can open the part record in that site and edit the part description.
Buyer/Commodity Purchasing?
Select this box to link buyers with the commodities they buy, by site. When this check box is selected, Commodity becomes a required field on the Inventory|Inventory|General tab, and the Requisitions Line Detail tab.
Note: Buyer/Commodity Purchasing automatically sets the Buyer and Commodity fields to mandatory when saving both Inventory and Requisitions. If you turn off Buyer/Commodity Purchasing, EAM clears the mandatory requirements for both Buyer and Commodity. You must reapply mandatory settings for those fields individually for Inventory and Requisitions, if needed.
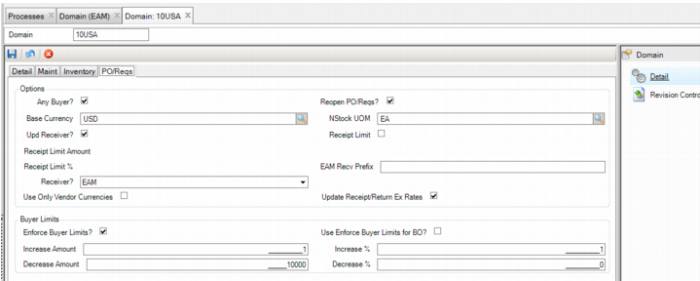
Domain: PO/Reqs Tab
On the PO/Reqs tab, enter system control information to set up domain-wide parameters.
Domain: PO/Reqs Tab
Options
Any Buyer?
With this option selected, buyers can modify any approved PO in their assigned sites. With the Any Buyer? option cleared, only the buyer who approved a PO can modify or edit the purchase order.
Reopen PO/Reqs?
If this option is selected, users with the required security setting can reopen POs or requisitions once they have been closed. Reopen the closed PO before you make adjustments, such as a return to vendor or additional receipts.
Base Currency
Select a base currency from the lookup of valid currencies. The currency must be the same currency defined for the domain in QAD EE. All entities in a domain use the same base currency. Transactions in other currencies are converted into the designated base currency before being passed to the QAD ERP application.
NStock UOM
Any time a non-stock item (does not have an EAM inventory part record) is specified on a requisition, the system uses the default unit of measure (UOM) from the parts record. Select from the lookup, which is then validated from the unit of measure table.
Upd Receiver?
This option determines whether users can update purchasing receivers.
EAM provides the choice of whether a receiver number is automatically generated. Sometimes Accounts Payable departments prefer to input the packing slip number as the receiver number. If selected, you can manually enter the receiver number when receiving against a purchase order. Clear the option to automatically generate a receiver number.
Receipt Limit
Select this option to receive orders exceeding the cost shown on the purchase order. When an order exceeds the cost on the purchase order, the system checks the receipt limit. You can receive the item if the cost does not exceed the specified percentage or amount, whichever is greater. Enter the percentage, amount, or both.
Receipt Limit Amount.
Enter an amount to allow an item to be received with more than the original quantity ordered.
Receipt Limit%.
Enter a percentage to allow an item to be received with more than the original quantity ordered.
Receiver?
Select EAM or MFGPRO to use the EAM or QAD ERP receiver number sequences.
EAM Recv. Prefix?
Enter the prefix for EAM receiver numbers. The prefix allows you to identify receipts from EAM in QAD ERP.
Use Only Vendor Currencies
By default, this check box is clear, meaning any currency can be used in purchasing. Select this option to enable the Vendor Currency submenu for vendors. When vendors are downloaded from EE into EAM, the Vendor Currency submenu is populated with supplier bank currencies from QAD EE. Only the specific currencies listed in the Vendor Currency submenu are available to use in EAM Purchasing for the vendor.
Update Receipt/Return Ex Rates
Select this box to enable an update to the defined currency exchange rate when you receive a PO. See
Receiving Purchase Orders.
Buyer Limits
Enforce Buyer Limits?
Use the buyer limit with the PO or requisition approval process. Once a PO or requisition is approved, you can change the cost from what was originally approved. The buyer limit prevents the buyer from exceeding the approved cost by a percentage above the approved cost and the designated dollar amount. If exceeded, the system reroutes the PO or requisition for approval.
Note: If the Enforce Buyer Limits? check box is not selected, Use Enforce Buyer Limits for BO? is disabled.
Use Enforce Buyer Limits for BO?
Select this check box if buyer limits should also be applied to the blanket orders based on a domain-level configuration setting. If this check box is selected, the same buyer limits that are used for requisition and purchase orders are used for blankets. By default, this check box is not selected.
If a blanket order is authorized and the expiration amount is changed, the following logic is used:
• If Use Buyer Limits for BO? is not selected, the expiration amount can be increased or decreased with no limitations, without the BO becoming unauthorized.
• If Use Buyer Limits for BO? is selected, any change to the expiration amount triggers the system to check that the change is within the buyer limit tolerance defined on the domain-level configuration.
If the change is outside of the buyer tolerances:
• Upon saving the BO, the user receives a message stating that the change has exceeded the Buyer Limits and the BO becomes unauthorized.
• If the user selects OK, the BO Auth Status changes to Previously Authorized, requiring the BO be reauthorized.
If the change is within the buyer tolerances:
• Upon saving the BO, the expiration amount is updated and the Auth Status remains Authorized.
Increase Amount
Enter an amount that represents how much a buyer can increase an already-authorized purchase order or requisition without having to reroute the PO or requisition for reapproval.
Increase %
Enter a percentage that represents how much a buyer can increase an already-authorized purchase order or requisition without having to reroute the PO or requisition for reapproval.
Decrease Amount
Enter an amount that represents how much a buyer can decrease an already-authorized purchase order or requisition without having to reroute the PO or requisition for reapproval.
Decrease %
Enter a percentage that represents how much a buyer can decrease an already-authorized purchase order or requisition without having to reroute the PO or requisition for reapproval.
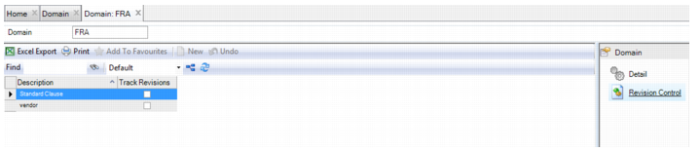
Enable Revision Control for Vendor and Standard Clause Browses
To enable revision control for the Vendor and Standard Clauses browses in the Purchasing module, open the Revision Control submenu. Select the Track Revisions check box to turn on revision control for the Vendor or Standard Clause browses.
Vendor and Standard Clause Revision Control
Adding an Entity Record to a Domain
To add an entity record and associate it with the domain record, select the domain, and in the middle browse click New.
Enter the entity code in the Entity field and a short description in the Description field. Press Enter to save.
Important: The entity codes must match the codes set up in QAD ERP.
Adding an Entity Record
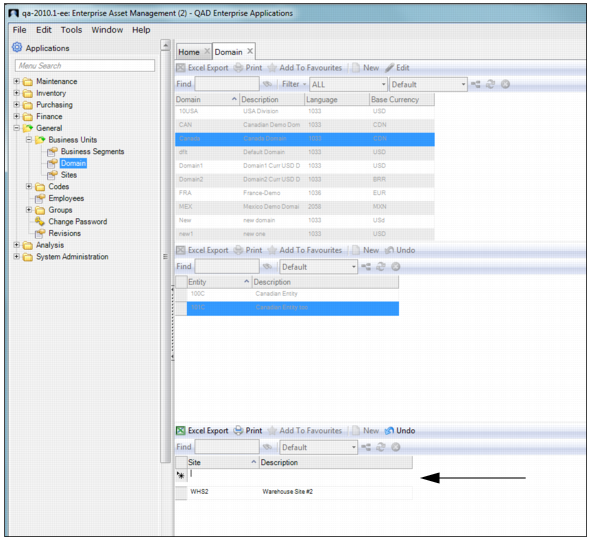
Adding a Site Record to an Entity Record
To add a site record and associate it with the entity record, select the entity, and in the lower browse click New.
Enter the site code in the Site field and a short description in the Description field. Press Enter to save.
Important: The Site codes must match the codes set up in QAD ERP.
Adding a Site Record