Using Product Structure Maintenance
Product Structure Maintenance includes a graphical tool for creating, viewing, and editing the structure of bills of materials when you use the program in the .NET User Interface mode. This tool is only available with the QAD .NET UI.
Product Structure Maintenance
Opening Product Structure Maintenance in .NET User Interface Mode
To access the tool, the program must be set to open in QAD .NET UI mode. To do so, in the Applications pane, right-click Product Structure Maintenance in the program listing and select Properties. Set the Open with field to .NET User Interface and click OK.
Creating a Product Structure
To create a product structure:
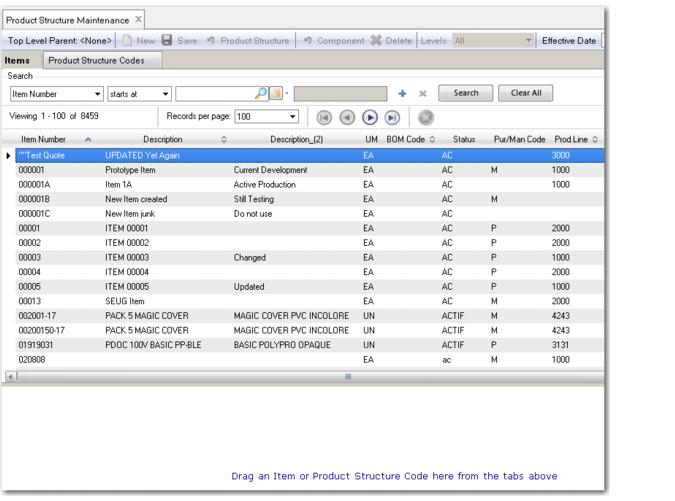
1 Open Product Structure Maintenance.
Opening Product Structure Maintenance
Note the blank workspace in the lower part of the display, located below the browses for Items and Product Structure Codes.
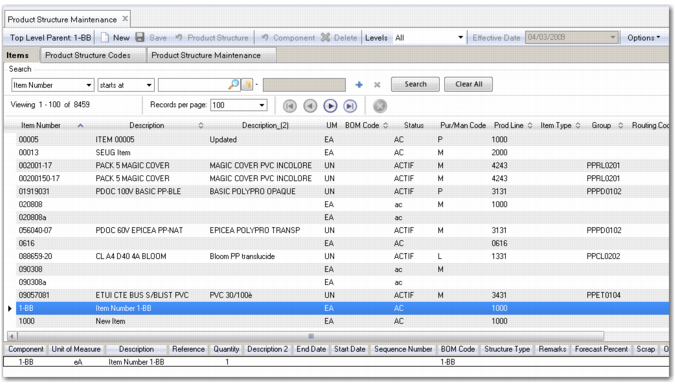
2 Drag a component (an item or product structure code) from a browse to the workspace.
3 The component is now added to the product structure. The interface displays relevant fields along the top, including Component, Description, Unit of Measure, Quantity, Reference, Start Date, and End Date. Note that you can edit the Quantity, Reference, Start Date, and End Date fields, while the other fields are read-only.
4 To undo a component added to the product structure, right-click the component, and select Undo Add.
5 To undo changes to the product structure, click the Undo Product Structure Changes icon. Clicking this icon reverses the changes you have made to the selected component and all components under the selected component in the product structure hierarchy.
6 To undo changes to a component, click the Undo Component Changes icon. Clicking this icon reverses changes you have made to the selected component only.
7 Drag additional components to the workspace and directly position them within the product structure. Alternatively, double-click an item or product structure code.
8 New or modified components in the product structure are colored yellow. These components have been added to the product structure as displayed in the workspace but have not yet been saved to the database.
9 The system displays an error message if:
• You attempt to create a cyclical structure. For example, the system will not allow you to add an item that is a parent of itself.
• You add duplicate components to the same parent and then save the structure.
• You try to have two same components with overlapping valid periods and then save the structure.
You can alter the column views using the Show and Hide Column options, which you access by right-clicking on a column header. This lets you hide data that is not immediately relevant to maintenance, such as local variables or pre-processor commands.
Effective Date and Maximum Levels
The Effective Date and Maximum Levels filters let you improve performance by limiting the number of records retrieved from a product structure browse.
When you specify an effective date, the browse returns only those records that are valid for that date (the effective date occurs between the products’ start and end dates). The default is the current date, and this filter is only available when you are in New mode.
The Maximum Levels filter returns a specified number of levels for the root product structure. When set to blank, the server returns all levels, and the maximum level is 25.
Note: By using these filters, you may create duplicate or cyclical structures, which are only validated when the structure is saved. This may cause the system to display a large number of error messages when saving.
Saving a Product Structure
To save a product structure to the database, select the top-level component, right-click, and select Save (or click the Save icon).
If there are issues with components when the system attempts to save the product structure, the components that need attention are displayed in red.
Once a product structure has been saved, you can delete a component in the structure as follows:
1 Select the component.
2 Left-click to select Delete from the pull-down menu.
Note: If a component has not yet been saved to the database, the option displayed is Undo Add instead of Delete. Rather than delete a component from the product structure, it is preferable to change the end date of a component so that the component is effectively obsolete.
Product Structure Maintenance Fields
Important fields include the following:
Reference
On a complex assembly that contains many components, an item may appear several times on the same drawing and product structure. Use Reference to identify a component that appears multiple times on the same parts list.
The reference code can be a drawing reference number that helps to relate a component to a specific position on a drawing, or a code associated with an engineering change order or an engineering change notice. The system uses parent, component, reference, and start date to define a unique product structure record. A component can have the same parent and same reference as long as the start dates are different.
Note: If you use the Product Change Control (PCC) module, engineering change notice functions in Product Structures are disabled. See User Guide: QAD Master Data for more information on PCC.
Since the system uses product structures to store configuration bills, you can also enter the feature code for configured products in Reference.
Start and End Effective
The way an item is manufactured can change over time. New components can be added or unnecessary ones deleted. Use effective dates to store relationships for historical, current, and future product structures.
All parent-component relationships are identified by a start and an end effective date. The start and end effective dates indicate when a relationship is active. A relationship is effective through the end date and becomes obsolete the next day.
Example: The hinges and fasteners for a frame are being upgraded. The existing components have an end effective date of March 14, and the new components have a start date of March 15. If an adhesive is added to prevent the screws from coming loose, you can also record the new product structure with the start date of March 15.
Quantity Per
Specify how much of this component is needed to make the parent item. In discrete manufacturing, items are made in individual units, and the component quantity is the amount needed for a single unit of a parent product. For example, two screws are required for one pair of sunglass frames.
In process manufacturing, products are made in batches and the component quantity per parent on a formula or recipe is stated with respect to a batch quantity for the parent product. Since the only economical way to coat lenses is in batches, the amount of a particular coating might be specified for a batch of several hundred lenses.
Scrap
Depending on the product, some components may be lost or unusable as a result of the manufacturing process. There are two ways to anticipate this loss:
• Use the scrap factor.
• Change the component quantity per.
The scrap factor is the percentage of a component expected to be lost during manufacturing. The system uses this with the quantity per to calculate component requirements for work orders and MRP. When a scrap factor is used, component quantities are almost always extended into fractional amounts and not whole units, making it difficult to use with items always handled in discrete quantities.
Example: One left lens is required for a pair of sunglasses and the scrap factor is 5%. The system calculates a requirement for 105.2631 left lenses to make 100 sunglasses.
Using scrap percentages other than zero promotes waste and can conceal quality problems. If additional quantities are consistently required, consider changing the component quantity per directly. This avoids the problem of fractional quantities but may result in even greater waste than using the scrap factor. Continuing the example of the sunglasses, it is not realistic to change the quantity per on the left lens to 2. If you did so, the system would always plan that 200 left lenses would be necessary to make 100 pairs of sunglasses.
Structure Type
Product structure relationships normally have a blank structure type code. Other codes are used for special applications.
Structure Type Codes
Code | Description |
Blank | A normal product structure relationship. |
X | A local phantom. Costed and exploded, but never planned as component requirements. |
D | Document. Records miscellaneous expense items or documents associated with this bill that are not planned, exploded, or costed. |
O | Option. An optional component. Normally defined using Configured Structure Maintenance (8.1), options may also be entered in planning bills. |
P | Plan. Planning bill used for multilevel master scheduling. Not exploded or costed. |
A | Alternate. Automatically created by the system for an alternate structure for this parent. Not planned, exploded, or costed. |
Option and planning bills are used to create production forecasts.
LT Offset
Not all of the components of a manufactured item are always required at the beginning. Normally, the differences in timing are not significant. However, if components are required long after the start date and/or the cost of those components is significant, consider using lead time offset.
Enter a positive or negative number, indicating the number of days after or before the start of an order when this component is required. MRP uses lead time offset to determine the need date for components and segregate them on separate picklists for individual work orders.
Op
Enter the number identifying the operation in the routing or process where this component is used. When specified, operation has the following effects:
• Determines whether this component is backflushed in repetitive manufacturing operations. If you enter the operation number here, this component is automatically issued when you report quantities for the parent. If Op is blank or does not match a defined operation, this component is not backflushed. See
Backflush Transaction.
• Enables component yield cost calculations. Product Structure Cost Roll-Up (13.12.13) and Routing Cost Roll-Up (14.13.13) use this field when calculating material costs. If the operation yield is less than 100% in Routing Maintenance (14.13.1), then material costs are increased to reflect yield loss. If blank, the system assumes components are issued at the first operation. See User Guide: QAD Costing.
• Enables operation-based yield calculations. If the parent item is defined with Operation Based Yield set to Yes in Item Master Maintenance and Enable Op Based Yield is Yes in MRP Control (23.24), MRP derives component yield percentages from the operations on the parent’s routing. The same method is used when bills of material are exploded in work orders, repetitive, advanced repetitive, and configured products. See “Operation Based Yield” on
here.
• Determines whether this component prints on Repetitive Picklist Print (18.22.3.5). If you enter an operation code, the component can be picked.
Comparing Bills of Materials Side-by-Side with Vertical Tab View
You can quickly compare two bills of materials side-by-side. To do so:
1 From the Applications menu, open Product Structure Maintenance.
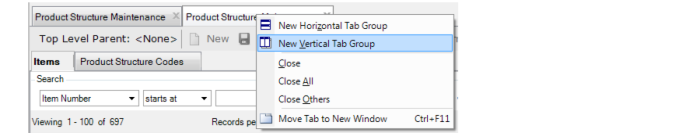
2 Open Product Structure Maintenance again. You now have two tabs for Product Structure Maintenance.
3 To view the two tabs of Product Structure Maintenance side-by-side, click on one of the tabs and choose New Vertical Tab Group:
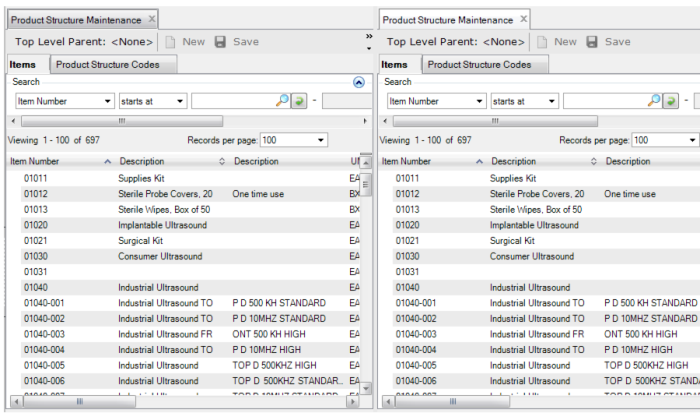
(You can also drag one of the tabs to the right to view the options.)
You now have a vertical, side-by-side view: