Creating and Modifying Deductions
Creating Deductions in Customer Payment Create
You can use Customer Payment Create to create deductions. The process is similar to the process for creating prepayments. However, unlike prepayments, you can enter many deductions for a single payment transaction.
When you add a deduction to a payment, the system creates two postings when the payment is saved. One posting is recorded in the customer payments daybook and the second posting is recorded in the customer deductions daybook. A customer invoice of type Deduction is created when you save the payment. The customer deduction invoice uses the daybook linked to the bank GL account for the second posting (deductions daybook).
The system uses the Deduction Suspense system type account to transfer the balance from the payment posting to the deduction posting.
If the deduction category allows automatic write-offs, the system automatically writes off any standard deduction within the specified deduction limits to the account associated with the deduction category. If you do not want to write off all or part of the deduction, use another category without automatic write-off.
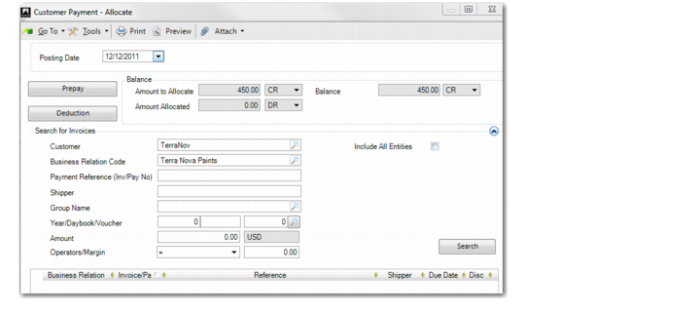
Customer Payment–Allocate
In Customer Payment–Allocate, click the Deduction button. The Customer Payment–Deduction screen opens.
Customer Payment–Deduction
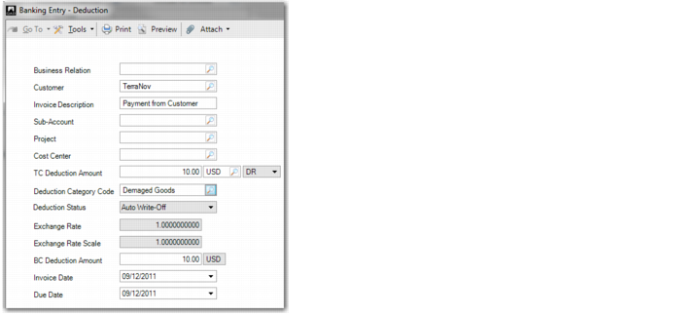
Business Relation/Customer
These values default from Customer Payment Create.
Deduction Description
Enter a description of the deduction. This field is mandatory.
Customer Reference
Specify the deduction reference submitted by the customer. This field is optional.
Sub-Account, Cost Center, Project
Specify the analysis values that the account requires.
TC Deduction Amount
Specify the deduction amount in transaction currency. The default value is the invoice amount, but you can modify this value.
Deduction Category Code
Specify the category for the deduction.
If you leave the Deduction Category Code field blank, the Deduction Details screen opens, where you can enter multiple deduction categories and detail amounts.
If you need only one deduction category, specify it here, and the Deduction Details screen will not open.
Deduction Status
This field displays the deduction status calculated by the system. If the deduction category you assign to the line allows automatic write-off and if the deduction amount is below the automatic write-off limit, the status of the line is Auto Write-Off. If the category does not allow automatic write-offs, the status of the line is Pending.
When you click OK in the Customer Payment–Deduction screen, the system adds a new line to the grid with allocated invoices.
The new line is a customer invoice of type Deduction. The grid lines contain fields that display the deduction category and the status. You can create more deductions by clicking on the Deductions button.
Specifying Deduction Details
Use the Deduction Details screen to create deductions that have more than one detail line. To access the Deduction Details screen, right-click on the deduction in the grid and choose Deduction Details from the context menu.
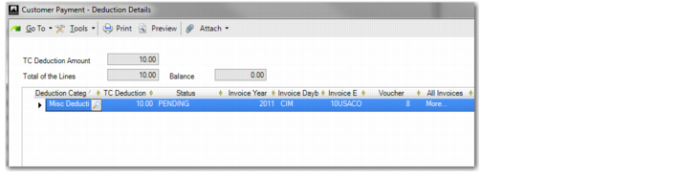
Customer Payment–Deduction Details
To create multiple detail lines, right-click in the grid and insert more detail lines. You can then specify other categories on the lines. You can also specify the same deduction categories on multiple deduction detail lines for the same payment if each line is linked to a different invoice. The total amount must equal the total deduction amount of the deduction invoice. You can only save the payment when the line total is equal to the deduction total.
If the deduction category allows automatic write-off and if the deduction amount is below the automatic write-off limit, the status of the line is Auto Write-Off. If the category does not allow automatic write-off, the status of the line is Pending. For a single customer payment, you can have multiple deduction lines, some with the status Pending and others with the status Auto Write-Off.
You can also use the Deduction Details screen to modify deduction details without creating additional deduction lines. You can modify the deduction category associated with any line. You can also delete lines.
For each detail line, you can specify a customer invoice to link to. This step is optional and the invoice is used for information purposes only. The lookup button in the Voucher field opens a list of invoices allocated to the current payment. The lookup in the All Invoice fields lets you search for any invoice in the system, open or closed.
At any stage before you save a customer payment, you can reopen the Deduction Details window and modify the details. In Customer Payment Modify (27.6.4.2) and Customer Payment View (27.6.4.3), you can open the Deduction Details screen in read-only mode.
When you save the customer payment, a new open item is created in the entity associated with the GL bank account. In Deduction Review, you can manually allocate the deduction invoice to one or more entities.
Note: If further modifications are needed after the payment is saved, you can apply the updates in Deduction Review. See
Reviewing Deductions.
The fields in the grid are:
Deduction Category Code
This field displays the category assigned to each deduction. You can change the deduction category, as required.
TC Deduction Amount
Specify the deduction amount that applies for the deduction detail line.
Invoice Entity, Invoice Year, Invoice Daybook, Voucher
The lookups list invoices that are already allocated to the payment. When you select an invoice, all four invoice fields are updated.
If you specify an invoice number on a Deduction Detail line, the payment posting is not affected. However, if you subsequently approve the deduction using Deduction Review, the information on related invoices can help you to identify the entity in which to write off the deduction.
Comment
Specify a comment for the deduction details. This field displays the invoice description by default. This field is optional.
All Invoices
Use the lookup in this field to retrieve any invoice in the system, open or closed.
This facilitates cases where a customer deducts from a payment, and references an old invoice that is already paid.
Customer Reference
Specify the deduction reference submitted by the customer. This field is optional.
Status
This field displays the deduction status, as determined by the system, and is read only.
When the conditions for automatic write-off are satisfied, the status of the deduction line is Auto Write-Off.
When the deduction has multiple detail lines and some lines have the status Auto Write-Off and other lines have the status Pending (based on the category and detail amount), the system uses the total deduction amount to create the new deduction open item. However, for each of the Auto Write-Off lines, the value of the open item is immediately reduced and results in an additional expense account posting line.
Example:
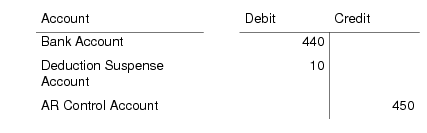
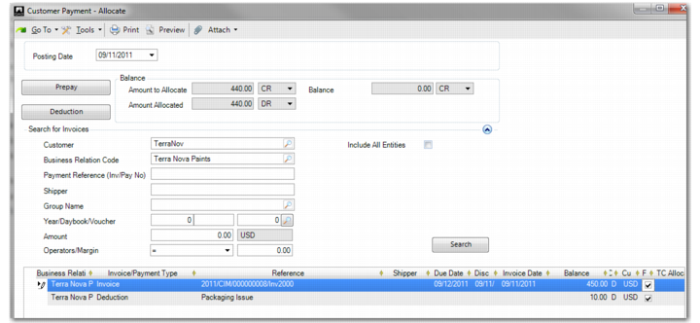
You create a customer invoice for $450. The customer pays $440 and claims a deduction of $10 for a spoiled item.
The payment posting is:
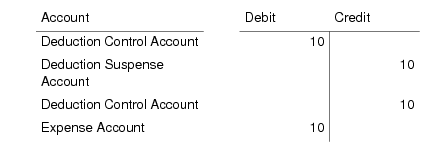
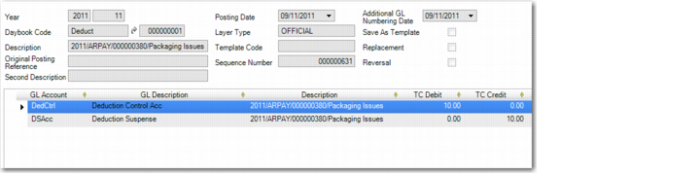
The system uses the total deduction amount to create the initial deduction open item posting to the deduction control account. The deduction control account is then credited by the value of the automatic write off line ($10) and this value is posted to the expense account. The deduction posting is:
Customer Payment Allocate, Updated for Deduction
Journal Entry for Deduction
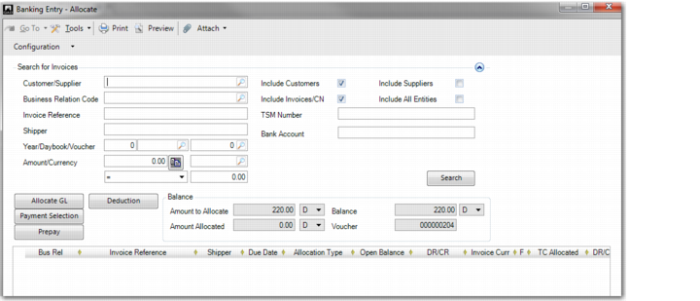
Creating Deductions in Banking Entry Create
You can use Banking Entry Create to create deductions for payments from customers. You create deductions using the same process described in
Creating Deductions in Customer Payment Create.
Note: You can also record deductions in Petty Cash Create.
Banking Entry–Allocate
Banking Entry–Deduction
Writing Off Deductions
If automatic write-off is enabled for a standard deduction category and the amount is less than or equal to the deduction limit, the system automatically writes off the deduction when you record it.
The deduction is always created as a new open item (Pending status), which is immediately written off according to the write-off amount (totally or partially). The deduction is debited from the expense account associated with the deduction category, and the posting is recorded in the entity of the bank account.
If the payment is recorded in an entity other than the invoicing entity and you want to allocate the expense in the invoicing entity, select a deduction category that causes the posting to remain in the Pending status. You can then allocate the deduction expense to the invoicing entity using Deduction Review.
If the payment is not in base currency, the system converts the deduction amount to the base currency in order to compare it to the write-off limit for the deduction category. This step is required because the write-off limit is always defined in the base currency of the domain. When it converts the deduction amount to base currency, the system uses the exchange rate that applies on the posting date of the payment.
The status of these deduction lines is Auto Write-Off.
Example:
In this example, the deduction of $2 has one detail line with a category that allows automatic write-offs up to a limit of $2.50.
The payment amount is $103 and deduction amount is $2. The payment posting is:
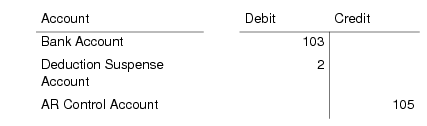
The deduction posting is:
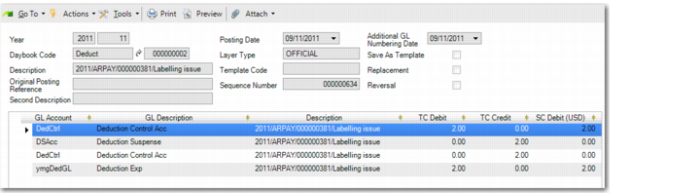
Journal Entry, Deduction
Example:
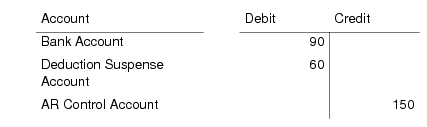
In this example, you can only automatically write off part of the deduction. The invoice amount is $150, the payment amount is $90, and the deduction amount is $60. You can automatically write off $10 immediately.
The payment posting is:
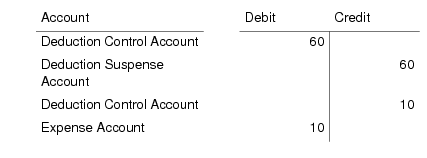
The deduction posting is:
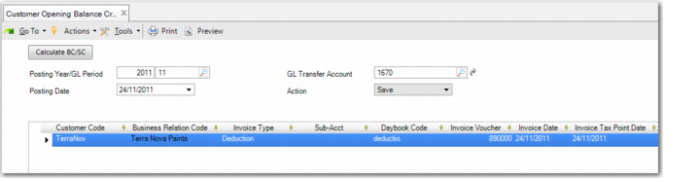
Recording Deduction Invoice Open Balances
Use Customer Opening Balance Create (27.1.10) to manually create a deduction invoice open item in the sales sub-ledger, and generate postings for customer control accounts.
The activity lets you transfer the outstanding open items for a specific customer in detail from an external system to your QAD application. See
Customer Opening Balance.
Customer Opening Balance Create