Creating Self‑Bills
Before you can begin to process customer-initiated payments, the corresponding shipping data must be collected for discrete sales orders and scheduled orders by Pre-Shipper/Shipper Confirm (7.9.5). You must allow a period of time for this shipping data to be captured before you begin to process any self-bills. During this time period, post all invoices to AR for shipments to customers that use self-bills.
If your customers do not use EDI eCommerce to create self-bill records, you use Self-Bill Auto Create (27.6.12.4) to enter customer remittance advice records into your system. Specify a range of selection criteria as shown on the customer’s remittance advice, and then associate the payment information with the correct invoice. You can assign a self-bill number to the document you are creating, or let the system auto-generate the self-bill number. See
Matching Adjustment Self-Bill Lines.
In certain situations, you may not be able to associate some lines from a customer’s remittance advice with the self-bill you are creating. These lines are labeled adjustment self-bill lines. You must manually associate these lines with the corresponding invoice lines using Self-Bill Maintenance (27.6.12.1).
Once you create the self-bill using Self-Bill Auto Create, Self-Bill Maintenance is automatically invoked so you can associate any adjustment self-bill lines with the corresponding invoice shipment.
The auto-create process consists of four steps:
1 Create a self-bill by defining selection criteria.
2 Refine the selection by deselecting any lines that should not be referenced on this self-bill.
3 Print, review, and add selections to the self-bill.
4 Use Self-Bill Maintenance to further refine these selections so that they correctly reflect the information on the customer-remitted self‑bill.
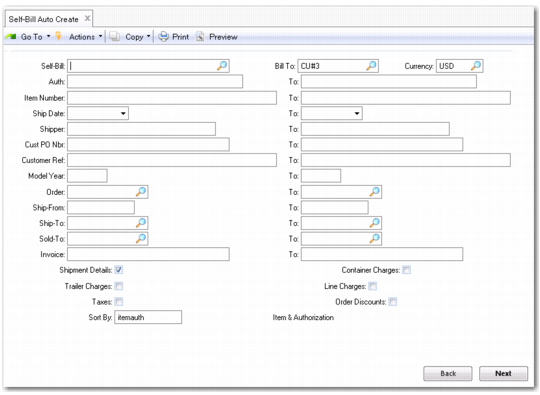
Self-Bill Auto Create (27.6.12.4)
Field Descriptions
Self-Bill
Enter the self-bill to which the selections are to be added.
When left blank, a self-bill number is generated using control program default information.
Specifying an existing self-bill number adds selections to that self-bill. Specifying any other number in this field creates a self-bill for that number and selections are added to it.
Bill-To
Enter the bill-to for which the selection is to be made. This is the customer’s address.When entering information for an existing self-bill, you must also enter that bill-to.
All shipments referenced on the shipper must be paid by the same bill-to.
Currency
Enter the currency for this self-bill document.
All shipments referred to on the self-bill must be invoiced in the same bill-to currency. Only this currency can be used on this self-bill.
Currency is mandatory. When a self-bill is specified in the Self-Bill field, data defaults from that self-bill’s bill-to.
Authorization
Enter the authorization number sent by the customer to identify a shipment. Release Authorization Number (RAN), Dealer Order Number (DON), and kanban numbers are examples of authorization numbers.
When you add detail lines, you can enter an authorization number to select shipments from the shipment-invoice cross-reference table.
Sort By
Specify the display order for information on the Self-Bill Workbench. The four sort orders are:
• Item Number and Authorization Number
• Authorization Number and Item Number
• Shipper Number and Item Number
• Customer PO and Item Number
Additional logical fields let you specify whether the self-bill includes the following types of charges:
• Line charges
• Trailer charges
• Taxes
• Container charges
• Order discounts
Using Self Bill Auto Create
Follow these steps to create a self-bill or to add lines to an existing self-bill using Self-Bill Auto Create (27.6.12.4).
1 Enter a previously created self-bill number, or leave Self-Bill blank when creating a self-bill.
2 Enter any identifying information in the auto-create selection screen. Enter as much or as little information as you have from the customer’s remittance advice you are re-creating. Significant information you should enter is:
• Shipper number
• Sold-to
• Ship-to
• Item number
• Date of shipment
• Authorization number
Note: The more selection criteria you provide, the narrower and more accurate your selection becomes.
3 Specify whether to include shipment details, trailer charges, taxes, container charges, line charges, or order discounts on the selection display screen.
4 Select a sort order for the resulting workbench report.
5 Choose Next.
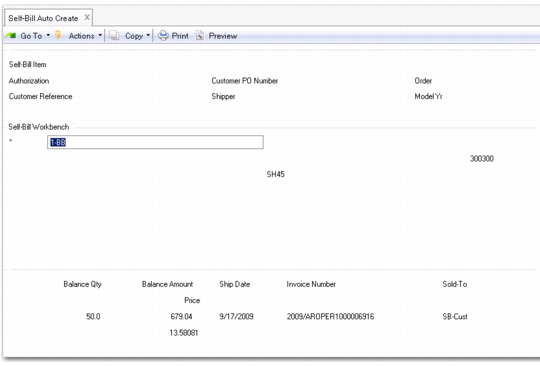
The system analyzes your customer’s shipment data and displays a list of possible shipper numbers that might be associated with the customer’s remittance advice document. This information is displayed in the screen according to the sort order you previously indicated.
Self-Bill Workbench Area
6 Use the workbench area to refine your selection by deselecting any lines that should not be referenced by this self-bill. The item number is the customer’s item number, which was originally used on the order.
• Use Next/Previous functions to navigate from entry to entry.
• Deselect any entry that does not belong on the self-bill. An asterisk (*) indicates selection.
7 Choose Next to continue with your selection.
8 Print and review the selection. You are prompted to continue.
• If you continue, either all selections are added to an existing self‑bill or a self-bill is created and selections are added to it.
• If you do not continue, selections are not added to the self-bill.
9 Self-Bill Maintenance (27.6.12.1) is automatically invoked to let you edit these selections to correctly reflect the information on the remittance advice. In the Self-Bill Maintenance header, you cannot edit the Self-Bill, Bill-To, or Currency fields, which default from Self-Bill Auto Create.