Creating Shippers Manually
Use Pre-Shipper/Shipper Workbench (7.9.2) to do the following:
• Modify picklists/pre-shippers.
• Create pre-shippers to document the contents and structure of an actual shipment.
• Establish a master container hierarchy. The hierarchy can be modified after initial creation.
In Pre-Shipper/Shipper Workbench, the Ship-From, Pre‑Shipper/Shipper, and Number fields uniquely identify shipping documents. If a pre-shipper exists for the entered values, that pre-shipper is retrieved. If a pre-shipper or shipper does not exist for the entered values, a new document is created.
1 Choose Pre-Shipper/Shipper Workbench (7.9.2).
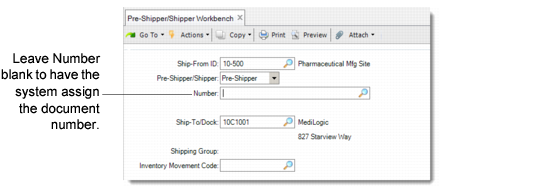
Pre-Shipper/Shipper Workbench (7.9.2)
2 Enter the site code from which this shipment originates in Ship-From. This site must have a valid associated address record. If inventory movement codes are required, a shipping group must be available for the Ship-From and Ship-To/Dock address combination.
3 Choose either Pre-Shipper or Shipper in Pre-Shipper/Shipper:
• Enter Pre-Shipper to create a pre-shipper document that can later be turned into a shipper. A shipper number is not assigned until the pre-shipper is turned into a shipper document.
• Enter Shipper to create a shipper document with a shipper number.
4 Enter a new number in Number (external sequence) or leave it blank to have the system assign a default pre-shipper or shipper number (internal sequence), depending on your selection in step 3.
5 Enter a customer, ship-to, or dock address code in Ship-To/Dock. If inventory movement codes are required, a shipping group must be available for the Ship-From and Ship-To/Dock address combination, and displays in the next field, for reference. See
Define Inventory Movement Codes.
6 For global shipping, enter a valid inventory movement code. Inventory movement codes determine NRM sequences, carriers, and document formats. This field defaults to the value assigned in the shipping group if one applies. Otherwise, inventory movement code remains blank.
When you click Next, the system:
• Retrieves and displays the shipping group, based on the Ship-From and Ship-To/Dock address combination.
• Validates the inventory movement code against the shipping group.
• If shipper ID is blank or does not exist, the system:
• Verifies your access to the inventory movement code, based on site/inventory movement security.
• Creates a new shipper.
• Retrieves and displays a valid NRM sequence number, based on the shipping group and inventory movement code (if shipper ID is blank), or validates the number you entered.
• Retrieves all other shipping group and inventory movement defaults from the control programs, including carriers and document formatting parameters.
• If you specified an existing shipper, the system:
• Retrieves the shipper.
• Verifies your access to the inventory movement code, based on site/inventory movement security.
• Issues a warning if you enter a Ship-To address or inventory movement code that differs from those stored in the actual shipper record.
• Displays the Ship-To address and inventory movement code, obtained from the existing shipper record.
Finally, the system displays the Carrier Detail frame.
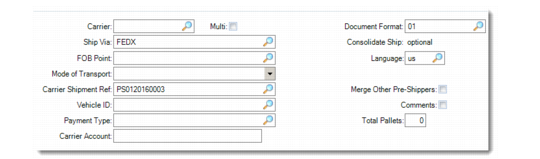
Pre-Shipper/Shipper Workbench, Carrier Detail
7 Enter the carrier data for this shipment.
Carrier, Ship Via, FOB Point, Mode of Transport, Carrier Shipment Reference, Vehicle ID, Payment Type, and Carrier Account appear on various printed documents.
8 Set the Multi field to Yes if this shipment requires more than one carrier. The system prompts you for additional carriers. See
Adding Multiple Carriers for details.
9 Enter a valid document format of a type applicable to shippers, or leave this field blank. If the document format is edited for a shipper marked as having been printed, the system issues a warning message, but lets you continue.
10 Consolidate indicates whether this shipment can be consolidated by transactions of a given type. Enter No to prohibit consolidation. Enter Optional to allow but not require consolidation. Enter Yes to require consolidation.
11 The Language field contains the default language for retrieving header, line item, and trailer comments with the shipper.
12 The Merge Other Pre-Shippers field is automatically set to No and cannot be edited if the shipper is confirmed or is not a sales order shipper. Specify Yes if you want to combine several pre-shippers together. Pre-shippers can be merged only if consolidation and NRM sequence number discarding restrictions are not violated. Canceled pre-shippers cannot be merged.
You can merge any number of pre-shippers sharing the same Ship‑To/Dock address code. This setting only works with pre-shipper documents. You cannot view merged pre-shippers using their original pre-shipper number after they have been merged.
13 Choose Yes in Comments if you want to attach any information about this document. The Master Reference field defaults to the document format of the shipper, and the Language field defaults to the language of the shipper. This enables you to copy comments associated with the document format to the line item of the shipper.
Skip steps 14 through 16 if you selected No in Merge Other Pre‑Shippers. If you chose Yes in Merge Other Pre-Shippers and No in Multi, the Merge Pre-Shipper pop-up appears. If you chose Yes in Merge Other Pre-Shippers and Yes in Multi, the Merge Pre-Shipper pop-up appears after the Carrier window.
14 Enter a pre-shipper number in the Merge Pre-Shipper pop-up. A message confirms the update.
15 Repeat step 14 for each pre-shipper you want to merge.
16 Choose No in Merge Other Pre-Shippers when you are done adding the pre-shippers you want to merge together.
The Shipper Detail frame appears.
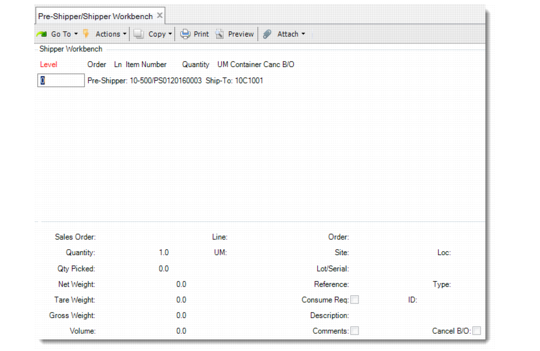
Pre-Shipper/Shipper Workbench, Shipper Detail
From the Shipper Detail frame you can:
• Add items, containers, and containers of items to a shipper.
• Delete items, containers, containers of items, and shippers.
• Remove containers and containers of items from a shipper without deleting the container or container of items.
Adding an Item to a Shipper
1 Select a container number, pre-shipper number, or shipper number from the Shipper Detail frame.
2 Use the Add command appropriate for your user interface.
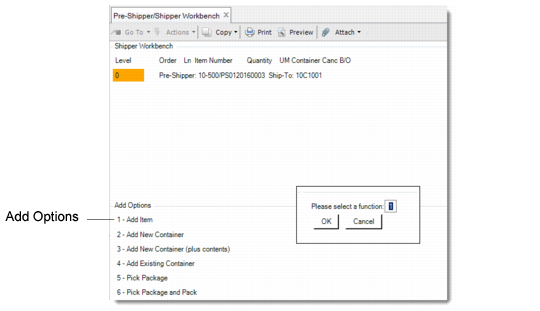
The Add Options pop-up appears.
Pre-Shipper/Shipper Workbench, Add Options Pop-Up
3 Choose Option 1 to add an item.
The Item Information frame appears.
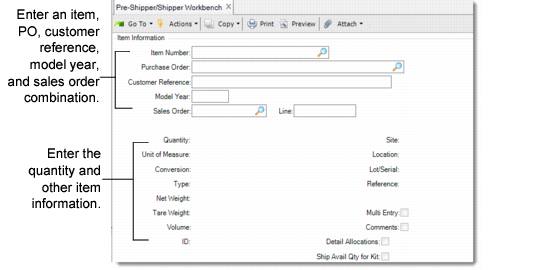
Pre-Shipper/ Shipper Workbench, Item Information
4 Enter the item number, customer reference number, or model year for the item you want to add and one of the following orders identifying it:
• Purchase order number
• Sales order and line item number.
• Customer schedule
An open, scheduled sales order, customer schedule, or purchase order must exist for the ship-from site code and ship-to/dock address code you assigned to the pre-shipper or shipper document.
5 Enter the quantity to be shipped for this order or schedule and other item information. The ID field contains the final assembly work order for an ATO configured item. This value is used when confirming the shipper. The Detail Alloc field specifies if detail allocations are created.
For an ATO item, entering Yes creates a detail allocation for the quantity to ship for this item from the quantity available. For a kit configured item, entering Yes creates detail allocations for the components of the item. Enter No if you do not want to create detail allocations.
The Shipper Detail frame appears.
6 Repeat steps 1 through 5 for each item you want to add.
Adding a Container to a Shipper
1 Select a container number, pre-shipper number, or shipper number from the Shipper Detail frame using the arrow keys.
2 Use the Add command appropriate for your user interface.
The Add Options pop-up appears.
3 Choose Option 2 to add a container.
You can add containers created in Container Workbench to a pre‑shipper only. Containers created in Container Workbench can also be selected by Picklist/Pre-Shipper–Automatic.
The Container Information frame displays.
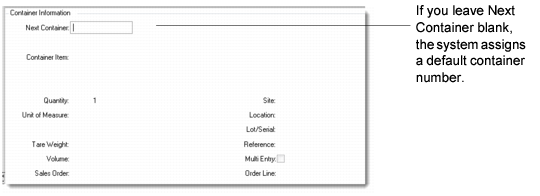
Pre-Shipper/Shipper Workbench, Container Information
4 Enter the item number for the container you want to add to this shipment and other container information.
The Shipper Detail frame appears.
5 Repeat steps 1 through 4 for each container you want to add.
Adding a Container of Items to a Shipper
1 Select a container number, pre-shipper number, or shipper number from the Shipper Detail frame using the arrow keys.
2 Use the Add command appropriate for your user interface.
The Add Options pop-up appears.
3 Choose Option 3 to add a container of items.
The Container Information frame appears.
4 Enter the item number for the container you want to add and other container information.
You cannot add a container created in Container Workbench to a shipper. Containers created in Container Workbench can only be selected by Picklist/Pre-Shipper–Automatic.
The Item Information frame appears.
5 Enter the item number, the customer reference, or the model year for the item you want to add, and either the purchase order, sales order, or customer schedule that includes the item you want to add.
An open, scheduled sales order, customer schedule, or purchase order must exist for the ship-from site code and ship-to/dock address code you assigned to the pre-shipper or shipper document.
6 Enter the quantity to be shipped from this order or schedule and other item information.
The Shipper Detail frame appears.
7 Repeat steps 1 through 6 for each item you want to add.
Picking a Serialized Package for a Shipper
1 Select the pre-shipper number or shipper number from the Shipper Detail frame using the arrow keys.
2 Use the Add command appropriate for your user interface.
The Add Options pop-up appears.
3 Choose Option 5 to add a package.
The package selection frame appears.
Package Information Frame
4 Enter the serial ID of the package to pick and click Next. Information about the package content is displayed. You are prompted to link this package to a sales order line.
Sales Order Information Frame
5 Enter the sales order number and line number. Then, enter the quantity to pick.
The maximum quantity to pick depends on the package setting.
6 Repeat steps 1 through 5 for each package you want to pick.
For more information about Serialization, see
QAD Serialization User Guide.
Picking and Packing Serialized Packs for a Shipper
1 Select the pre-shipper number or shipper number from the Shipper Detail frame using the arrow keys.
2 Use the Add command appropriate for your user interface.
The Add Options pop-up appears.
3 Choose Option 6 to add a package.
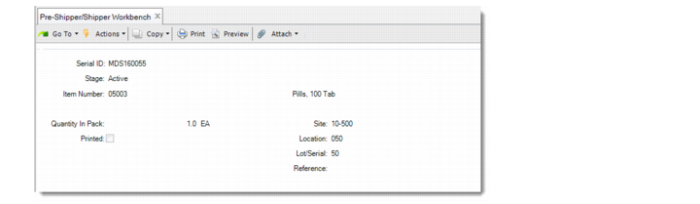
The Parent Pack frame appears.
Parent Pack Frame
4 Enter the serial ID of the parent pack or leave it blank for the system to generate one.
The serial ID can also be a serial ID booked for the sales order.
5 If you enter an existing serial ID for the parent package, the Pack Code is automatically populated with the associated pack code.
If you enter a booked serial ID for the parent pack or leave it blank for the system to generate a serial ID, enter the pack code and click Next. The Child Pack frame is displayed.
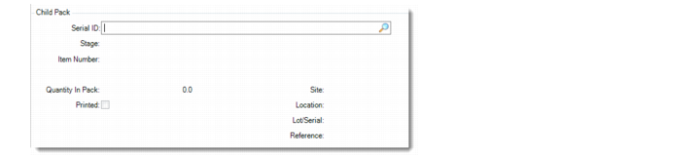
Child Pack Frame
6 Enter the serial ID of the child pack and click Next. Information about the child pack content is displayed. You are prompted to link this package to a sales order line. See
Sales Order Information Frame.
7 Enter the sales order number and line number. Then, enter the quantity to pick.
The maximum quantity to pick depends on the package setting.
Repeat steps 5 through 7 to add more child packs to the parent pack.
For more information about Serialization, see
QAD Serialization User Guide.
Deleting or Removing Items/Containers/Shippers
1 Select a container and use the Delete command appropriate for your user interface.
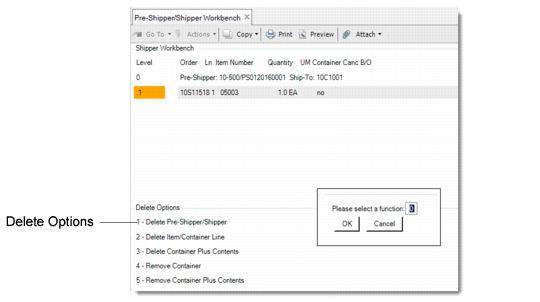
2 The Delete Options pop-up displays.
Pre-Shipper/Shipper Workbench, Delete Options Pop‑Up
3 Choose one of the following options:
Choose | To |
1–Delete Pre-Shipper/Shipper | Delete the entire container from the database. |
2–Delete Item/Container Line | Delete a container or item line from the database. Any container or item belonging to the deleted container or item line is moved up one level. You cannot delete a container line if it results in an item that does not have a container line. |
3–Delete Container plus Contents | Delete a container and all containers or items belonging to it. |
4–Remove Container | Remove a next-level container from a container. The container can still be accessed under its own container number. |
5–Remove Container plus Contents | Remove a next-level container and all containers or items belonging to it from a container. The container can still be accessed under its own container number. |
4 You are prompted to confirm deletion. Enter Yes to continue deleting or No to cancel.
Adding and Editing Trailer Information
After maintaining line items, the Trailer Information frame displays.
Pre-Shipper/Shipper Workbench, Trailer Information
1 The Status field specifies whether the shipper is active or canceled. Leave this field blank for active shippers. To cancel a shipper, enter X. A canceled shipper is ignored by the system and unavailable for processing, other than deleting or archiving. You cannot cancel a confirmed shipper.
2 The Cancel Date field contains the date the shipper was canceled. The system sets this field to the current date when an open shipper is canceled. When a canceled shipper is reopened, the system sets the date to blank.
3 The Trailer Comments field indicates whether trailer comments can be associated with this shipment. Enter Yes to enter trailer comments. The system prompts you for your comments. Enter No if you do not want to add comments.
Adding Multiple Carriers
If you specified that you want multiple carriers for this shipment, the Carriers frame displays after completing the header information.
Pre-Shipper/Shipper Workbench, Carriers Frame
Seq
This field indicates the order in which the various carriers handle shipments for this inventory movement code and shipping group. The ship-from site of a shipment turns over possession to the first carrier, who may later turn over possession to a second carrier, and so forth, before the shipment is eventually delivered to the ship-to destination.
Since you can remove any carrier and the system does not automatically renumber remaining carriers, the lowest-numbered carrier is always considered the first carrier. For sequence, enter an integer greater than zero that is unique to this shipping group and inventory movement code.
Note: This Sequence field is not the same as an NRM sequence.
Carrier
This field identifies the carrier to be used for shipments within this shipping group, for this inventory movement code, in the sequence defined by the Seq field. Enter an existing carrier address code.
Name
This field displays the name of the carrier you entered in the Carrier field and cannot be edited.
Deleting Shipments
To delete a shipment created with Pre-Shipper/Shipper Workbench, NRM must permit the assigned sequence number to be deleted. If the sequence number cannot be deleted, you can cancel the shipper using the Status field on the trailer frame. If the shipper was converted from a pre-shipper, the system also checks whether the NRM pre-shipper number can be deleted. If not, the shipper cannot be deleted.