Multi-Level Item Maintenance
Use Multi-Level Item Maintenance (4.4.5) to maintain all of the additional item data required within the QAD Warehousing system; see
Multi-Level Item Maintenance (4.4.5).
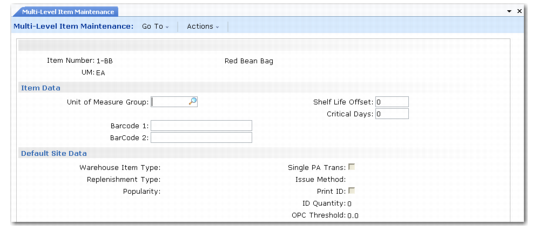
Multi-Level Item Maintenance (4.4.5)
Item Data
Unit of Measure Group
If the units of measure used for this item belong to a group, you can enter the UM group code here. Any future revisions to the conversion factors in this UM group are then applied to this item when you run UM Conversion Generation. Leave this field blank if a UM group is not applicable. See
UM Conversion Generation.
Note: UM groups are a tool to help generate conversion factors. Defining a group and linking it to an item is not enough to have conversion factors created. You must run UM Conversion Generation.
Barcode 1
Enter a barcode number to use for this item. The system uses this number instead of the original barcode number. The barcode number must be unique; that is, the same barcode number cannot be linked to multiple items.
Typically EAN/UCC 13 or EAN/UCC 14 codes and customer item numbers that you define in Customer Item Maintenance (1.16) are alternate barcodes used in most warehouses.
For an example, see
EAN-128 Barcodes.
Barcode 2
Enter an alternate barcode number to use in place of the original barcode number. The alternate barcode number must be unique; that is, the same alternate barcode number cannot be linked to multiple system items.
Shelf Life Offset
For inventory that has a limited shelf life, enter the number of days between the customer’s best before date and the expiry date for the item. This time period is taken into account by some of the picking algorithms to prevent picking inventory which would have insufficient shelf life remaining to be saleable. If shelf life is not applicable, leave this field blank. This field is frequently used in the food industry when the customer is a distributor/grocer and not the end customer.
Critical Days
For inventory that has a limited shelf life, enter the number of days counting back from the item’s expiry date during which time the inventory can be regarded as critical inventory. This time period is taken into account by some of the picking algorithms that pick only critical inventory. If critical days are not applicable, leave this field blank.
Default Site Data
The entries you make in this frame default when you enter the Item-Site data. You can override these values for individual sites.
Warehouse Item Type
Enter a code to categorize items in groups of similar type; for example, handling characteristics or put-away method. These codes can be used in some algorithms and in internal routing assignment. Leave this field blank if the item does not belong to a particular item type. Set up type codes in Generalized Codes Maintenance (36.2.13).
Replenishment Type
Enter a code to categorize items in groups that have the same replenishment requirements. Replenishment can then be specified for a group of items, rather than for individual items. Leave this field blank if the item does not belong to a particular replenishment type.
Set up type codes in Generalized Codes Maintenance (36.2.13).
Popularity
Locations are assigned popularity codes that represent the ease of access. Similarly, you assign a popularity code to each inventory item so that the system can match popular inventory with popular locations. You can use this feature to ensure that fast moving items are stored in the most accessible locations. A sensible way to define this value is to use an ABC analysis and make categories for fast and slow moving items. Locations have a popularity code as well, and using the appropriate algorithm, the system tries to put away fast-moving items in very accessible locations.
Single PA Trans
Enter Yes if the system should attempt to put away received quantities of this item in a single put-away transaction, that is, all the inventory in the same location. Otherwise, enter No.
Issue Method
This field specifies the picking transactions that are created for this item in the bulk picking process. See
Load ID.
Print ID
Enter Yes to print identification labels for this item; otherwise, enter No.
ID Quantity
If you have entered Yes for Print ID, enter the number of identification labels to be printed; otherwise, leave this field blank.
OPC Threshold
This field relates to opportunity counts, which you can specify when this item is stored in an RDT environment. When inventory is taken out of the location, the system checks whether the quantity on-hand falls below the threshold level you specify for the item, and also checks the OPC frequency value for the location where the item is stored. If both conditions are met, a cycle count is requested.
Inspection Data
Define values related to how inspections occur in the Inspection Data frame. See
Quality Inspection for details on managing inspections. These values can be configured for specific suppliers in Supplier Item Inspection Maintenance (4.4.13).
Inspection Data
Selective Inspection
Enter Yes if you want this item to be inspected every time the corresponding algorithm is used. Only items marked for selective inspection are considered for inspection.
Inspection Frequency
Specify the number of receipts between each inspection of this item when the corresponding algorithm is used.
Insp Freq (Days)
Specify the number of days separating two consecutive inspections of this item when the corresponding algorithm is used.
Random %
Specify the probability of this item being inspected when the corresponding algorithm is used.
Sample Quantity
Specify the sample quantity to consider. If Reference is Yes, quantity indicates a number of references, such as pallets, to consider for inspection. Otherwise, quantity is in the base UM of the item.
Ref
Indicate if the inventory to be inspected includes pallet reference numbers.
Sample %
The sample % is used in place of the sample quantity. It represents the percentage of items inspected out of those being received.
Destructive
Indicate if the inspection test is a destructive test. When set to Yes, the inspection sample is assigned a specific status after inspection. This stock must be deleted manually, using an unplanned issue, for example.
Default Site Data for Merging Items into Warehouse
After you enter inspection data, the system displays the Default Site Data frame if this is the first time you associate this item with warehousing data; see
Default Site Data for Merging Items. If you are editing existing warehousing item data, the system prompts you to enter the site, then displays the Site Data and Default Warehouse Data frame.
Note: The frames associated with site data in Multi-Level Item Maintenance are identical to those in Item-Site Maintenance (4.4.9).
The fields in the Default Site Data frame define the merging rules when the system considers whether to merge newly received quantities of this item with quantities already stored in a warehouse location. The merging rules work by comparing the number of days left before the item reaches its expiry date. If the difference between the days remaining for the newly received inventory and the existing inventory is sufficiently small, the items can be merged; if the difference is too large, the items must be kept separate.
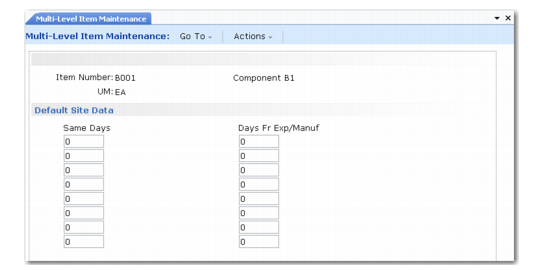
Default Site Data for Merging Items
Same Days
Enter the number of days by which the days remaining before expiry date can differ while allowing the inventory to be merged.
Example: If the existing inventory in the location has 70 days remaining before its expiry date, the newly received inventory has 80 days remaining, and the Same Days value for the item is 12, the inventory can be merged in the same location because the difference between 70 and 80 is less than 12. If the Same Days value was 5, the system would not allow the inventory to be merged.
Days Fr Exp/Manuf
Enter the maximum number of days remaining before expiry date to which this Same Days value applies. You can use this field to set bands of merging rules which depend on the length of time remaining until expiry.
Example: You might want a figure of 10 for the Same Days field if the inventory is within 100 days of expiry, but a figure of 5 if the inventory is within 50 days from expiry. To achieve this, you would specify values of 10 and 100 on the first line, and 5 and 50 on the second line.
Note: The provision of multiple lines on which you can enter Same Days and Days Fr Exp/Mfg values lets you specify that the further away the expiry date is, the greater the acceptable difference is when merging stock. In practice, this is very useful in a LIFO location, where only the last pallet can be picked. By merging the stock, you can ensure that the last pallet in, if not the oldest, is one of the oldest.
The next section of Item Master Maintenance corresponds to Item-Site Maintenance, where you set up default values for the item-warehouse data for a particular site.
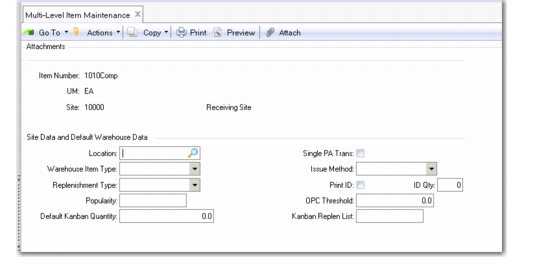
Site Data and Default Warehouse Data
After you specify default site data, the system prompts you to enter the site associated with the item. Once you enter the site and click Next, the system displays the Site Data and Default Warehouse Data frame.
The values you enter in these fields apply to the whole site, the Site Location field, or default to each warehouse in this site when you enter data for the warehouses of the site.
Site and Default Warehouse Data
Location
Enter a valid location that can be either a warehouse or a warehouse master list for this item on this site. This value is used when an item is issued from one site using that site’s location, warehouse or master list, and received at another site, where a different location, warehouse or master list applies. It is therefore necessary to identify the location, warehouse or warehouse master list for the item on each site.
The remaining fields (Warehouse Item Type, Replenishment Type, Popularity, Single PA Trans, Issue Method, Print ID, ID Quantity, and OPC Threshold, Default Kanban Quantity, Kanban Replen List) display the default values—if any—that you entered at the item level. At the item-site level, you can accept the generic defaults or override them with different values for this site.
After you enter this data, the system redisplays the Inspection Data and Default Site Data frames. You can enter item-site data in these frames. These frames also display in Item-Site Maintenance.
After you enter item-site data, the system prompts you to enter the warehouse
Warehouse Data
The next section of Multi-Level Item Maintenance lets you set up values used in all inventory transactions relating to this item at a specific warehouse.
Note: The frames associated with warehouse data in Multi-Level Item Maintenance are identical to those in Item-Warehouse Maintenance (4.4.9).
Item-Warehouse Maintenance.
Enter the warehouse to which the item data applies. When you have selected the warehouse, the system displays the first of the Item-Warehouse Maintenance frames shown in
Warehouse Data.
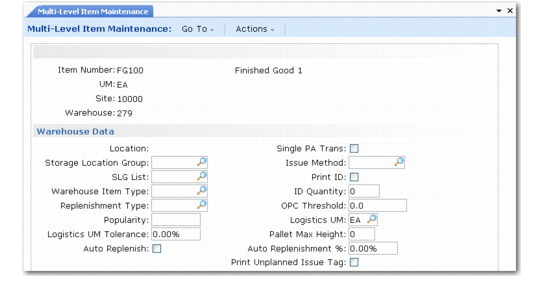
Warehouse Data
Location
This field is accessible only when the warehouse is inactive, when you can enter or modify the default location for this warehouse, if required. When the warehouse is active, the SLG or the SLG list specified in the following fields is used to identify locations for the item.
Storage Location Group
Enter the storage location group where you want the put-away algorithms to search for locations to store receipts of this item. If you are using storage location group lists, you can leave this field blank and enter a list in the SLG List field. You cannot enter values in both of these fields.
SLG List
If you have left the Store Loc Group field blank, you can enter the name of a storage location group list. The put-away algorithms consider each SLG on the list in sequence when searching for locations to store receipts of this item.
The fields Warehouse Item Type, Replenishment Type, Popularity, Single PA Trans, Issue Method, Print ID, ID Quantity, and OPC Threshold display the default values—if any—that you entered at the Item-Site Maintenance level. At the item-warehouse level, you can accept the item-site level defaults or override them with different values for this warehouse.
Logistics UM Tolerance
Enter a percentage value to specify when the sizing calculations use the Logistics UM and when they use base UM.
Example: The base UM for an item is EA (each), the logistics UM is PL (pallet), and a pallet contains a maximum of 100 EA. The location where the item is stored can hold two pallets or 200 EA of the item. If you set the Logistics UM Tolerance to 10%, a pallet containing 90 items is within the tolerance of 10%, so the location is considered to have one full pallet and be 50% full. However, a pallet containing 80 items is outside the 10% tolerance, so the calculation for the space used in the location is performed in base UM (EA). Since the location holds 80 items in a capacity of 200, the location is considered to be 40% full. The main difference with pallet sizing is that additional pieces can be received in that location.
Auto Replenish
This field specifies the tolerance for the replenishment point. The replenishment point is the quantity of stock below which an automatic replenishment is triggered.
Example: If the replenishment point is defined as 50 EA, when the inventory level drops below 50 EA, the system initiates a replenishment process. If the Auto Replenish value is set to 80%, the automatic replenishment occurs only when the stock level falls below 40 EA. Note that a value of 0% has the same effect as a value of 100%.
Logistics UM
Enter the logistics unit of measure to be used as the receipt UM when the receipt is made in base UM.
Note: The logistics UM is only used if the receipt is made in the base UM for the item. Its use lets you make the receipt in pieces. For example, if the logistics UM is a pallet (PL) which holds 100 EA, and you receive 280 EA, the system creates 3 records with reference information: 2 full pallets of 100 EA, and 1 partial pallet of 80 EA. The logistics UM Tolerance % field specifies whether the partial pallet is considered as full. You can use the logistic UM even when receiving in alternate UM, like boxes. At the warehouse level, the Log w/Base UM Only field indicates whether logistics UM is used with base UM only or also with alternate UM.
Pallet Max Height
This field modifies the capacity calculation for the corresponding item to consider the stacking of pallets. When the location capacity is defined in referenced unit of measures such as pallets, the result of the capacity calculation is the multiplication of the height, width, and length. When the maximum pallet height is defined for a given item, the multiplication is made using this maximum height and not the location height.
Auto Replenish
Enter Yes to select automatic replenishment. If an existing replenishment definition exists for a location/item or an SLG/item, when the inventory level falls below the replenishment point, the system automatically starts a replenishment process. This process picks the missing items and transfers them to the location/SLG to be replenished. With auto replenishment, you do not need to start a manual replenishment; the process is triggered automatically. Enter No to switch off automatic replenishment.
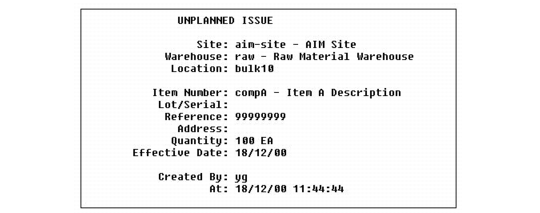
Print Unplanned Issue Tag
This field enables you to print an unplanned issue tag to request the issue of material out of stock. It is created when using Issues–Unplanned (3.7). Make sure that the ISS‑UNP transaction type is defined in Transaction Type Maintenance (4.7.1) with print procedure code PK. The printer used is the same as for pallet ID. Make sure the printer is defined correctly at the work location group level.
Unplanned Issue Tag Generated by QAD Warehousing shows the unplanned issue tag generated by the system. When printed, the system is already updated. Its purpose is to help in knowing which goods are manually issued from the warehouse.
Unplanned Issue Tag Generated by QAD Warehousing