Setting Up Control Options
For batch picking, you complete most setup tasks using Batch Picking Control (4.15.24). Specify options for determining settings such as order types, the RF device, printing labels, displaying tasks, scanning during the pick tasks, and containers.
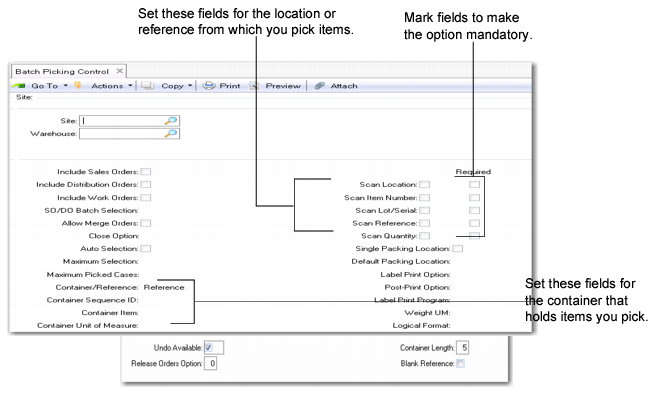
Batch Picking Control (4.15.24) illustrates Batch Picking Control. Field explanations follow the figure.
Fields that relate to containers set options for the container into which staff place picked items, while fields that relate to scanning set options for the warehouse location and containers from which items are picked. There is a separate Containerization Frame that follows the main frame, too; see
Containerization Frame.
For containerization fields, see
Batch Picking Control Options.
Batch Picking Control (4.15.24)
Site
Enter the site to use for batch picking.
Warehouse
Enter the warehouse to use for batch picking.
Include Sales Orders
Indicate whether sales orders are included for batch picking when using Batch Pick-All on the RF.
No: The system does not include sales orders for batch picking.
Yes: The system includes sales orders for Batch Pick-All on the RF. When warehouse staff select sales orders, the orders display with the letter S preceding the order number.
Include Distribution Orders
Indicate whether to include distribution orders for batch picking when using Batch Pick-All on the RF.
No: The system does not include distribution orders for batch picking.
Yes: The system includes distribution orders for Batch Pick-All on the RF. Warehouse staff specify Batch Pick-ALL from the RF selection screen to select distribution orders. Distribution orders display with the letter D preceding the order number.
Include Work Orders
Indicate whether to include work orders for batch picking.
No: The system does not include work orders for batch picking.
Yes: The system includes work orders for Batch Pick-All on the RF. Warehouse staff specify Batch Pick-ALL from the RF selection screen to select work orders. Work orders display with the letter W preceding the order number.
SO/DO Batch Selection
Indicate whether to display customers, orders, or pre-shippers when selecting from the RF screen. The system displays the following options for this field at the bottom of the screen:
C=Customer O=Order P=Pre-shipper
The system validates these codes against Generalized Codes Maintenance (36.2.13).
Customer: Display customer IDs to select from in the RF screen. You define customers in Address Warehouse Detail Maintenance (4.13.13).
Order (the default): Display order numbers to select from in the RF screen. The system displays orders by priority, then due date. The system checks order priority in SO Warehouse Data Maintenance (4.13.3) or in DO Warehouse Data Maintenance (4.13.6). The priority defaults from Address Warehouse Detail Maintenance when you create a new order. You can also manually update priority in Address Warehouse Detail Maintenance by modifying the Priority field.
Pre-shipper: Display pre-shipper numbers to select from in the RF screen. The priority defaults from the Priority field in Address Warehouse Detail Maintenance.
Allow Merge Orders
Indicate whether warehouse staff can combine items from different orders into containers. The items can be from separate orders but must have the same pre-shipper.
No: Do not combine items from different orders into the same container.
Yes: Combine items from different orders and the same pre-shipper into the same container.
Close Option
Indicate the action to be performed when staff scan a container other than the one the system defaults in the batch-picking process.
When staff select a container for a given order, the system defaults that container for additional order lines to pick for the same order. If the container is full, staff can scan another container—new box or tote—and the system prompts to close the previous box.
If staff specify Yes to close the box, the system determines the action required for the remaining order lines through options you set in Release Orders Option.
0: Never close container. The system confirms the pick and leaves the previous container open. For the next pick on the same order, staff can use either an old or new container.
1: Always close container. The default container is closed. Because carts can hold only a certain number of boxes or totes, specify this option if it is not practical to open more boxes on the cart. The system determines whether it should continue proposing additional lines by options you set in Release Orders Option.
2: Prompt to close container. The system prompts to close the container and order. The system considers the option you set in Release Orders Option depending on the response to this prompt.
Auto Selection
Indicate whether to automatically select orders with the highest priority.
No (the default): Warehouse staff can select orders for batch picking.
Yes: Select orders with the highest priority for picking. The orders are marked with an asterisk (*) on the RF screen. Staff must pick for orders in the order that they display on the RF; they cannot scroll to the bottom of the list or skip orders.
Maximum Selection
Enter the maximum number of sales orders, pre-shippers, or customers that display on the RF screen. The system displays the orders with the highest priority.
Maximum Picked Cases
Enter the maximum number of orders that warehouse staff can pick at the same time. The default is one open container/tote per order, but staff can open additional containers/totes during the picking process. You cannot leave this field blank. This number typically depends on the capacity of the cart. When selecting orders from the RF, staff cannot select more orders, customers, or pre-shippers than the maximum number of picked cases.
Container/Reference
Specify a container level to create for each tote/box/pallet staff use during the batch-picking process. This field applies to sales and distribution orders only.
Container: The system creates a container level for every tote or pallet in the pre-shipper structure. The items that staff pick and place in the container display as a sub-level of the container. If you set this field to Container, you must specify an item number in Container Item.
Reference: The system does not create a container level. Instead, it uses the reference field of the inventory record as the placeholder for a container number or a kit number. All items staff place in the same container or kit have the same reference number. This field applies to work orders only when specifying a reference for a container. This field also applies to sales orders, if specifying a reference for a kit.
Container Sequence ID
Enter the starting sequence ID for box/tote/container numbers when staff print labels before picking. You specify the sequence IDs in Sequence Definition Maintenance (4.23.1). If staff use preprinted labels, the system does not consider this field.
Container Item
Enter the item number of the container. If you set Container/Reference to Container, you must specify an item number.
Container Unit of Measure
Enter the unit of measure for the container. For example, if batch picking items to a box, enter the box UM. You define the UM in Alternate Unit of Measure Maintenance (4.5.1).
Modified
This field is display only and displays the date that control values were last modified and the user who modified them.
Scan Location
Indicate whether to scan the location from which items are picked.
No: Do not scan the location label or barcode from which items are picked.
Yes: Warehouse staff can access the Location field on the RF and scan. To make scanning mandatory, mark the Required field next to the scan option field.
Note: Pressing Enter while in the Required field selects or deselects the requirement.
Scan Item Number
Indicate whether to scan the item being picked.
No: Do not scan the item when picking.
Yes: Warehouse staff can access the Item field on the RF and scan. To make scanning mandatory, mark the Required field next to the scan option field.
Scan Lot/Serial
Indicate whether to scan the lot/serial number for the picking location.
No: Do not scan the lot/serial number when picking.
Yes: Warehouse staff can access the Lot/Serial field on the RF and scan. To make scanning mandatory, mark the Required field next to the scan option field.
Scan Reference
Indicate whether to scan the source reference (pallet ID) when picking. Typically, pallet IDs are not maintained in the picking area; however, you can set the second step of an internal routing so that pallet numbers are blank when staff move the pallet from the reserve area to the picking area.
No: Do not scan the reference ID when picking.
Yes: Warehouse staff can access the Reference field on the RF and scan. To make scanning mandatory, mark the Required field next to the scan option field.
Scan Quantity
Indicate whether to scan the quantity picked.
No: Do not scan the quantity picked.
Yes: Warehouse staff can access the Quantity field and scan. To make scanning mandatory, mark the Required field next to the scan option field.
Single Packing Location
Indicate whether batch-picked items are for a single-packing location. For example, if you use a single-shipping location as the packing location, set this option to Yes. Locations are defined in Warehouse Location Maintenance (4.3.13). Specify a default packing location in Default Packing Location.
No: There are multiple packing locations. When creating picking tasks, the system uses a location-find algorithm to determine the destination location for each task. You can reassign tasks to a specific shipping lane using Wave Release (4.15.8). When staff have different possible destinations for picking tasks, they must drop off each box and scan the destination location; for example, the shipping lane.
Yes: There is a single packing location. The system eliminates an RF screen since all picks from all references go to the same destination. Once picking tasks are complete and confirmed as completed, the RF screen displays the selection screen with the default location in the To Location field.
Default Packing Location
Specify a default packing location. Locations are defined in Warehouse Location Maintenance (4.3.13). You define this field when you set Single Packing Location to Yes.
Label Print Option
Indicate whether labels print automatically, not at all, or if the system prompts to print labels after the order selection is complete but before picking begins. You must specify the print program in the Label Print Program field. The system prints UCC128/EAN128-format labels for cases, empty boxes, or totes that do not already have a label.
0: Never print labels before picking.
1: Always print labels before picking.
2: Prompt RF user to print labels before picking.
Note: To specify printing after picking, set Postprint Option to Yes.
Printing before picking is useful when staff perform multiple order picking. Warehouse staff can print labels for containers, scan the labels, then use the scanned data to ensure that each order is put into the right container.
Warehouse staff frequently use different sized containers, depending on their picking experience and the picking information the system provides in the picking order selection program specified in the Batch Picking Order Selection (whbpklx1.p) field in Local Exit Routines Setup (4.23.10).
Since the system does not recommend the size of the container/box that staff should use for a given number of picks, staff can select a container/box, then paste the pre-printed box label on the edge of the box, so that it can be easily removed should a different size container be needed when the batch picking is complete.
Post-Print Option
Indicate whether labels print automatically after picking, not at all, or if the system prompts to postprint labels.
0: Never postprint labels.
1: Always postprint labels.
2: Prompt to postprint labels.
Printing after picking—postprinting—is useful when warehouse staff know the exact contents of the box, tote, or pallet to which they picked items. If you use batch picking for multi-bin pickup with only one pallet, staff typically use post-printed labels, not preprinted labels.
Label Print Program
Specify the print program to use when printing labels. The whpripkz.p print program, which is Loftware-format compatible, is supplied with the system You can edit whpripkz.p, using a standard text editor; rename the program; then, enter it here.
Weight UM
Specify the unit of measure in which each transaction’s weight is calculated on the main batch picking selection screen. When blank, the system adds each item’s unit of measure weight.
Logical Format
Indicate whether RF users enter logical values 1/0 or Yes/No, Y/N, or any other logical format. Yes/No is applicable to RF devices that have a keyboard.
This field is mandatory. Enter the forward slash (/) with either the 1/0 or Yes/No. The system treats the value preceding the slash as positive, and the value following the slash as negative.
Note: Entering characters without the slash can cause errors in interpretation. For example, if RF users specify 10, the system interprets the number 10 as negative.
1/0: RF users can enter the number 1 for positive and 0 (zero) for negative responses.
Yes/No: RF users can type Yes or No on the keypad.
Undo Available
Indicate whether the system prompts to undo picking tasks and leave the batch picking process on the RF when the RF user presses cancel (F4) during picking.
No: RF users are not prompted to undo tasks and leave picking functions after they click Back.
Yes: If RF users click Back on the RF screen during picking, the system first displays a prompt to exit the process. If the user specifies Yes, the system displays a prompt to undo and leave picking tasks. If Yes, the system rolls back all completed picks and sets pick tasks to unassigned. Upon exiting the picking process, the system sets confirmed to No or 0 (zero).
Note: RF use of Yes/No or 1/0 depends on control settings.
Release Orders Option
Indicate whether to release the order after staff close a box. Use this field in conjunction with the
Close Option field.
0: Never Release Order: When staff close a box, they can continue picking for the next order lines and open additional boxes for the order.
1: Always Release Order: Staff cannot open additional boxes and the picking process for the order is complete. You should unallocate all remaining picking tasks for the same order so that the system does not present remaining tasks to the picker assigned. You can assign remaining tasks to other pickers.
2: Prompt for Releasing Order. The system prompts to release the order and execute the appropriate action.
Container Length
Specify the number of characters for the container ID. For example, if you specify 8 characters, you can have a container ID as CA000001.
Blank Reference
Indicate whether the system retains the pallet reference number or blanks the reference number when RF users confirm a transaction when the Container/Reference field in Batch Picking Control is set to Container.
Yes: The system voids the To Reference field and leaves it blank.
No: The system supplies the default To Reference value for the transaction.
Typically, it is ideal to have a blank reference on the RF when warehouse staff scan a tote to populate the pre-shipper. This setting has no effect when working with work orders. In this case the To reference field inherits the value from the container as no pre-shippers are created for work orders.