Generate Telnet Log-in and Connection Scripts
Use MFG/UTIL to generate the Connection Manager and telnet connection scripts. Later on, these values default into the Connection Manager.
1 In MFG/UTIL, choose UI|Create Connection Manager and telnet scripts from the main menu. The create scripts screen displays.
2 Select the UI configuration. The database type and tier type display. Use the check boxes to overwrite existing .pf files and scripts built during your base install. Choose OK to generate the scripts.
MFG/UTILCreate Connection Manager and telnet Scripts
3 Using the specified configuration information, MFG/UTIL generates two files in the UI installation directory. The file names depend on the operating system specified in the configuration settings screen:
• For UNIX servers, the connmgr.DBSetName and telnet.DBSetName files are generated.
• For Windows servers, the connmgrDBSetName.bat and telnetDBSetName.bat files are generated.
New DBSetName.pf and .ini files are created in QADInstallDir.
DBSetName refers to the database set name specified in the build screen.
Depending on the release you are upgrading from, some files may be backed up. If any .pf or telnet connection script files are found in the QADInstallDir or QADUIInstallDir and you choose not to overwrite them, they are moved to an old_dtscripts directory.
Important: In some UNIX environments (HP-UX and AIX), you may need to include additional parameters such as SHLIB_PATH and LIBPATH in the generated files. For details, refer to your operating system documentation.
The QAD .NET UI uses values defined in the Progress
protermcap. The keys listed in
Function Keys must have their default setting or actions in the Desktop UI may fail. If you have modified keys in the
protermcap file, change the PROTERMCAP environment variable to point to an unchanged file.
Function Keys
UNIX | Windows |
F16 | Shift-F5 |
F17 | Shift-F6 |
F18 | Shift-F7 |
F19 | Shift-F8 |
F20 | Shift-F9 |
When the Connection Manager scripts have been created, use MFG/UTIL to create Connection Manager log-in scripts:
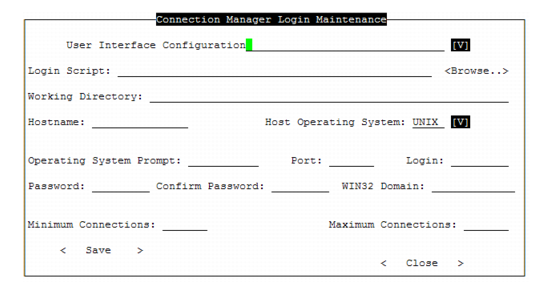
1 In MFG/UTIL, choose UI|Connection Manager Login Maintenance. The Login Maintenance screen displays.
Connection Manager Login Maintenance
2 Choose the configuration you are setting up in User Interface Configuration. Update the other fields as follows:
Login Script
Locate or type in the connmgr script generated in the previous set of steps; for example, QADInstallDir/ qaduiConfig/connmgr.Production.
Working Directory
Enter a directory where temporary files can be written during telnet sessions. This directory must exist and must have write privileges for user mfg.
Hostname
The database server host machine, including domain value; for example, hpux01.corp.com.
Host Operating System
This defaults in and should be correct.
Operating System Prompt
This, and the next few fields through the password, are used to construct the log-in sequence for the session telnet connections to the system. The prompt is typically a dollar sign ($), pound sign (#), or greater than sign (>) depending on your operating system and UNIX shell.
Port
The operating system telnet port. Typically this is 23. Check your operating system to verify.
Login
The user that will be used to log in to the operating system and run the Character UI Progress sessions that underlie the .NET UI screens. This user is not required to be a user in the application. QAD recommends that this user not be used to run anything other than these sessions so that you can easily identify these Progress processes on the operating system.
Password/Confirm Password
Enter the user password and then confirm it. No characters display during data entry in these fields for your security.
Minimum Connections
Enter the minimum number of telnet connections that the system will keep open during a Desktop session.
Maximum Connections
Enter the maximum number of telnet connections that the system will open during a Desktop session.
3 Choose Save to update the login script.
4 When the save is complete, you are informed that file connectionManagerConfig.xml was updated and a backup of the original file was saved to connectionManagerConfig. xml.back. Choose OK to continue.
5 Choose Close to exit.