Creating a Work Order
Follow these steps to create a work order:
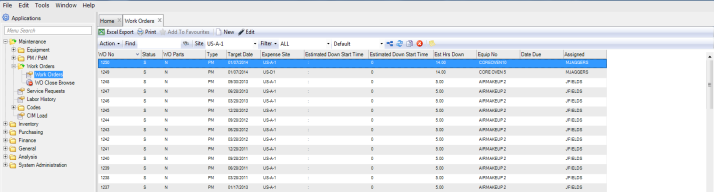
1 Open the Work Order browse in Maintenance|Work Orders|Work Orders.
Work Orders Browse
2 Click New. A blank WO record opens.
The system automatically assigns a WO number, which you cannot modify.
3 Enter information in the relevant fields on the General, Codes, Text, Detail, and User Defined tabs. See
Filling Out the Work Order.
4 Once all the information has been entered, click Save.
Filling Out the Work Order
Work Orders contain five tabs: General, Codes, Text, Detail, and User Defined.
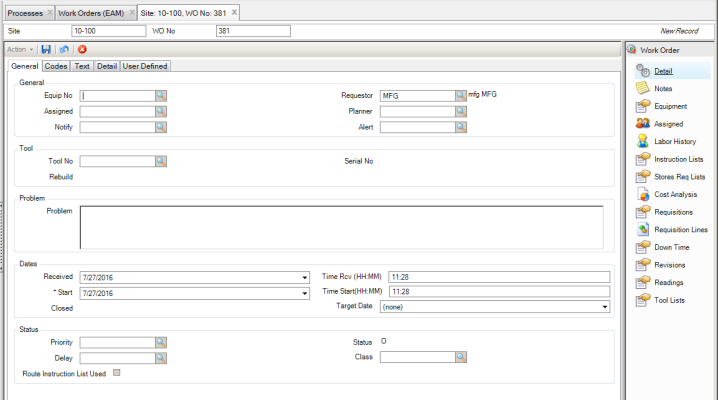
Work Orders: General Tab
Use the General tab to review default information about the record you selected from the Work Order browse. To assign equipment or a tool to the work order, use the lookup feature to find the correct equipment or tool.
Note: You must assign either a piece of equipment or a tool to a WO, but you cannot assign both. Once you select an equipment number or a tool number, the other option becomes inactive.
Work Orders: General Tab
General
Equip No
All equipment has a unique alphanumeric identifier. If a piece of equipment is selected on the work order, the equipment’s default cost center’s department accounts and sub-accounts display in the WO accounting fields.
Requestor
The individual who is requesting work to be performed.
Assigned
Select an employee to assign to the work order. The lookup displays employees designated as assignable in Employee Maintenance. If a number of employees have been assigned through the Scheduling module, the first employee in the list displays in this field.
EAM sends an e-mail to the assigned employee when the WO is created and also sends an e-mail any time the Assigned field is updated. Both the employee newly assigned to the WO and the employee removed from the WO receive an e-mail.
Planner
Select a planner from the lookup or use the default planner from the equipment record.
Notify
Use the lookup to select a person or group. The person or mail group that is selected in the Notify field receives e-mail associated with an event on the work order. Several events on a work order can trigger EAM to send an e-mail, for example; a work order status change, the use of an as-left code, or a part status change (parts on-order, due date changes, and part receipts).
Alert
Use the lookup to select a user ID to receive pager text messages about this work order. This field is also set when a WO is created from a service request.
Tool
Tool No
Each tool has a unique alphanumeric identifier. Use the lookup to select the correct tool.
Serial No
Use the lookup to select the serial number for the specific tool for this WO.
Rebuild
Optionally select the tool rebuild area if this tool is rotable.
Problem
Problem
Use this text input area to describe the problem the work order addresses.
When manually adding a work order, you can enter free-form text in this box. When service requests convert into work orders, some information from the service request automatically copies to the problem field, which you can edit. The PO Text for a fabricated part also defaults in this field.
Dates
Received
The date and time the work order was created on the system. Changes to the received date or time create work order revisions, if applicable. On both add and copy, the date defaults to the current date. You can update the date.
Start
The date the requestor or planner wants the work to be performed:
• On a CM work order, the start date defaults to today’s date when the work order is first created.
• On a PM work order, the start date depends upon which Issue Date calculation method is selected when the PM is issued.
The start date can be overwritten. The start date is not used in the work order scheduling; however, it can be used to designate a proposed date for work to begin.
Closed
The date when the work order status was changed to C for Closed, an indication that all work is complete and no further charges or changes should be made.
Target Date
Select a date when the work order is targeted to start.
Status
Priority
Priority denotes the rank or importance of the work order. Use it to sort or filter records.
If the equipment number is specified when adding a work order, EAM defaults the work order’s priority from the equipment. If the equipment number changes on an existing work order, EAM prompts the user with the question “Pull in equipment defaults?” If yes, EAM defaults the priority from the equipment. If no, the priority does not change. In edit mode, you can change the priority on the work order.
Status
The work order status. In general, the work order statuses are user-defined except for (F)inished, (C)losed, or (X) canceled. Any other status can be changed, deleted, or added; however, these three are updated based on specific functionality for the WO life cycle.
In Work Order Status, you also can decide the default status for CM and PM work orders. For example, you can configure EAM so that the initial status of new CM work orders is Requested or Planning and new PM work orders is Scheduled. See
Work Order Status Codes.
When technicians have completed the work, the work order changes to a Finished status where the work order waits for a supervisor’s approval.
Note: You cannot make changes or modifications to a closed work order. You cannot charge against or modify a canceled work order.
Delay
Use the lookup to select user-defined codes to indicate why a work order has remained open for a given period of time. For example, the reason could be the unavailability of parts or skilled labor needed for the repair, the lack of a permit/authorization to perform the job, or the equipment is not available.
Class
Use the lookup to select user-defined classes that are used to group common types of work orders together, which are useful for filtering. Sample class codes are unplanned corrective, planned corrective, breakdown, safety/health, and preventive maintenance.
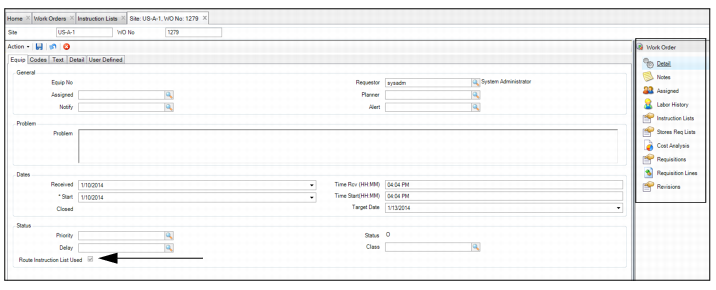
Route Instruction List Used
This check box indicates if a route type MIL is attached to the work order. When you attach a route type MIL to a work order, this check box is automatically selected. If this check box is not selected, a route type MIL is not attached to the work order.
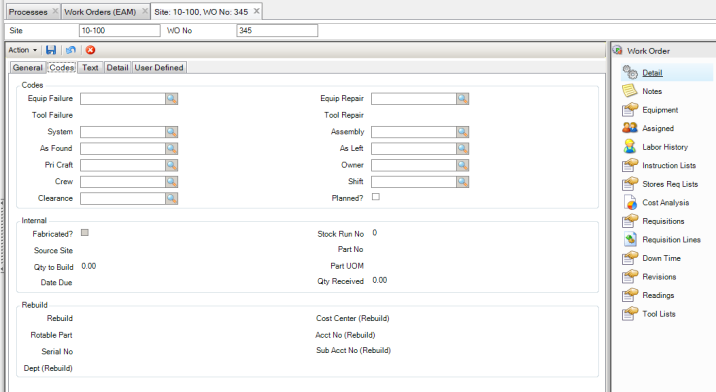
Work Orders: Codes Tab
Use this tab to group work orders by type or classification.
Work Orders: Codes Tab
Codes
Equip Failure
Use the lookup for user-defined codes to select a code that indicates the failure that the word order addresses. See
Failure Codes.
Failure codes, when used consistently on CM work orders, reflect PM opportunities based on the Failure Analysis updates associated with the equipment. Failure codes can be associated with PM templates to indicate the type of failure the PM should prevent from occurring. EAM uses this data to predict when the next failure will occur.
Equip Repair
Use the lookup of user-defined codes and select a code for the type of repair made to the equipment. Use it to further analyze specific types of repairs made against specific types of failures. If a failure type is associated with the piece of equipment on the work order, EAM only offers repair codes associated with the specific failure type.
Tool Failure
Use the lookup for user-defined codes to select a code that indicates the failure that the work order addresses. See
Tool Failures. EAM only supports failure codes associated with the tool-specific failure type.
Tool Repair
Use the lookup of user-defined codes and select a code for the type of repair made to the tool. See
Tool Repairs. EAM only supports repair codes associated with the tool-specific repair type.
System
System codes denote a specific area or component of the equipment. System codes are assigned to the equipment record through the BOM Type group. If a work order is associated with a piece of equipment with specific system codes assigned to it and you look up the system code in a work order, only valid system codes for that piece of equipment are displayed. All costs charged to the work order, such as parts, labor, contractors, and downtime, are denoted to the equipment and the system code identified on the work order. This functionality provides more detailed reporting and analysis. If a piece of equipment is not denoted on the work order, then no system codes are available.
Assembly
The Assembly code is associated with the system code and to the specific piece of equipment that is associated with the work order. Since specific assembly codes are created for each system code, only assemblies associated with a given system code are displayed in the selection lookup. By associating an assembly code with a system code; all cost, labor, parts, issuing, and purchase orders are associated with the equipment and assembly linked to the work order, where cost is directly charged to a work order.
As Found
Use the lookup to identify the equipment condition as part of the work order history before performing the work.
Use the As Found code with the As Left code. Together, these codes address mechanical integrity issues, such as the condition in which you found and left the piece of equipment.
As Left
Use the lookup to identify the condition the equipment was in as part of the work order history at the completion of the work order. An as-left code notes additional work to perform. The maintenance manager or supervisor then knows to create a WO to repair an additional problem identified during the last work order. You can configure an as-left code to send e-mail to the equipment’s notify person or mail group.
Use the As Left code with the As Found code. Together, they address mechanical integrity issues such as the condition in which you found and left a piece of equipment.
Primary Craft
The primary craft is a user-defined lookup to indicate skills required to perform this work. PM templates with an associated primary craft include that information by default on generated work orders.
Owner
This field adds security to each work order. In add and modify mode, you can modify the owner field. The lookup data comes from the user and owner group tables. The copy option does not copy the owner. Once an owner is populated, only that owner can modify the WO.
Crew
The crew defines a group of technicians who can be assigned to a work order.
Shift
The time at which the work order is planned.
Clearance
Specify the type of safety clearance required when performing the prescribed work. You can identify which equipment to shut down before performing maintenance.
Planned
Use this check box to track the number of planned work orders versus unplanned work orders.
Internal
Note: If the work order is a request for fabricated parts, the Internal portion is enabled for data to be added.
Fabricated
Indicate whether the work order is for an internally sourced fabricated part. The check box is not selected by default. Use the Create Requests action in Stock Replenishment to automatically create work orders for fabricated or internally sourced parts.
Stock Run No
The stock run number for the fabricated part. It displays on the work order for planning. To better determine if the work order proceeds, the planner tracks the status of the fabricated parts with this number.
Source Site
You can source the part from one site and expense it to another, creating an intercompany part. For example, when parts built for one site expense against another, this field indicates the inventory site for which the part is being made. The source site’s inventory sub-account is credited and the expense sub-account in the work order’s expense site is debited when the fabricated part enters inventory from the work order.
Part No
The fabricated part number.
Qty to Build
The quantity of parts to fabricate.
Part UOM
The unit of measure in which fabricated parts are typically issued.
Date Due
The following formula calculates the estimated due date: Today + Lead Days.
Qty Received
The quantity of fabricated parts received into inventory. The planner uses this data to know when all the parts are built and received.
Rebuild
If the work order is created to repair a rotable part, enter information regarding the rebuild location, the rotable part, and the expense accounts in these fields.
Rebuild
Select the rebuild location using the lookup.
Rotable Part
Use the lookup to select the rotable part. This lookup only displays the rotable parts that are available in the selected rebuild location.
Serial No
Use the lookup to select the serial number of the rotable part. This lookup only displays the serial numbers that are available for the selected rotable part.
Cost Center (Rebuild), Acct No (Rebuild), Sub Acct No (Rebuild), and Dept (Rebuild)
Displays the expense information for the rebuild location.
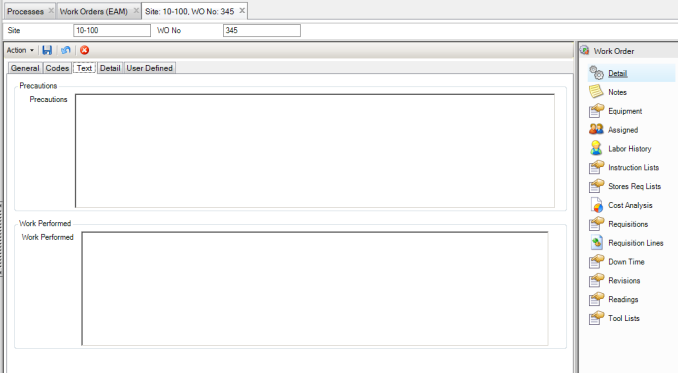
Work Orders: Text Tab
Use this tab to add precautions and notes about work performed.
Work Orders: Text Tab
Precautions
Precautions
Displays all warnings entered when a work order is created from a PM template. If the equipment spending limits have been exceeded, or if service requests exist, they are automatically defaulted into this field.
Note: A printed copy of the work order includes all precautions.
Work Performed
Work Performed
Use this field to describe repairs made to the equipment.
Work Orders: Detail Tab
Use this tab to enter accounting information, estimates, and work order source data.
Work Orders: Detail Tab
Expense Information
Project No
A project number can identify a project for which a work order captures cost.
If a work order is associated with a project, any planned costs that are created and attached to the work order display in the Project Cost tab as part of the planned costs.
Job No
You can associate cost with a project and specific job number within the project. Select from the lookup of jobs for the project entered.
Expense Site
This field defaults to the current site, but you can charge expenses for this work order to another site. In add or modify mode, the drop-down menu for this field displays only sites you are authorized to use. If the expense site differs from the source site or piece of equipment’s site, expenses for the work order flow through intercompany accounts set up between sites in Finance|Codes|Intercompany Accounts.
Dept
Accounting does not assign department. Maintenance or Production can use this field to track expenses. It can represent legacy departments or cost centers.
Cost Center
Enter the cost center used to expense costs such as material issues, internal labor, or external contract costs. The lookup displays a list of valid cost centers for the expense site. Typically, expense accounting data defaults from the equipment or project associated with the work order.
Account Information
Matl Acct No/Sub Acct
Enter the account and sub-account numbers assigned to a piece of equipment or tool to collect material costs.
Cont Acct/Sub Acct
Use these numbers when contract cost charges directly to a work order through a purchase order receipt. If a purchase order is received, the system automatically expenses the contract account number on the work order.
Labor Acct No /Sub Acct No
The account number assigned to a piece of equipment or tool to collect internal labor costs. The sub-account number allows for further details associated with an account number.
Estimates
Labor Estimate
Enter a cost estimate for labor on the work order. Use it to compare estimated cost with actual cost.
Matl Estimate
Enter a cost estimate for materials on the work order. Use it to compare estimated cost with actual cost.
Cont Estimate
Enter a cost estimate for contract work on the work order. Use it to compare estimated cost with actual cost.
Est Hours Down
Enter the estimated amount of time the equipment will be down for this work order. Define time from the point when the equipment stops working to the time it returns to production.
Est Hrs Labor
The estimated hours of labor the equipment or tool requires for this work order. This value is automatically populated and updated with the total number of estimated hours entered on all instruction list steps attached to the WO.
Note: If you manually change this value at any time, EAM no longer updates the estimated hours automatically.
Est Downtime Date
Enter the estimated start date when the equipment will be down for this work order.
Est Down Start Time
Enter the estimated start time (up to 24:00 hours) when the equipment will be down for this work order.
Est Downtime End
EAM uses Est Downtime Date and Est Down Start Time to mark a beginning date and time when the equipment will be down for this work order. Then EAM uses Est Hours Down to calculate Est Downtime End in a date and time. This information can be made available to the ERP Scheduling program.
Note: Downtime estimates are not needed for tools on a WO.
Detail
Type
The type of work order: PM (preventive maintenance) or CM (corrective maintenance).
Auth
Indicate whether the work order has been authorized.
PM Template No
The PM template number, if the work order originated from a PM template.
Auth By
The user who authorized the work performed on a work order.
PM Run No
A number assigned automatically when PM templates are globally issued.
The number in Sequence Maintenance is the last number used, and EAM assigns the next sequential number when you globally issue PM templates.
Orig WO No
The original work order number, if the work order was copied from an earlier work order.
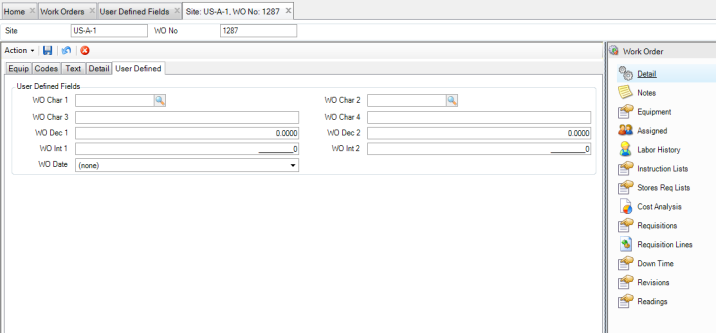
Work Orders: User Defined Tab
Use the WO User Defined tabs to track information against specific EAM work orders. There are ten user-defined fields. Service Request and PM Template modules share the WO user-defined fields. Data displayed here could come from entries in those modules.
Work Orders: User Defined Tab
User Defined Fields
WO Character 1/2
User-defined character fields, validated against tables that you add.
WO Character 3/4
Free-form user-defined character fields, not validated against tables.
WO Decimal 1/2
User-defined decimal fields for the work order.
WO Integer 1/2
User-defined integer fields for the work order.
WO Logical
A user-defined check box.
WO Date.
A user-defined date.
Work Order Notes
If necessary, you can add any notes to the WO. To add notes, open the WO and select the Notes submenu.
Note: The Notes submenu is a free-form text box for notes that are for internal use only and are not printed on any documents.
Assign People to a Work Order
In the Assigned submenu, you can select multiple employees to assign to the WO. The employee that is entered as Assigned in the Equipment tab is automatically listed here. All the employees entered in this menu appear on the work order.
To assign people to a work order, open the Assigned submenu and click New. Use the lookup to select the employee to assign to the work order. Press Enter to save. EAM sends an e-mail to users as they are assigned to the WO.
Note: The lookup in the Assigned field only lists the employees who can be scheduled for work orders. For an employee to be scheduled for a work order, the Assigned? check box must be selected in the General|Employees|Codes tab. See
Employee: Codes Tab.
Assign People to a Work Order
Create an Instruction List for a Work Order
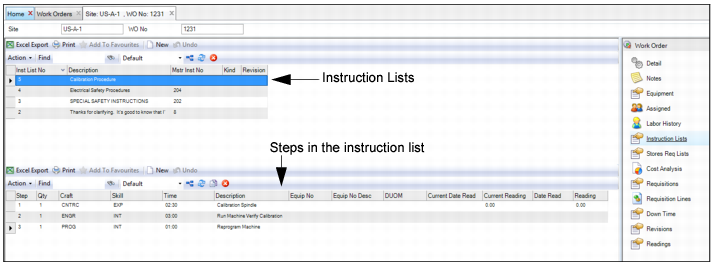
In the Instruction Lists submenu, you can define step-by-step instructions for technicians to use to perform the work.
Create a Procedure for a Work Order
Follow these steps to create an instruction list for a work order:
1 Open the work order and select the Instruction Lists submenu.
2 In the upper browse, click New to create an instruction list.
3 Enter the following information to define the instructions:
Instruction List Number
Autofills with the instruction list number.
Description
Enter a short description of the instruction list.
Master Instruction Number
Displays the MIL number when this is copied from an MIL.
Kind
Enter the kind of instruction list; for example, Instruction or Route.
Revision
Displays the revision number for the instruction list.
4 Press Enter to save.
5 Add steps to the instruction list. Highlight the instruction list and click New in the lower browse.
6 Enter the following information about the step:
Step
Autofills with the step number.
Quantity
Enter the number of craft people required to complete that step. Calculate the cost per instruction step by multiplying the quantity by the time and its craft rate.
Craft
Select the specific craft required to complete this step from a validated table of user-defined codes.
Skill
Select a skill level from a validated table of user-defined codes.
Time
Enter the estimated amount of time in whole hours required to complete this individual step.
Description
Enter a short description of the step.
Equipment Number
The equipment number for route MILs only. Otherwise, this field is blank.
Equipment Number Description
The equipment description for route-type MILs only. Otherwise, this field is blank.
Tool
The Tool Number for route MILs only. Otherwise, this field is blank.
Serial Number
The serial number for route MILs only. Otherwise, this field is blank.
DUOM
The equipment’s DUOM for route MILs only. Otherwise, this field is blank. It defaults from the equipment record.
Current Date Read
The date the current DUOM reading was taken.
Current Reading
The current DUOM reading.
Date Read
Select the date using the calendar lookup.
Reading
Defaults to zero.
7 Press Enter to save.
Attach an MIL to a Work Order
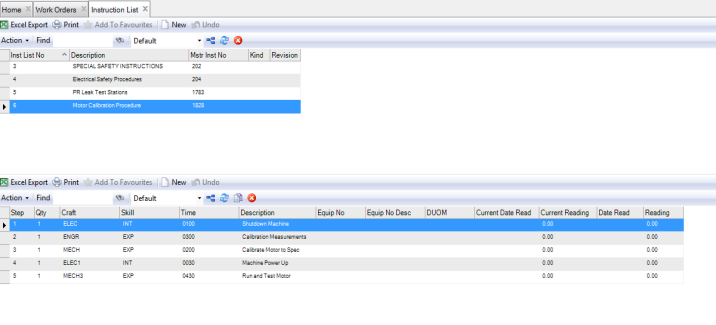
In the WO module, you can copy an MIL to a work order.
Follow these steps to attach an Instruction or Route MIL to a work order:
1 Open the Work Order browse. Highlight the work order and select Copy Master Instruction List from the WO Action menu.
2 Use the lookup to view the instruction or route MIL. Double-click to select the MIL from the list.
The Instruction List browse opens, displaying the MIL. The MIL has been added to the work order.
Copy an MIL to a Work Order
3 If you open the work order and select the Instruction List submenu, you can view the MIL.
Work Order Instruction List Submenu
4 If necessary, make changes to the MIL.
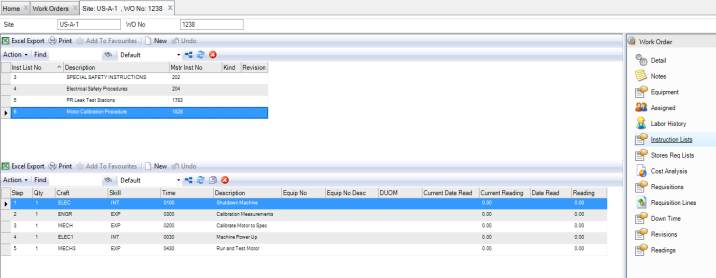
Note: When you add a route MIL to a work order:
• The Route Instruction List check box on the WO is automatically selected. This check box indicates that a route MIL is attached to the WO.
• The Equipment field is blank and disabled.
• The Equipment, Downtime, and Readings submenus are disabled and are removed from the submenu panel.
Route Instruction List Used Selected
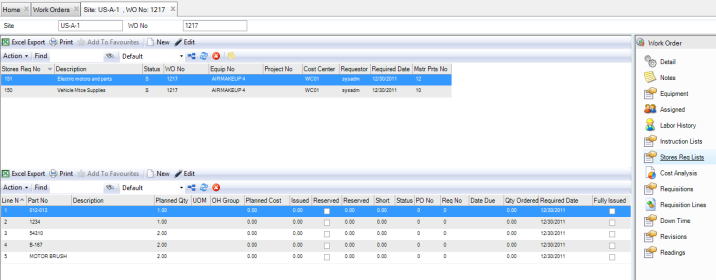
Create a Stores Requisition List for a Work Order
Use stores requisitions lists to create a detailed list of parts for technicians to use to perform the work. See
Create Stores Requisition Lists.
Create a Stores Requisition List for a Work Order
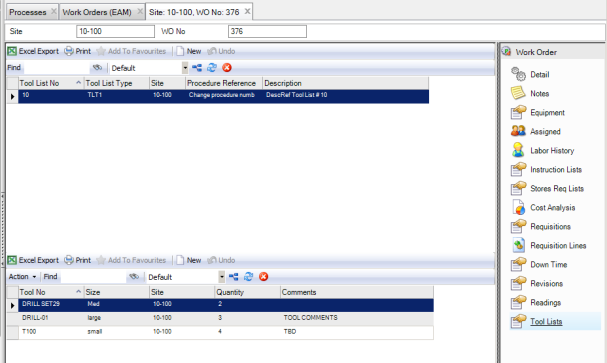
Add Tool Lists to Work Orders
To add a tool list to a WO:
1 Open the WO.
2 Select the Tool Lists submenu.
Add Tool List to Work Order
3 Click New in the upper browse.
4 Enter or select from the lookup the tool list you want to add to this WO. Press Enter to save.
The lower browse displays the tools that are part of the newly added tool list.
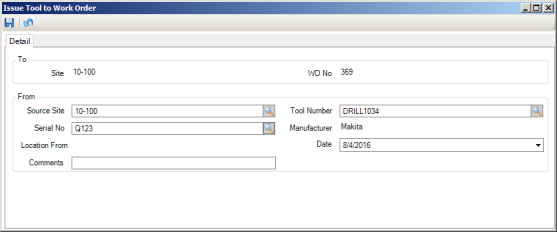
Issue a Tool
To issue a tool from a WO:
1 Highlight the tool in the main WO browse.
2 Select Issue Tools from the WO Action menu. The Issue Tools to Work Order window appears.
Issue a Tool
3 Enter or select the tool’s Tool Number and Serial No.
4 Update the Source Site and Date, if necessary, and enter comments if desired.
5 Click the disc icon to save.
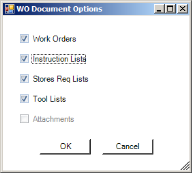
Print Work Orders
To print a WO, select Print Document from the WO Action menu. The WO Document Options pop-up window gives you the choice of what work-order related documentation you want to print. You can choose from the following:
• Work Orders
• Instruction Lists
• Stores Req Lists
• Tool Lists
• Attachments
Work Order Print Options
Select the boxes next to the elements you want to print and click OK.
To print multiple work orders, highlight the work orders and select Global Print Document from the WO Action menu. Select the boxes next to the elements you want to print for the selected work orders and click OK.
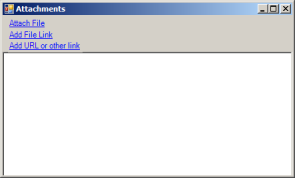
Add Attachments to a Work Order
EAM gives you the option of attaching an unlimited number of files or linking an unlimited number of files or URLs to a work order. If you can run the file on your operating system, you can run it from EAM once it is linked.
Attachment Window
Attach a File
To attach a file to a WO:
1 Select a WO from the WO browse.
2 Select Attachments from the Action menu.
3 In the Attachments window, select Attach File.
4 Locate the file on your computer and click Open. The file is now attached to the WO.
Note: You can also use Attachments for equipment, parts, and PMs attached to the WO by selecting the Attach File Options in the Site|Maintenance tab.
Link a File
To link a file to a WO:
1 Select a WO from the WO browse.
2 Select Attachments from the Action menu.
3 In the Attachments window, select Add File Link.
4 Locate the file on your computer and click Open. The file is now linked to the WO record.
Link a URL
To link a URL to a WO record:
1 Select the WO record from the WO browse.
2 Select Attachments from the Action menu.
3 In the Attachments window, select Add URL or other Link.
4 Copy and paste the link into the field and then click OK. The URL is now linked to the WO record.