Attribute Deviations - Production
In IAQ, you can create the following item profiles that are specific to items that are produced and received:
• Work Order Profile. Applies to a specific item and work order combination in production.
• CUM Order Profile. Applies to a specific item and CUM order combination in production.
You can also create the following item profiles that are specific to components and raw materials required for production:
• BOM Component Profile. Applies to a specific product structure and component or a formula and ingredient for production.
• WO Component Profile. Applies to a specific WO component in production.
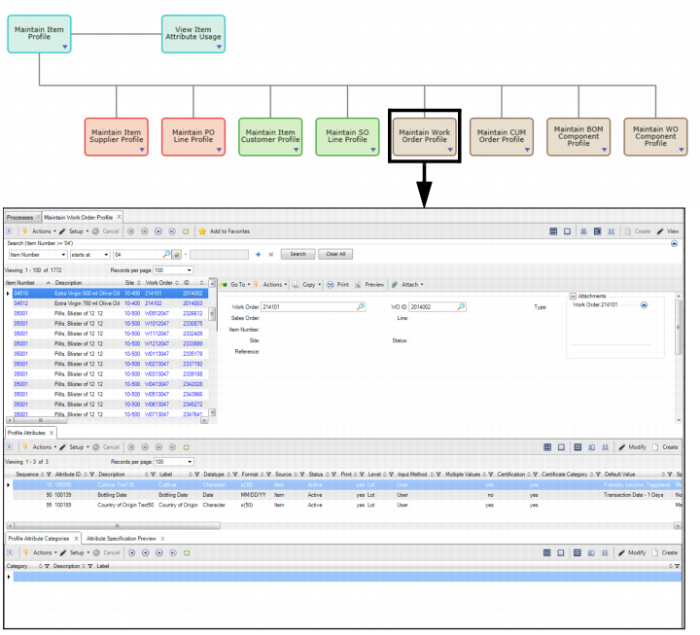
Maintain WO Order Profile
In the Maintain Work Order Profile collection, you can create work order profiles that allow you to track attributes for specific work orders.
To access the work order profile collection, select Maintain Work Order Profile from the Manage Attribute Profile process map.
Maintain Work Order Profile
The top browse of the Maintain Work Order Profile collection contains the following fields:
Work Order
This field displays the WO number associated with the work order profile.
WO ID
Enter or select the WO ID associated with the work order profile. The WO number and WO lot ID together identify a unique order.
Type
This field displays the type of work order. The work order type identifies the work order source and how it should be processed. The following is a list of work order types:
• Blank. Most work orders are created with an order type that is blank. Blank type WOs are normal manufacturing orders with a standard product structure and routing.
• E (Expense). Expense work orders are used for non-inventory jobs, such as engineering prototypes or design projects. They are tracked by a work order so costs can be accumulated. Usually a special GL account and project code are entered. Expense work orders do not have any routing operations or components. These are added manually.
• R (Rework). Rework work orders are used for products needing repair or reworking. This type of order is created with no routing and only one component (the product being reworked). Rework expenses can be tracked separately by entering a different GL account and project code.
The system generates work order types S, C, F, or W:
• S (Scheduled). Generated by the system when a Repetitive schedule is entered. The work order number is the item number scheduled for production. Scheduled orders can be tracked using Repetitive feedback functions or released to create work orders. To release it, change the status field from exploded to allocated or to released. The system automatically changes the type to blank and treats it like a normal work order. The system also updates the repetitive schedule to exclude the order.
• C (Cumulative). Generated by the system to track repetitive production costs. These cannot be processed by work order functions.
• F (Final Assembly). Generated when a sales order for a configured product is released to manufacturing. It uses the standard routing for the item, but the product structure contains only the items chosen on the sales order configuration. These orders are released and processed as regular work orders. You must specify Type as F in Multiple WO Release/Print to release the work order, however.
• W (Flow). Generated when you use Flow Schedule Maintenance to create a flow scheduled order that does not reference an existing work order. These cannot be processed by work order functions.
Sales Order
This field displays the SO number associated with the work order profile. The option to specify a sales order and SO line provides linkage to profiles defined for the SO line and customer.
Line
This field displays the SO line number associated with the work order profile.
Item Number
This field displays the work order item number.
Site
This field displays the site on the WO that is associated with the work order profile.
Status
This field displays the current status of the WO. Work order status tracks a work order through the manufacturing process. Status mainly determines whether the work order quantity and due date can be changed by MRP, and whether the work order should be affected by engineering changes before release. Most functions can specify order status — in particular, capacity planning recalculations. The following is a list of WO status codes:
• P (Planned). Planned orders are created, changed, or deleted by MRP, not manually. Once approved, the status of a planned order is changed to one of the other status codes.
• F (Firm Planned). Defaults to F when a new work order is added. Approved orders that cannot be rescheduled automatically by MRP. They are fixed in quantity and time relative to the MRP process, although they can be changed manually. A bill and routing are associated with these orders, but they are not frozen from engineering changes. Operations are scheduled.
• B (Batch Input Firm Planned). Firm planned orders entered in batch. They do not have a bill or routing, and do not generate component requirements until their status is changed to F, E, A, or R.
• E (Exploded). Similar to a firm planned order, but its bill and routing are not affected by engineering changes to the product structure, formula, routing, or process.
• A (Allocated). An exploded order on which components are allocated, phantom components are exploded, and work orders are created and exploded for routable components. Items can be issued to allocated orders.
• R (Released). Allocated orders that have been released to the shop, and the picklist and routing have been printed. Component items have been detail allocated and picked. Labor can be reported and items can be issued.
• C (Closed). This work order has been completed. Additional component issues cannot be recorded. Labor can continue to be reported. This work order cannot be deleted until the Accounting Close function has been processed.
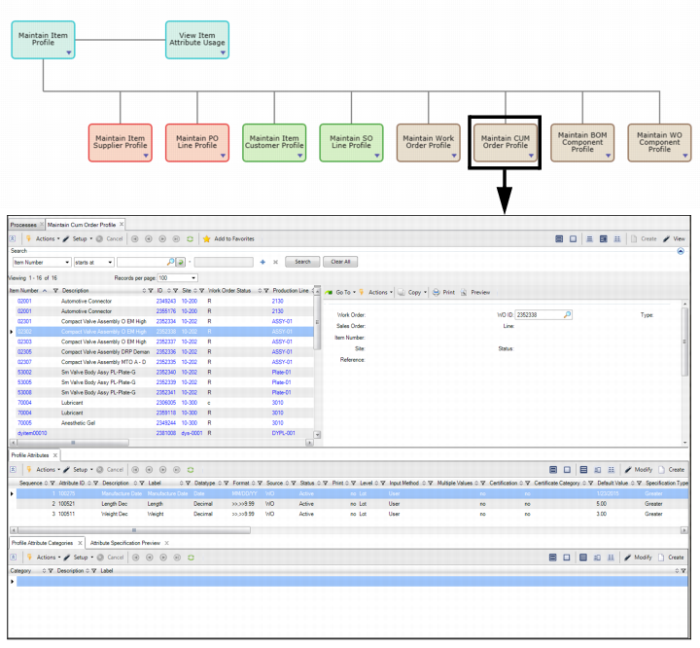
Maintain CUM Order Profile
In the Maintain CUM Order Profile collection, you can create CUM order profiles that allow you to track different attributes when dealing with specific advanced repetitive cumulative orders.
To access the CUM order profile collection, select Maintain CUM Order Profile from the Manage Attribute Profile process map.
Maintain CUM Order Profile
The top browse of the Maintain CUM Order Profile collection contains the following fields:
Work Order
This field displays the WO number associated with the CUM order profile.
WO ID
Enter or select the WO ID associated with the CUM order profile. The WO number and WO lot ID together specify a unique order.
Type
Sales Order
Enter or select the SO number associated with the CUM order profile. The option to specify a sales order and SO line provides linkage to profiles defined for the SO line and customer.
Line
Enter or select the SO line number associated with the CUM order profile.
Item Number
This field displays the cumulative order item number.
Site
This field displays the site on the WO that is associated with the CUM order profile.
Status
Reference
Optionally, enter any reference information.
Creating a Deviation - Work Order and CUM Order Profile
Follow these steps to create a work order or CUM order profile:
1 Select the Maintain Work Order Profile collection from the Manage Attribute Profile process map. If you are creating a CUM order profile, select Maintain CUM Order Profile.
2 To create a new profile, click Create.
3 In the top browse of the work order profile collection, specify which work order and WO ID are associated with the profile by entering the required information. For detailed field definitions, see
Maintain WO Order Profile or
Maintain CUM Order Profile.
Attribute Layer Priority - Production
When there are multiple work order or CUM order profiles, some profiles will override other profiles. For example:
• What if there are multiple profiles for an item, item and customer, work order, or CUM order?
• What if the same attribute appears with different default values at different levels?
• What if the same attribute appears with different specifications at different levels?
Each profile uses a different set of layers and priorities, which control how profile attributes override one another. The following graphic outlines the attribute layer priority for production profiles:
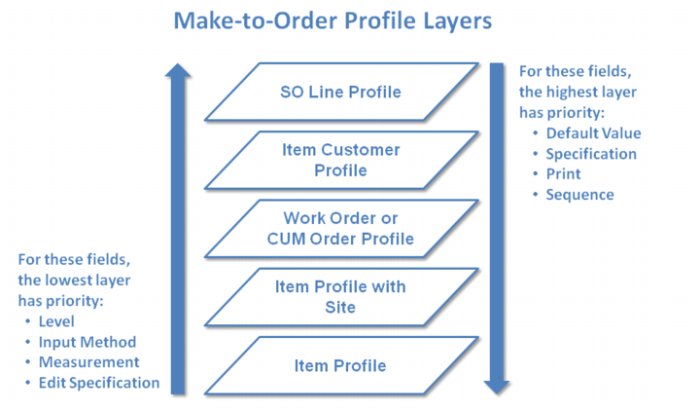
Attribute Layer Priority - Make-to-Order
The sub-layers determine how different entries within a layer override one another. The sub-layers will not, however, allow a layer to override a higher layer. A make-to-order line incorporates both an SO line and a work order or CUM order. As such, it combines priority layers for both concepts.
The SO line profile and item customer profile have higher priority than the work order or CUM Order profile, as do their sub-layers. Item profile, as always, is the most general concept and has the lowest priority.
• SO Line
• Item Customer Profile
• Item, Customer, Ship-to, Site
• Item, Customer, Ship-to
• Item, Customer, Site
• Item, Customer
• Work Order or CUM Order Profile
• Item Profile
• Item and Site
• Item
Field priority functions in both directions, depending on the field. In the case of Default Value, Specification, Print, and Sequence, the highest layer has priority. The field value of the highest layer cascades down.
For the Level, Input Method, UM, and Edit Specification fields, the lowest layer has priority. The field value of the lowest layer cascades up.
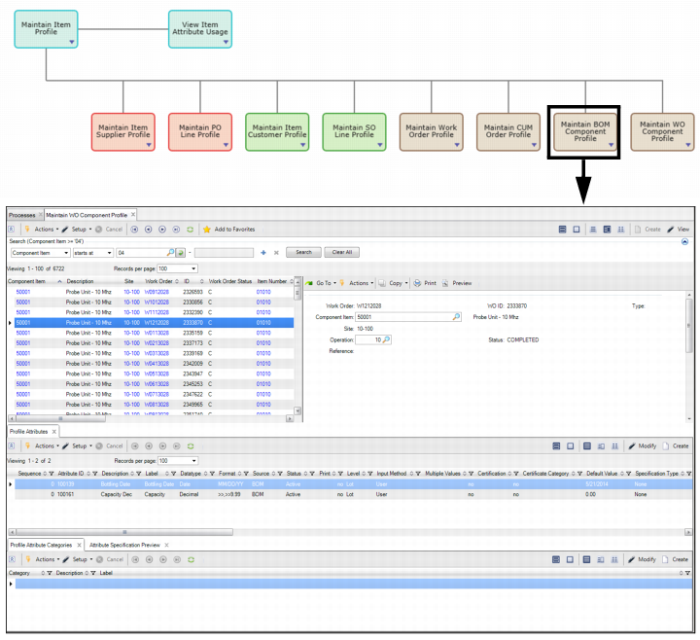
Maintain BOM Component Profile
In the Maintain BOM Component Profile collection, you can create BOM component profiles that allow you to track different attributes when dealing with a specific BOM component.
To access the BOM component profile collection, select Maintain BOM Component Profile from the Manage Attribute Profile process map.
Maintain BOM Component Profile
The top browse of the Maintain BOM Component Profile collection contains the following fields:
Parent Item
Enter or select the BOM code or the parent item for the BOM component profile. Parent and child BOM components are built in Product Structure Code Maintenance.
Component Item
Enter or select a valid component for the BOM code or parent item established in Product Structure Maintenance.
Reference
Enter or select the reference for the BOM component profile.
Start Effective
Enter or select the starting date for the BOM component profile.
End Effective
Enter or select the end date for the BOM component profile.
Profile Reference
Enter the name of the profile that you are creating for this BOM component profile.
Maintain WO Component Profile
In the Maintain WO Component Profile collection, you can create WO Component Profiles that allow you to track different attributes when dealing with a specific WO component.
To access the WO component profile collection, select Maintain WO Component Profile from the Manage Attribute Profile process map.
Maintain WO Component Profile
The top browse of the Maintain WO Component Profile collection contains the following fields:
Work Order
Enter or select the WO number associated with the WO component profile.
WO ID
Enter or select the WO ID associated with the WO component profile. The WO number and WO lot ID together identify a unique order.
Type
Component Item
Enter or select the component item number that is associated with the WO component profile.
Op
Enter or select the operation that is associated with the WO component profile.
Site
This field displays the site that is associated with the WO component profile.
Status
Reference
Optionally, enter any reference information.
Creating a Deviation - WO or BOM Component Profile
Follow these steps to create a WO or BOM component profile:
1 Select the Maintain WO Component Profile collection from the Manage Attribute Profile process map. If you are creating a BOM component profile, select Maintain BOM Component Profile.
2 To create a new profile, click Create.
3 In the top browse of the work order profile collection, specify which parent item, component item, work order, and work order ID are associated with the profile by entering the required information. For detailed field definitions, see
Maintain BOM Component Profile and
Maintain CUM Order Profile.
Attribute Layer Priority - Production Components
When there are multiple WO or BOM component profiles, some profiles will override other profiles. For example:
• What if there are multiple profiles for an item, WO component, and BOM component?
• What if the same attribute appears with different default values at different levels?
• What if the same attribute appears with different specifications at different levels?
Each profile uses a different set of layers and priorities, which control how profile attributes override one another. The following graphic outlines the attribute layer priority for production profiles:
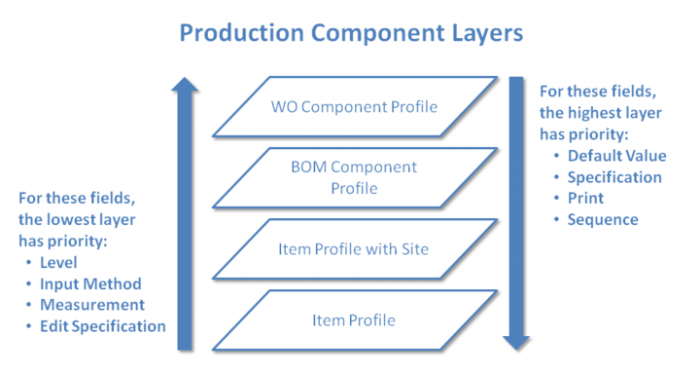
Attribute Layer Priority - Production Components
The sub-layers determine how different entries within a layer override one another. The sub-layers will not, however, allow a layer to override a higher layer.
The WO Component Profile layer has the highest priority. The next highest is the BOM Component Profile layer. The lowest priority layer for production components contains the Item Profile sub-layers.
• WO Component Profile
• BOM Component Profile
• Item Profile
• Item and Site
• Item
Field priority functions in both directions, depending on the field. In the case of Default Value, Specification, Print, and Sequence, the highest layer has priority. The field value of the highest layer cascades down.
For the Level, Input Method, UM, and Edit Specification fields, the lowest layer has priority. The field value of the lowest layer cascades up.