Create Profiles
Pending Call Frame Maintenance (11.1.3.15) lets you complete a number of setup tasks related to pending calls. You can:
• Create, modify, or delete a pending call profile, which identifies a specific method for entering data in Pending Call Maintenance. When you are creating a new profile, you can start with an existing one as a template to reduce data entry.
• Specify a default profile that applies to all users and user roles without an assigned profile in Pending Call User/Role Default (11.1.3.19).
• Assign user and role access to a profile.
• Create frames associated with a profile and specify which fields display on them.
You can delete a profile only when:
• It is not referenced as part of a frame sequence by another profile.
• It is not the default profile of any user or role.
After creating profiles and frames, use Pending Call Frame Sequence Maintenance (11.1.3.17) to specify the order in which frames display during pending call entry.
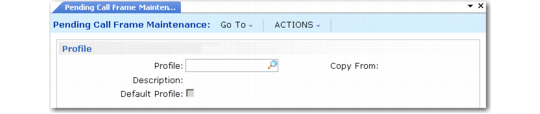
Pending Call Frame Maintenance (11.1.3.15), Profile Frame illustrates the first frame of Pending Call Frame Maintenance.
Pending Call Frame Maintenance (11.1.3.15), Profile Frame
Profile
Enter a value (maximum 16 characters) identifying the profile you want to edit, create, or delete.
When you are creating a new profile, you can start with an existing profile, such as the system-supplied DEMO, by specifying a value in the Copy From field. This minimizes data entry for similar profiles.
Copy From
If you are creating a new profile, specify an existing profile ID in this field to begin with a copy of it. The system creates a new record based on the one you specify, including frame details, frame field details, frame sequence details, and frame sequence condition details.
Description
Enter a brief (maximum 40 character) description of this profile.
Default
Indicate whether this profile should be used as the default profile for any users or roles without an associated profile.
No: This profile applies only to the specific users and roles with which it is associated.
Yes: This profile applies to all users without an assigned profile, as well as to any users or roles assigned to it.
Only one profile can be designated as the default. When you enter Yes, the system determines if another default profile exists. If it does, a warning displays and you are prompted to continue. If you choose to continue, the current profile becomes the default.
Use Pending Call User/Role Default (11.1.3.19) to assign profiles to users and roles.
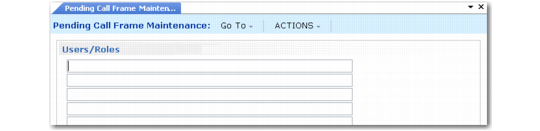
Assign Access to Profiles
Before a user can execute the frames defined in a profile, they must have security access. If you do not want to implement security for profiles, do not assign any users or roles. This has the same effect as assigning all users and roles.
See
QAD Security and Controls User Guide for details on users and security.
Note: Assigning security access to a profile is a separate task from assigning a default profile. A user must have both to be able to execute Pending Call Maintenance.
Pending Call Frame Maintenance (11.1.3.15), Users/Roles
Users/Roles
Enter a list of user IDs or role names that can access the associated profile. Leave blank if you do not want to restrict access to the profile.
Create user IDs and in User Maintenance (36.3.1). Create user roles in Role Create (36.3.6.1) and associate them with users in Role Membership Maintain (36.3.6.6).
Separate user IDs and role names with commas. Spaces are eliminated upon entry. An asterisk indicates all user IDs or roles. The exclamation point is used to restrict specific users by user ID or role.
For example, the string ap,sales means only users associated with role ap or sales have security access. The string !user1,* means all users except user1 have access. Exclusions must be entered first. Specifying *,!user1 is the same as * (all roles).
Define Frames
Use the next frame in Pending Call Frame Maintenance—illustrated in
Pending Call Frame Maintenance (11.1.3.15), Frame Frame— to add, modify, or delete frames associated with the current profile. You can delete a frame after specifying its number only when it is not referenced by any frame sequence in this or any other profile.
Pending Call Frame Maintenance (11.1.3.15), Frame Frame
Frame Number
Enter a value from 1 to 999 identifying this frame in this profile.
Note: This number is used strictly to identify the frame and its contents. The sequence in which frames display is determined by the information you enter in Pending Call Frame Sequence Maintenance (11.1.3.17).
Number frames by 10’s or 100’s, so you can add new frames without renumbering existing ones. For example, if you define frames 10, 20, and 30 and want to add another frame between 20 and 30, you can enter it as frame 25. You can also use Pending Call Setup Utility to renumber frames.
Frame Title Term
Optionally specify a label term identifying the translated title for this frame. When a term is specified, the long label associated with this term in Label Master Maintenance (36.4.17.1) displays as the label for this frame in Pending Call Maintenance.
If you leave this field blank, the system creates a frame label based on the profile ID and frame sequence number, with the following form:
Profile xxxxxxxx Frame nnn
Define Frame Contents
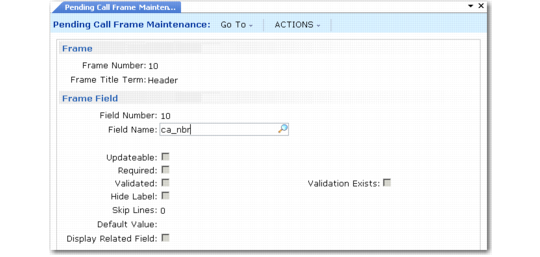
Pending Call Frame Maintenance (11.1.3.15), Frame Fields illustrates the frame you use to add, modify, or delete fields from the current frame definition. After you specify a field number, you can use Delete to remove the field from the frame.
The fields you add to frames must be defined in Pending Call Field Maintenance and marked as active. Field values such as Updateable, Required, and Default Value default from settings in Pending Call Field Maintenance. The term used to find the field label is also defined here.
Each field you specify displays on a separate line on the associated frame, with or without a label based on the value of Hide Label. You can place a field on more than one frame, and specify different options for each frame where it displays. For example, you can add a field for update on one frame and then display it without allowing update on another.
When you add a field to a frame, the system ensures that sufficient room exists on the frame to display it; if not, an error displays. A frame can contain up to 18 lines. The system calculates the number of lines already used by adding:
• The total number of fields specified on the frame
• The total number of skip lines specified for all fields in the frame
• The total number of related fields (Display Related Field is Yes) specified
Pending Call Frame Maintenance (11.1.3.15), Frame Fields
Field Number
Enter a value from 1 to 999 indicating the display sequence for this field on the specified frame when it is used during the creation of pending calls.
Number fields by 10’s or 100’s, so you can add new fields without renumbering existing ones. For example, if you define fields 10, 20, and 30 and want to add another field to display between 20 and 30, you can enter it as field 25. You can also use Pending Call Setup Utility to renumber frames.
Field Name
Enter the name of an active field to display on this frame. You can specify only fields marked as active in Pending Call Field Maintenance.
The system displays up to 20 characters of the field label below the field name. The term for finding the appropriate label is specified in Pending Call Field Maintenance.
Updateable
This field defaults from the same field in Pending Call Field Maintenance. Enter Yes if you want users to be able to update the value of this field on this frame when it displays in Pending Call Maintenance. Otherwise, enter No.
Required
Enter Yes if users must enter a value in this field when it displays in Pending Call Maintenance. Otherwise, enter No.
When Yes, an error displays in Pending Call Maintenance when the field is left blank.
This field defaults from Pending Call Field Maintenance. Even though a field is required to create a call in the call master, you can set required to No when it displays on this frame. Do this if you want to let users leave the field blank during initial call entry.
For example, the customer service representative has a call profile that lets fields be blank. Later the supervisor reviews the pending call with a different profile and fills in required fields before transferring it to Call Maintenance. An error is generated during call transfer when required fields do not have a value.
Validated
You can modify this field only when Validation Exists is Yes.
No: Do not validate the field during data entry.
Yes: Use the existing validation to validate the user’s entry in Pending Call Maintenance.
Note: A non-blank field validation is managed with the Required field. When you set Validated to Yes, the system performs all validations but still lets the user leave the field blank unless Required is also Yes.
Field values must be valid before a pending call can be transferred to Call Maintenance. However, if you want to record data quickly, you can delay verification by setting this field to No. After initial data entry, you can modify the pending call later to ensure data is correct.
You can generate a report indicating any errors or warnings that would be generated during transfer before you transfer the pending call to Call Maintenance.
Validation Exists
This display-only field indicates whether a validation is available for this field. When setting this field to Yes, the system looks for both validations built into the database schema and code validations.
No: The Validated field cannot be updated. No validations occur in Pending Call Maintenance.
Yes: You can specify whether you want this validation to occur by setting the Validated field to Yes or No.
Hide Label
Indicate whether to include the label for this field.
No: The label associated with the label term specified in Pending Call Field Maintenance displays next to this field in this frame in Pending Call Maintenance.
Yes: The label for this field does not display on this frame.
Skip Lines
Optionally enter an integer representing the number of blank lines to be allocated on the frame before this field. Leave the default 0 (zero) to place this field on the next available line.
Use this field to organize fields into logical groups in the presentation of the frame.
Default Value
Optionally specify a default value to display in this field when a new pending call is created in Pending Call Maintenance. This field defaults from a value specified in Pending Call Field Maintenance.
Leave this field blank if you want the system to use the same logic as Call Maintenance uses to search for a default value for the field in Pending Call Maintenance.
This field is not validated. You must ensure that the value you specify is consistent with the type and format of the associated field; otherwise, errors will be generated during pending call entry or transfer.
For example, for a logical field, specify Yes if you want the field to default to Yes. If you specify a string such as OK, errors are generated either in Pending Call Maintenance or when the call is transferred.
Note: In non-English environments, specify the English Yes or No as the default value for logical fields. These are then displayed to the user in the correct language.
Display Related Field
You can modify this field only when a related field currently displays next to this field.
No: The related field does not display on this frame in Pending Call Maintenance.
Yes: The field related to this field displays below it on this frame in Pending Call Maintenance.
Related fields provide more information that helps users identify a record. For example, the sort name is often displayed next to the Customer ID field, letting you associate a meaningful name with a shorter ID.
Related Field
This field displays the name of the field that is related to the field specified in Field Name. When a value displays, you can update the value of Display Related Field.
Note: You can choose your own related fields to display by adding a field to a frame and setting Updateable to No. When the user clicks Next and the value is found through defaulting logic, the screen redisplays so the user can see the related value. You can use this method for any field that is generated by defaulting logic.