Creating a PM Template Record
Follow these steps to create a PM template record:
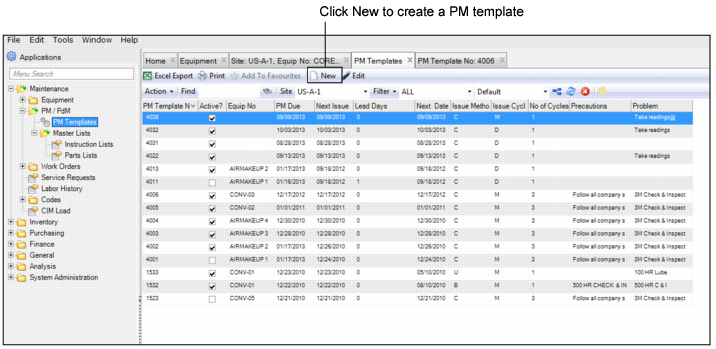
1 Open the PM Template browse in Maintenance|PM/PdM|PM Templates and click New.
PM Templates Browse
A blank PM template record opens. The system automatically assigns a PM template number, which you cannot modify.
2 Enter the necessary information in the Equipment, Issue Method, Codes, Detail, and User Defined tabs. See
Filling Out the PM Template.
3 When all the information has been entered, click Save.
Filling Out the PM Template
PM templates contain five tabs: General, Issue Method, Codes, Detail, and User Defined.
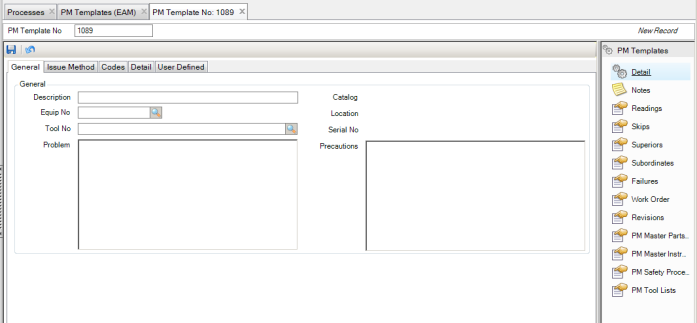
PM: General Tab
Use the PM General tab to review default information about the record you selected from the PM template browse. If you are creating a PM template, use the lookup feature to find the correct piece of equipment or tool. Select a piece of equipment or a tool to copy record data such as the location and catalog fields.
Note: A blank PM template displays a lookup for both Equipment and Tool. Once you select either Equipment or Tool, the other option is disabled.
PM: General Tab
General
Description
This field contains a brief description of what the PM is, such as: “Monthly ball bearing replacement.”
Catalog
EAM copies catalog data from the equipment or tool record. Use cataloging to report differences in operating characteristics, such as cost and failures.
Equip No
Equipment originates in the Maintenance|Equipment module. The field must contain a valid equipment number in the current site. If the equipment is locked, EAM displays a warning message. This field is disabled if a route instruction list is attached to the PM.
Note: If a Route Instruction list is attached to the PM, the Equip No is blank
Location
Location indicates the geographic location of the piece of equipment or tool. EAM copies location data from the equipment or tool record.
Tool No
A valid tool number in the current site.
Serial No
The serial number identifying a particular tool.
Problem
This field contains a detailed description of issues with the equipment, such as “Be sure no knives are on the conveyor before starting the line.” This field also contains general information, such as “Monthly PM, perform all tasks on the attached work orders.” Data in this field prints on the PM work order document.
Precautions
Indicate any special precautions to take while maintaining this piece of equipment, such as “Let this conveyor belt sit idle for 20 minutes before touching the motor, as it is hot.”
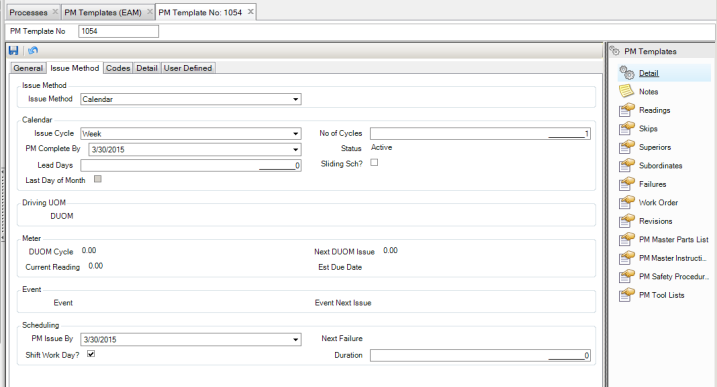
PM: Issue Method Tab
PM: Issue Method Tab
Issue Method
Issue Method
There are four different ways to schedule PMs. Select from the following:
• Calendar (C). Calendar-based PMs depend on issue cycle and number of cycles. The issue cycle is one of the following: day, week, month, or year. The issue cycle, combined with the number of cycles, determines the number of days between due PMs.
• DUOM (U). Meters accumulate measurements, such as hours or miles. Define these measurements on Maintenance|Codes|DUOMs and establish them on relevant equipment records. The term for defined metering is driving unit of measurement (DUOM). Select one from a list of valid DUOMs for the equipment. The DUOM cycle equals the number of cycles between PM Issue By dates. Link DUOMs (count, hours, hits, and so on) to the equipment record before it is available in the PM template.
You are only required to set the starting point for this PM template. Once the readings start, it resets incrementally based on the DUOM cycle.
The current reading field is read-only. It displays the current reading for the selected equipment. EAM calculates an estimated due date after there is data from two readings.
• Both (B) Calendar and DUOM. With issue method Both, establish a PM template to issue based either on calendar or meter DUOM, whichever comes first.
• Event (E). Events are on-demand PM work orders. This PM occurs on a specific event date established under event maintenance. Events can be annual, such as an annual plant shutdown, which may not always fall on the same date. Events can represent opportunities to perform maintenance on equipment. For example, if production brings down a line or piece of equipment, maintenance can use unscheduled downtime to perform predefined preventive maintenance that is not dated.
Calendar
Issue Cycle
Select Day, Week, Month, or Year to use for calendar-based PMs only.
No of Cycles
Displays the number of cycles between PMs.
For example, if you selected a daily issue cycle and you want to perform the PM every day, enter 1 as the number of cycles. If you want the PM to be due every six months, select a monthly issue cycle and enter 6 in this field.
PM Complete By
Displays the next scheduled issue date. If you do not enter a date, EAM defaults to today’s date. EAM calculates the PM Issue By date based on the issue cycle and the number of cycles.
Note: The value changes to Last Issue date when Sliding Sch? is selected and an open WO references the PM number.
Status
Displays Active or Inactive, depending on the setting from the Detail tab. If you select Sliding Sch?, and there is an open work order from this PM template, then status is open.
Lead Days
Displays the number of lead days before the actual due date. Enter the number of lead days to calculate a PM Issue By date before the PM is due. EAM backs up the PM Issue By date by the number of days entered here. This field is used for planning purposes. It is active only when the issue method is calendar or both.
Sliding Sch?
Determines the PM Complete By date. Select if you want the calculation of the PM Complete By date based upon the closing of the previously generated work order for that PM. Leave the setting unselected if you want the PM to be issued routinely, even when there is already an open work order for the same PM.
Last Day of Month
If the last issue falls on the last day of the month, select this check box so that subsequent PMs also occur on the last day of the month.
Driving UOM
DUOM
When issue method is DUOM or both, indicate the DUOM. Enter a valid DUOM for the equipment. This must be a type of meter if issue method is set to both. If you change the issue method and DUOM type is meter, it defaults to the current reading.
Meter
DUOM Cycle
Indicate the number of cycles or units between PMs; used only for meter-based PMs.
Next DUOM Issue
A PM is due when the meter reaches the reading value in this field. Enter it when you create the PM. EAM generates it automatically for subsequent PMs based on the DUOM cycle.
Current Reading
Displays the current DUOM reading for the equipment.
Est Due Date
EAM calculates the estimated due date with this formula: Today + ([next DUOM cycle - current reading]/average unit per day usage).
Event
Event
This option displays the selected event.
Event Next Issue
This read-only field displays the next issue date if the issue method is event.
Scheduling
PM Issue By
EAM calculates this value with this formula: PM complete by – lead days.
Next Failure
This read-only field displays the next statistical failure date for a defined failure code associated with the current PM template. EAM predicts a future failure date.
Note: If multiple failure codes associated with this PM have different failure dates, this field displays the closest date or the next date available.
Shift Work Day?
You can create a maintenance department workday calendar. If a PM is due on a non-work day and you select the check box, then EAM adjusts the Requested Start Date to the next available work day. If this field is not selected, then EAM issues the PM work order based on the PM Complete By date.
Duration
Enter the estimated duration for this work.
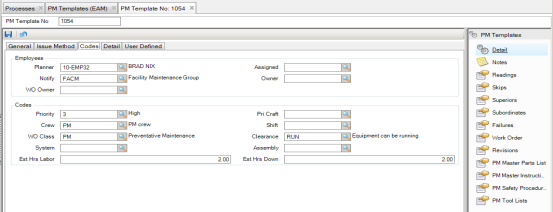
PM: Codes Tab
Use this tab to work with employees, users, and codes.
PM: Codes Tab
Employees
Planner
The assigned planner’s name. A lookup filters planners at the current site.
Assigned
The person responsible for the PM. A lookup filters eligible employees at the current site.
Notify
The user or group to notify with e-mail when this PM is due. A lookup filters users in the user and mail groups.
Owner
Select a user or group using the lookup filtered to user and owner groups. Only the user or group specified in this field can make changes to the PM. This can be used when change control for PM is needed to meet internal or external compliance requirements.
WO Owner
Select a user or group using the lookup filtered to user and owner groups. When the PM template issues, the owner is copied to the WO. Only the user or group specified in this field can make changes to the WO.
Codes
Priority
Priority displays a valid priority from the standard priorities defined for your system.
Pri Craft
A valid craft from the standard craft codes defined for your system.
Crew
Identify a group of technicians by a crew code. The crew code is associated with the PM template. When the PM is issued and a work order is created, that crew number or crew code is copied to the designated work order.
Shift
A valid shift from the standard shifts defined for your system. A lookup is available for this field.
Class
A valid work order class from the standard classes defined for your system. A lookup is available for this field.
Clearance
A valid clearance level from the standard clearances defined for your system. A lookup is available for this field.
System
A valid system code from the standards defined for your system. A lookup is available for this field. If the equipment has a BOM type, the lookup filters by the equipment’s BOM type system codes.
Assembly
A valid assembly code from the standards defined for your system. A lookup is available for this field. If the equipment has a BOM type, the lookup filters by the equipment’s BOM type system codes.
Est Hrs Labor
The estimated hours of labor required to perform this PM. This value is automatically populated and updated with the total number of estimated hours entered on all MIL steps attached to the PM.
Note: If you manually change this value at any time, EAM no longer updates the estimated hours automatically.
Est Hrs Down
The estimated hours of equipment downtime required to perform this PM.
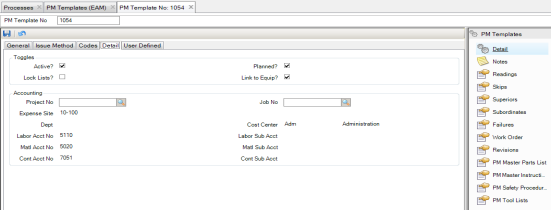
PM: Detail Tab
Use this tab to apply expense information from the equipment record to the PM template and to work orders created from this template.
PM: Details Tab
Toggles
Active?
Select this check box to indicate that the PM is currently active. Clear the check box to set Status on the Issue Method tab to Inactive.
Planned?
This setting is copied to the work order at issue. Planners use it to track the amount of planned and unplanned work.
Lock Lists?
There is no functionality for this field at this time.
Link to Equip?
Linking to equipment populates these fields: expense site, department, cost center, labor account number, labor sub-account, material account, sub-account, contractor account, and sub-account associated with the equipment record.
Accounting
Project No
Enter a project number to use for WOs issued from the template.
Job No
Enter a job number for the project entered. Use job numbers to break down large jobs into component parts for better cost analysis. All jobs in a PM template copy to corresponding work orders.
If the Link to Equip? check box is cleared, the user can enter account numbers, sub-accounts, cost center, and department to use for PM activity. When the work order is generated, accounting from the PM template is copied to the work order.
Expense Site
This field defaults to the current site, but you can charge expenses for this PM template to another site.
Dept
The expense site department for the PM.
Cost Center
Charges for materials, internal labor, or outside contractor cost use this cost center.
Labor Account No
Account to charge the labor.
Labor Sub Account
Sub-account number to charge labor.
Matl Acct No
Account number to charge material cost.
Matl Sub Acct
Sub-account number to charge material cost.
Contractor Acct No
Account number to charge contractor cost.
Contractor Sub Acct
Sub-account number to charge contractor cost.
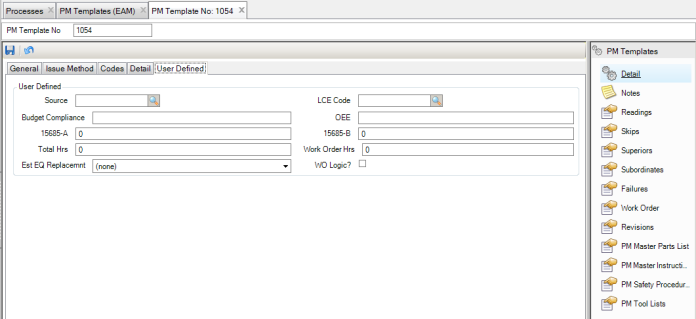
PM: User Defined Tab
Use this tab to track information against specific PM templates or work orders in EAM. There are ten user-defined fields. If you add any user-defined data to a PM template, it copies to its work orders.
PM: User Defined Tab
User Defined
Character 1/2
User-defined character fields, validated against tables that you add.
Character 3/4
Free-form user-defined character fields, not validated against tables.
Decimal 1/2
User-defined decimal fields for PM templates or work orders.
Integer 1/2
User-defined integer fields for PM templates or work orders.
WO Date
User-defined date field for PM templates or work orders.
Logic for WO
Select this check box to add a logical field to the PM templates or work orders.
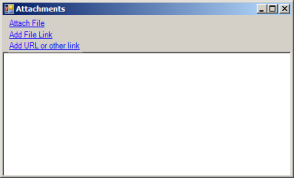
Attach or Link Files to a PM Template
EAM gives you the option of attaching or linking an unlimited number of files or URLs to a PM template record. If you can run the file on your operating system, you can run it from EAM once it is linked.
Attach or Link a File to a PM Template
Attach a File
To attach a file to a PM template:
1 Select the PM template from the PM Templates browse.
2 Select Attachments from the Action menu.
3 In the Attachments window, select Attach File.
4 Locate the file on your computer and click Open. The file is now attached to the PM template.
Link a File
To link a file to a PM template:
1 Select the PM template from the PM Template browse.
2 Select Attachments from the Action menu.
3 In the Attachments window, select Add File Link.
4 Locate the file on your computer and click Open. The file is now linked to the PM template.
Link a URL
To link a URL to a PM template:
1 Select the PM template from the PM Template browse.
2 Select Attachments from the Action menu.
3 In the Attachments window, select Add URL or other Link.
4 Copy and paste the link into the field and then click OK. The URL is now linked to the PM template.
Note: To make Equipment Attachments available in PM templates for a site, select the Equip to PM? check box in the General|Business Unit|Site|General tab. This option allows files or links associated with the equipment entered on the PM template to be accessible. The links are available for all equipment associated with the PM.
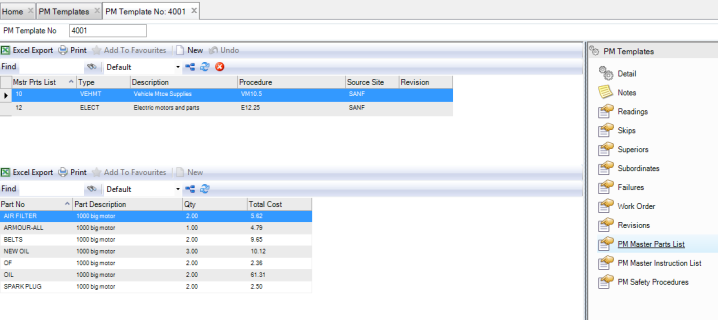
Adding Master Parts Lists to a PM Template
A master parts list (MPL) allows you to easily attach a standard list of parts required for a PM instead of entering the same parts for every PM that uses them. One or more master parts lists can be added to a PM template. The same MPL can then be added to multiple PM templates. The quantity and cost from the MPL represent the planned cost for the eventual WO created from the PM.
To add an MPL to a PM template, click New in the upper browse. Use the lookup in the Master Parts List field and select the parts list. Press Enter to save.
Adding Master Parts Lists to a PM Template
Adding Tool Lists to a PM Template
A tool list allows you to easily attach a standard list of tools to a PM that is required for a PM instead of entering the same tools for every PM that uses them. One or more tool lists can be added to a PM template. The same tool list can then be added to multiple PM templates.
To add a tool list to a PM:
1 Open the PM template to which you want to attach the tool list.
2 Select the PM Tool Lists submenu.
3 Click the New button in the upper browse.
4 Enter or select from the lookup the Tool List No. Tab to populate the Tool List Type, Site, and Procedure Reference fields. Update the Description field as necessary. Press Enter to save.
The lower browse displays the tools that are part of the new tool list.
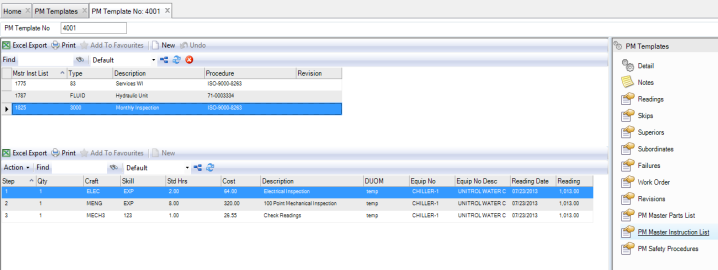
Adding MILs to a PM Template
An MIL displays the steps necessary to complete a task. Each step includes a craft and skill code, as well as time and cost involved. Route steps include equipment or serialized tool, DUOM, current reading, and date. For instructions for creating an MIL, see
Creating an MIL.
To add an MIL to a PM template, click New in the upper browse. Use the lookup in the Master Instruction List field and select the Instruction and/or Route kinds of MIL required for the PM. Press Enter to save.
Note: When a PM Route MIL for DUOM Readings is attached, each step of the MIL has a piece of equipment or serialized tool specified with its DUOM. This is used on PM templates and work orders to facilitate recording equipment or serialized tool DUOM readings.
Adding MILs to a PM Template
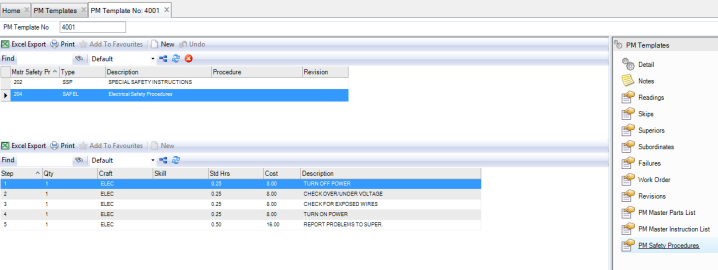
Add Master Safety Procedures to a PM Template
Select a master safety procedure (MSP) to identify all safety instructions that are required for a PM using the PM Safety Instruction submenu.
To add an MSP to a PM template, click New in the upper browse. Use the lookup in the Master Safety Procedure field and select the MSP. Press Enter to save.
Adding MSPs to a PM Template
View DUOM Readings in PM Template
To view the DUOM readings for a piece of equipment or serialized tool, open the PM template and select the Readings submenu.
Note: You cannot enter DUOM readings in this submenu when a route MIL is attached to the PM template.
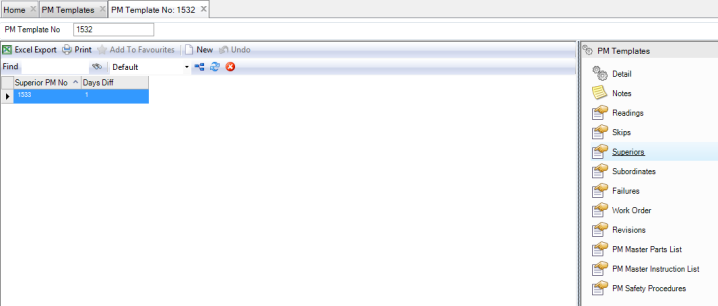
Link PMs Together
By establishing subordinate and superior PMs, you prevent performing duplicate work for both PMs. Certain PMs can include other PMs. For example, if you have an annual PM and it includes all of the work of a quarterly PM, you would not want to perform the quarterly within a few days of the annual PM. In this case, the annual PM would be the superior and the quarterly PM would be the subordinate.
Link to Superior PMs
Superiors prevent excessive maintenance by linking multiple levels of PMs. This option displays PMs superior to the current record.
Linking to Superior PMs
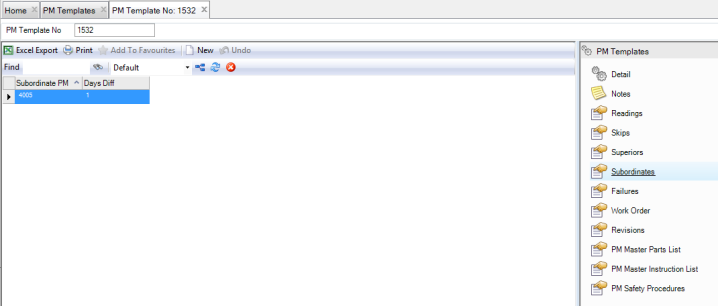
Link to Subordinate PMs
Subordinates (subs) link multiple levels of PMs together. This option displays PMs subordinate to the current record.
Linking to Subordinate PMs
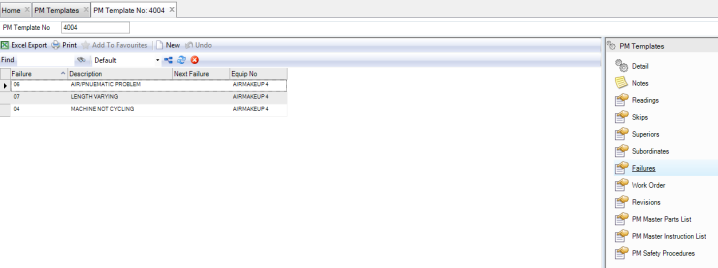
Associate Failure Codes with a PM Template
The failure code represents what the PM is designed to prevent. The Failure Analysis batch job reviews PMs that are designed to prevent that failure on that piece of equipment. If such a PM is found, the Next Failure date is updated on the PM template based on the mean time between failures. It also triggers the system to send an e-mail to the Notify person or group on the PM.
For example, if a PM is created to prevent oil from leaking from a piece of machinery and the PM is performed every six months, you can associate the failure code (leaking oil) to this PM. You then can check the next schedule date for the PM and compare it with the statistical next failure date for leaking oil.
If a CM work order with the failure code for leaking oil is created for the piece of equipment prior to the PM’s complete-by date, then a failure alarm is flagged to signal the Notify person on the PM to issue the PM ahead of schedule. It can also lead to increasing the frequency of the PM or to changing the parts or procedures that are used on the PM.
Follow these steps to associate failure codes with a PM template:
1 Open the PM template and select the Failures submenu.
2 Click New and enter the following information:
Failure
Use the lookup and select the failure code from the list.
Description
Autofills with the failure description.
Next Failure
The Failure Analysis batch job populates this date based on PM Failure codes and MTBF calculation.
Equip Number
Autofills with the equipment associated with the PM template.
3 Press Enter to save.
Associate Failure Codes with a PM Template
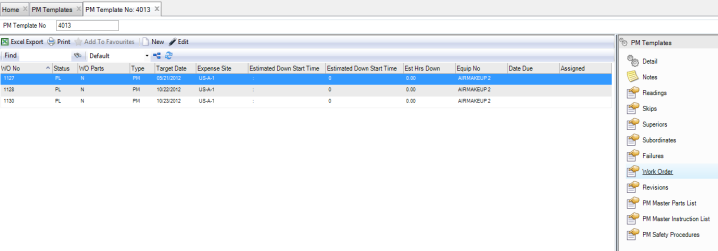
View Work Orders Created from a PM Template
To view the work orders created from a PM template, open the PM template and select the Work Orders submenu.
View Work Orders Created from a PM Template
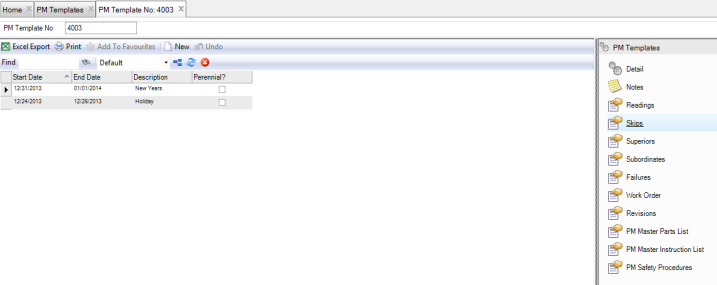
Set Dates to Skip the PM
EAM gives you the ability to skip a PM during a set range of dates. During this time, that PM is inactive and EAM does not create work orders for it.
Follow these steps to skip a PM:
1 Open the PM template and select the Skips submenu.
2 Click New and enter the following information:
Start Date
Use the calendar lookup to select the first day the PM is inactive.
End Date
Use the calendar lookup to select the last day the PM is inactive.
Description.
Enter a short description why the PM is being skipped during these dates.
Perennial?
Select this check box if the PM should be skipped every year during this time.
3 Press Enter to save.
Set Dates to Skip the PM
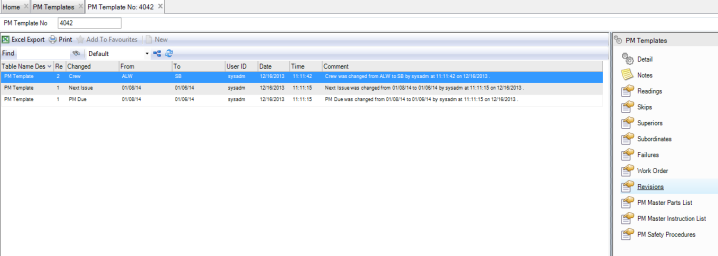
View the Revision History for a PM Template
Because many quality systems call for strict record keeping about the revisions made to PM templates, the Revisions submenu provides an audit trail of all modifications that are made to this record. The revision records, which are stored in the Revisions submenu and in the Revisions module at General|Revisions, are automatically created when a modification is made to the PM template.
To view the revision history for an equipment record, open the PM and select the Revisions submenu.
PM Template Revisions Submenu